
Arduino Nano and BTS7960 Motor Driver-Based Linear Actuator Control with Force Sensing
View and Edit Project In Cirkit Designer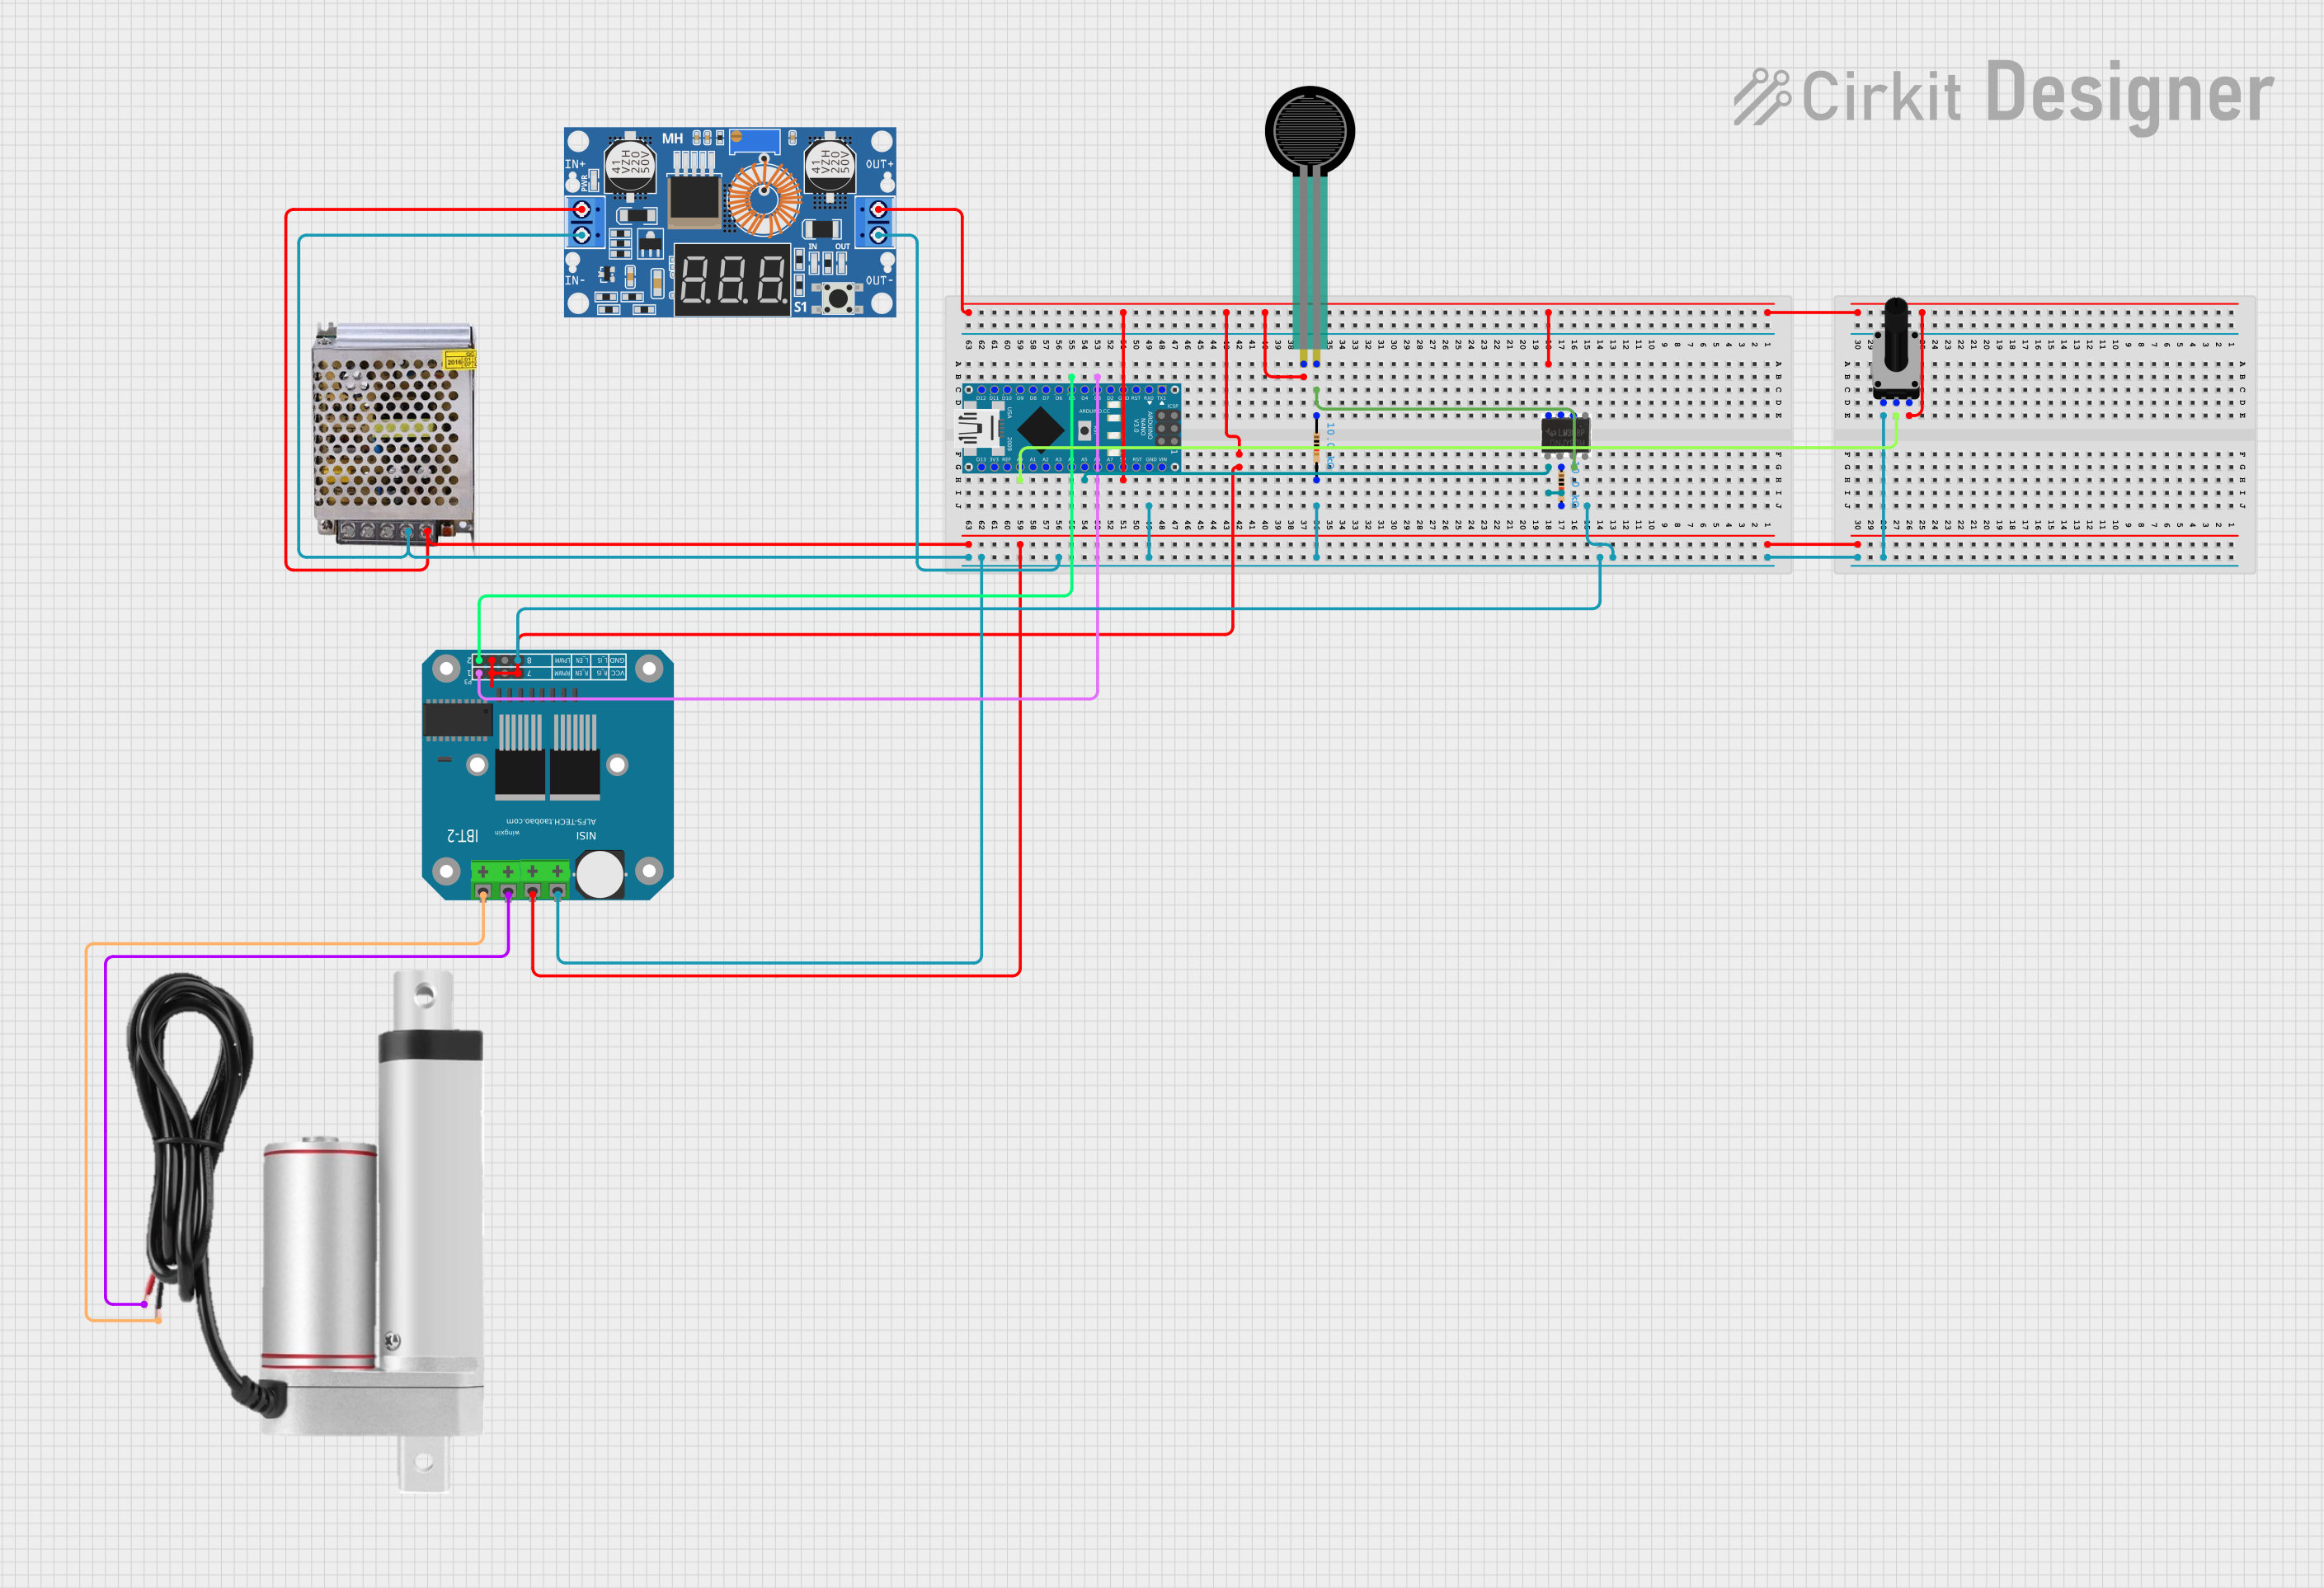
Circuit Documentation
Summary
This circuit is designed to control a linear actuator based on the input from a Force Sensing Resistor (FSR). The FSR measures the force applied, and when the force exceeds a certain threshold, the actuator is activated to push. The circuit includes an Arduino Nano microcontroller, a BTS7960 motor driver, a rotary potentiometer, resistors, an LM358 op-amp, a power supply, and an XL4015 DC-DC buck converter.
Component List
LMA
- Description: Linear Actuator
- Pins: +, -
POWER SUPPLY 12V 5AMP
- Description: Power supply providing 12V DC at 5A
- Pins: 220V Positive Pole (AC), 220V Negative Pole (AC), GND, GND (DC), 12V-24V Output (DC)
BTS7960 Motor Driver
- Description: Motor driver for controlling the linear actuator
- Pins: Pin 1, Pin 2, Pin 3, Pin 4, Pin 5, Pin 6, Pin 7, Pin 8, Pin 9, Pin 10, Pin 11, Pin 12
Rotary Potentiometer
- Description: Adjustable resistor for tuning
- Pins: leg1, wiper, leg2
- Properties: Resistance: 10k Ohms
XL4015 5A DC Buck Step-down
- Description: DC-DC buck converter for voltage regulation
- Pins: Output +, Output -, Input +, Input -
LM358 Op-Amp
- Description: Operational amplifier
- Pins: 8, 1, 2, 3, 4, 5, 6, 7
Arduino Nano
- Description: Microcontroller for controlling the circuit
- Pins: D1/TX, D0/RX, RESET, GND, D2, D3, D4, D5, D6, D7, D8, D9, D10, D11/MOSI, D12/MISO, VIN, 5V, A7, A6, A5, A4, A3, A2, A1, A0, AREF, 3V3, D13/SCK
Force Sensing Resistor
- Description: Sensor for measuring force
- Pins: pin 0, pin 1
Resistor (10k Ohms)
- Description: Fixed resistor
- Pins: pin1, pin2
- Properties: Resistance: 10k Ohms
Wiring Details
LMA
- + connected to Pin 10 of BTS7960 Motor Driver
- - connected to Pin 9 of BTS7960 Motor Driver
POWER SUPPLY 12V 5AMP
- GND (DC) connected to:
- Output - of XL4015 5A DC Buck Step-down
- Input - of XL4015 5A DC Buck Step-down
- Pin 1 of BTS7960 Motor Driver
- Pin 12 of BTS7960 Motor Driver
- GND of Arduino Nano
- leg1 of Rotary Potentiometer
- pin2 of Resistor (10k Ohms)
- 12V-24V Output (DC) connected to Input + of XL4015 5A DC Buck Step-down
BTS7960 Motor Driver
- Pin 1 connected to GND (DC) of POWER SUPPLY 12V 5AMP
- Pin 3 connected to pin 0 of Force Sensing Resistor
- Pin 4 connected to D5 of Arduino Nano
- Pin 5 connected to pin 0 of Force Sensing Resistor
- Pin 7 connected to pin 0 of Force Sensing Resistor
- Pin 8 connected to D3 of Arduino Nano
- Pin 9 connected to - of LMA
- Pin 10 connected to + of LMA
- Pin 11 connected to Input + of XL4015 5A DC Buck Step-down
- Pin 12 connected to GND (DC) of POWER SUPPLY 12V 5AMP
Rotary Potentiometer
- leg1 connected to GND (DC) of POWER SUPPLY 12V 5AMP
- wiper connected to A0 of Arduino Nano
- leg2 connected to Output + of XL4015 5A DC Buck Step-down
XL4015 5A DC Buck Step-down
- Output + connected to:
- leg2 of Rotary Potentiometer
- 5V of Arduino Nano
- Output - connected to GND (DC) of POWER SUPPLY 12V 5AMP
- Input + connected to 12V-24V Output (DC) of POWER SUPPLY 12V 5AMP
- Input - connected to GND (DC) of POWER SUPPLY 12V 5AMP
LM358 Op-Amp
- Pin 8 connected to pin 0 of Force Sensing Resistor
Arduino Nano
- GND connected to GND (DC) of POWER SUPPLY 12V 5AMP
- 5V connected to Output + of XL4015 5A DC Buck Step-down
- A0 connected to wiper of Rotary Potentiometer
- A5 connected to pin2 of Resistor (10k Ohms)
- D3 connected to Pin 8 of BTS7960 Motor Driver
- D5 connected to Pin 4 of BTS7960 Motor Driver
Force Sensing Resistor
- pin 0 connected to:
- Pin 3 of BTS7960 Motor Driver
- Pin 5 of BTS7960 Motor Driver
- Pin 7 of BTS7960 Motor Driver
- Pin 8 of LM358 Op-Amp
- pin 1 connected to pin1 of Resistor (10k Ohms)
Resistor (10k Ohms)
- pin1 connected to pin 1 of Force Sensing Resistor
- pin2 connected to:
- GND (DC) of POWER SUPPLY 12V 5AMP
- A5 of Arduino Nano
Code Documentation
/*
 * Linear Actuator Control Based on FSR
 * This code reads values from an FSR to control a linear actuator via a BTS7960
 * motor driver. When the FSR value exceeds a threshold corresponding to 50N,
 * the actuator is activated to push. When below the threshold, the actuator
 * returns to its initial position.
 */

// Pin definitions
const int fsrPin = A5; // FSR connected to analog pin A5
const int actuatorControlPin1 = 3; // Control pin 1 for actuator
const int actuatorControlPin2 = 5; // Control pin 2 for actuator

const int threshold = 500; // FSR threshold for 50N

void setup() {
  // Initialize serial communication
  Serial.begin(9600);

  // Set control pins as outputs
  pinMode(actuatorControlPin1, OUTPUT);
  pinMode(actuatorControlPin2, OUTPUT);
}

void loop() {
  // Read FSR value
  int fsrValue = analogRead(fsrPin);

  // Debugging output
  Serial.print("FSR Value: ");
  Serial.println(fsrValue);

  // Control actuator based on FSR value
  if (fsrValue >= threshold) {
    digitalWrite(actuatorControlPin1, HIGH);
    digitalWrite(actuatorControlPin2, LOW);
  } else {
    digitalWrite(actuatorControlPin1, LOW);
    digitalWrite(actuatorControlPin2, HIGH);
  }

  // Small delay to avoid rapid switching
  delay(100);
}
This code reads the value from the FSR connected to analog pin A5 of the Arduino Nano. If the FSR value exceeds the threshold (500), the actuator is activated by setting actuatorControlPin1 to HIGH and actuatorControlPin2 to LOW. If the FSR value is below the threshold, the actuator is deactivated by setting actuatorControlPin1 to LOW and actuatorControlPin2 to HIGH. The serial monitor is used for debugging to print the FSR values.