
Arduino Nano Weather Station with BMP180 Sensor and MicroSD Data Logging
View and Edit Project In Cirkit Designer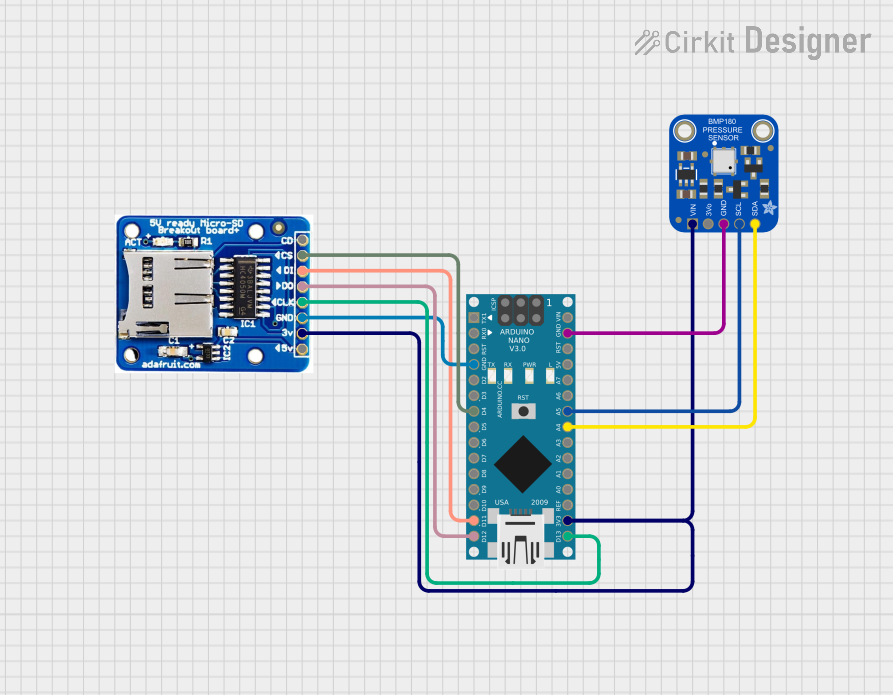
Circuit Documentation
Summary
This document provides a detailed overview of a circuit that includes an Arduino Nano, an Adafruit BMP180 sensor, and a MicroSD Card Socket. The Arduino Nano serves as the central microcontroller, interfacing with the BMP180 sensor for environmental data and the MicroSD Card Socket for data storage.
Component List
Arduino Nano
- Description: A small, complete, and breadboard-friendly board based on the ATmega328P.
- Pins: D1/TX, D0/RX, RESET, GND, D2, D3, D4, D5, D6, D7, D8, D9, D10, D11/MOSI, D12/MISO, VIN, 5V, A7, A6, A5, A4, A3, A2, A1, A0, AREF, 3V3, D13/SCK
Adafruit BMP180
- Description: A barometric pressure sensor that can measure atmospheric pressure and temperature.
- Pins: +5V, +3V3, GND, SCL, SDA
MicroSD Card Socket
- Description: A socket for interfacing with a MicroSD card, used for data storage.
- Pins: CD, CS, DI, DO, CLK, GND, 3V, 5V
Wiring Details
Arduino Nano
- GND: Connected to GND of MicroSD Card Socket and Adafruit BMP180.
- D4: Connected to CS of MicroSD Card Socket.
- D11/MOSI: Connected to DI of MicroSD Card Socket.
- D12/MISO: Connected to DO of MicroSD Card Socket.
- A5: Connected to SCL of Adafruit BMP180.
- A4: Connected to SDA of Adafruit BMP180.
- 3V3: Connected to 3V of MicroSD Card Socket and +5V of Adafruit BMP180.
- D13/SCK: Connected to CLK of MicroSD Card Socket.
Adafruit BMP180
- GND: Connected to GND of Arduino Nano.
- SCL: Connected to A5 of Arduino Nano.
- SDA: Connected to A4 of Arduino Nano.
- +5V: Connected to 3V of MicroSD Card Socket and 3V3 of Arduino Nano.
MicroSD Card Socket
- GND: Connected to GND of Arduino Nano.
- CS: Connected to D4 of Arduino Nano.
- DI: Connected to D11/MOSI of Arduino Nano.
- DO: Connected to D12/MISO of Arduino Nano.
- CLK: Connected to D13/SCK of Arduino Nano.
- 3V: Connected to +5V of Adafruit BMP180 and 3V3 of Arduino Nano.
Code Documentation
Arduino Nano Code
void setup() {
  // put your setup code here, to run once:

}

void loop() {
  // put your main code here, to run repeatedly:

}
This code is a basic template for the Arduino Nano. The setup() function is where you initialize your components and settings, and the loop() function is where the main logic of your program runs repeatedly.
Additional Documentation
This section is reserved for any additional documentation or notes related to the code or circuit. Currently, it is empty.
This document provides a comprehensive overview of the circuit, including a summary, detailed component list, wiring details, and documented code. This should serve as a useful reference for understanding and replicating the circuit.