
Arduino Nano and ESP8266-Based Wi-Fi Environment Monitoring System
View and Edit Project In Cirkit Designer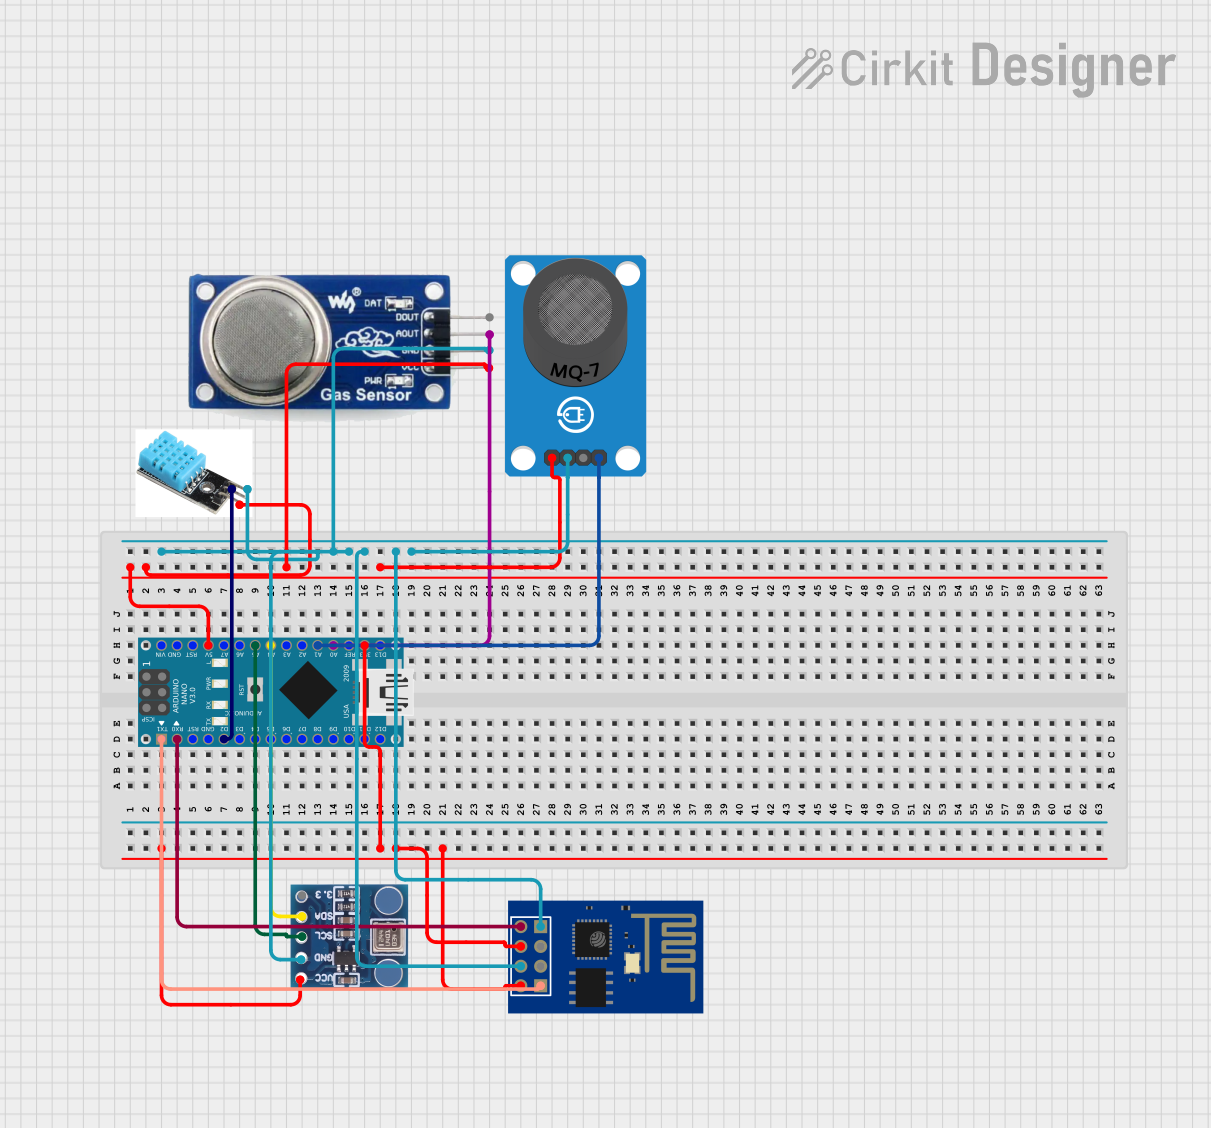
Drone Based Environment Monitoring System
Summary
This circuit is designed to monitor environmental conditions using various sensors and transmit the data via a WiFi module. The system includes an Arduino Nano microcontroller, an ESP8266 WiFi module, and several sensors including the DHT11 for humidity and temperature, the MQ-135 and MQ-7 for gas detection, and the BMP180 for pressure and temperature. The Arduino Nano reads data from these sensors and sends it to the ESP8266 for transmission.
Component List
Arduino Nano
- Description: A small, complete, and breadboard-friendly board based on the ATmega328P.
- Pins: D1/TX, D0/RX, RESET, GND, D2, D3, D4, D5, D6, D7, D8, D9, D10, D11/MOSI, D12/MISO, VIN, 5V, A7, A6, A5, A4, A3, A2, A1, A0, AREF, 3V3, D13/SCK
ESP8266 ESP-01 WiFi Module
- Description: A self-contained SOC with integrated TCP/IP protocol stack that can give any microcontroller access to your WiFi network.
- Pins: TXD, CH_PD, RST, VCC, GND, GPIO_2, GPIO_0, RXD
DHT11
- Description: A basic, low-cost digital temperature and humidity sensor.
- Pins: vcc, GND, out
MQ-135
- Description: A gas sensor that can detect various gases including ammonia, nitrogen oxides, alcohol, benzene, smoke, and carbon dioxide.
- Pins: D OUT, A OUT, GND, VCC
MQ-7 Breakout
- Description: A carbon monoxide (CO) sensor.
- Pins: VCC, GND, DO, AO
BMP180
- Description: A barometric pressure sensor that can measure atmospheric pressure and temperature.
- Pins: 3.3, SDA, SCL, GND, VCC
Wiring Details
Arduino Nano
- D0/RX connected to TXD of ESP8266 ESP-01 WiFi Module
- D1/TX connected to RXD of ESP8266 ESP-01 WiFi Module
- 3V3 connected to VCC of ESP8266 ESP-01 WiFi Module and VCC of BMP180
- 5V connected to vcc of DHT11, VCC of MQ-135, and VCC of MQ-7 Breakout
- GND connected to GND of ESP8266 ESP-01 WiFi Module, GND of DHT11, GND of MQ-135, GND of BMP180, and GND of MQ-7 Breakout
- D2 connected to out of DHT11
- A5 connected to SCL of BMP180
- A4 connected to SDA of BMP180
- A1 connected to AO of MQ-7 Breakout
- A0 connected to A OUT of MQ-135
ESP8266 ESP-01 WiFi Module
- TXD connected to D0/RX of Arduino Nano
- RXD connected to D1/TX of Arduino Nano
- CH_PD connected to VCC of ESP8266 ESP-01 WiFi Module and VCC of BMP180
- RST connected to GND of ESP8266 ESP-01 WiFi Module, GND of DHT11, GND of MQ-135, GND of BMP180, and GND of MQ-7 Breakout
DHT11
- vcc connected to 5V of Arduino Nano
- GND connected to GND of Arduino Nano
- out connected to D2 of Arduino Nano
MQ-135
- VCC connected to 5V of Arduino Nano
- GND connected to GND of Arduino Nano
- A OUT connected to A0 of Arduino Nano
MQ-7 Breakout
- VCC connected to 5V of Arduino Nano
- GND connected to GND of Arduino Nano
- AO connected to A1 of Arduino Nano
BMP180
- VCC connected to 3V3 of Arduino Nano
- GND connected to GND of Arduino Nano
- SCL connected to A5 of Arduino Nano
- SDA connected to A4 of Arduino Nano
Code Documentation
/*
 * Drone Based Environment Monitoring System
 * This Arduino sketch reads data from various sensors including DHT11, MQ-135, MQ-7, and BMP180.
 * It then sends the data to an ESP8266 WiFi module for transmission.
 */

#include <DHT.h>
#include <Wire.h>
#include <Adafruit_Sensor.h>
#include <Adafruit_BMP085_U.h>

#define DHTPIN 2
#define DHTTYPE DHT11
DHT dht(DHTPIN, DHTTYPE);

Adafruit_BMP085_Unified bmp = Adafruit_BMP085_Unified(10085);

void setup() {
  Serial.begin(9600);
  dht.begin();
  if(!bmp.begin()) {
    Serial.print("Could not find a valid BMP085 sensor, check wiring!");
    while(1);
  }
}

void loop() {
  // Read DHT11 sensor
  float h = dht.readHumidity();
  float t = dht.readTemperature();
  if (isnan(h) || isnan(t)) {
    Serial.println("Failed to read from DHT sensor!");
    return;
  }

  // Read MQ-135 sensor
  int mq135Value = analogRead(A0);

  // Read MQ-7 sensor
  int mq7Value = analogRead(A1);

  // Read BMP180 sensor
  sensors_event_t event;
  bmp.getEvent(&event);
  if (event.pressure) {
    float temperature;
    bmp.getTemperature(&temperature);
    Serial.print("Temperature: ");
    Serial.print(temperature);
    Serial.println(" C");
    Serial.print("Pressure: ");
    Serial.print(event.pressure);
    Serial.println(" hPa");
  } else {
    Serial.println("Sensor error");
  }

  // Send data to ESP8266
  Serial.print("Humidity: ");
  Serial.print(h);
  Serial.print(" %");
  Serial.print(" Temperature: ");
  Serial.print(t);
  Serial.print(" C");
  Serial.print(" MQ-135: ");
  Serial.print(mq135Value);
  Serial.print(" MQ-7: ");
  Serial.print(mq7Value);
  Serial.println();

  delay(2000);
}
This code initializes the sensors and reads data from them in the loop function. The data is then sent to the ESP8266 WiFi module via the serial connection. The DHT11 sensor is used for humidity and temperature, the MQ-135 and MQ-7 sensors are used for gas detection, and the BMP180 sensor is used for pressure and temperature.