
Arduino and ESP8266 Controlled Water Quality Monitoring System with Automated Pumps
View and Edit Project In Cirkit Designer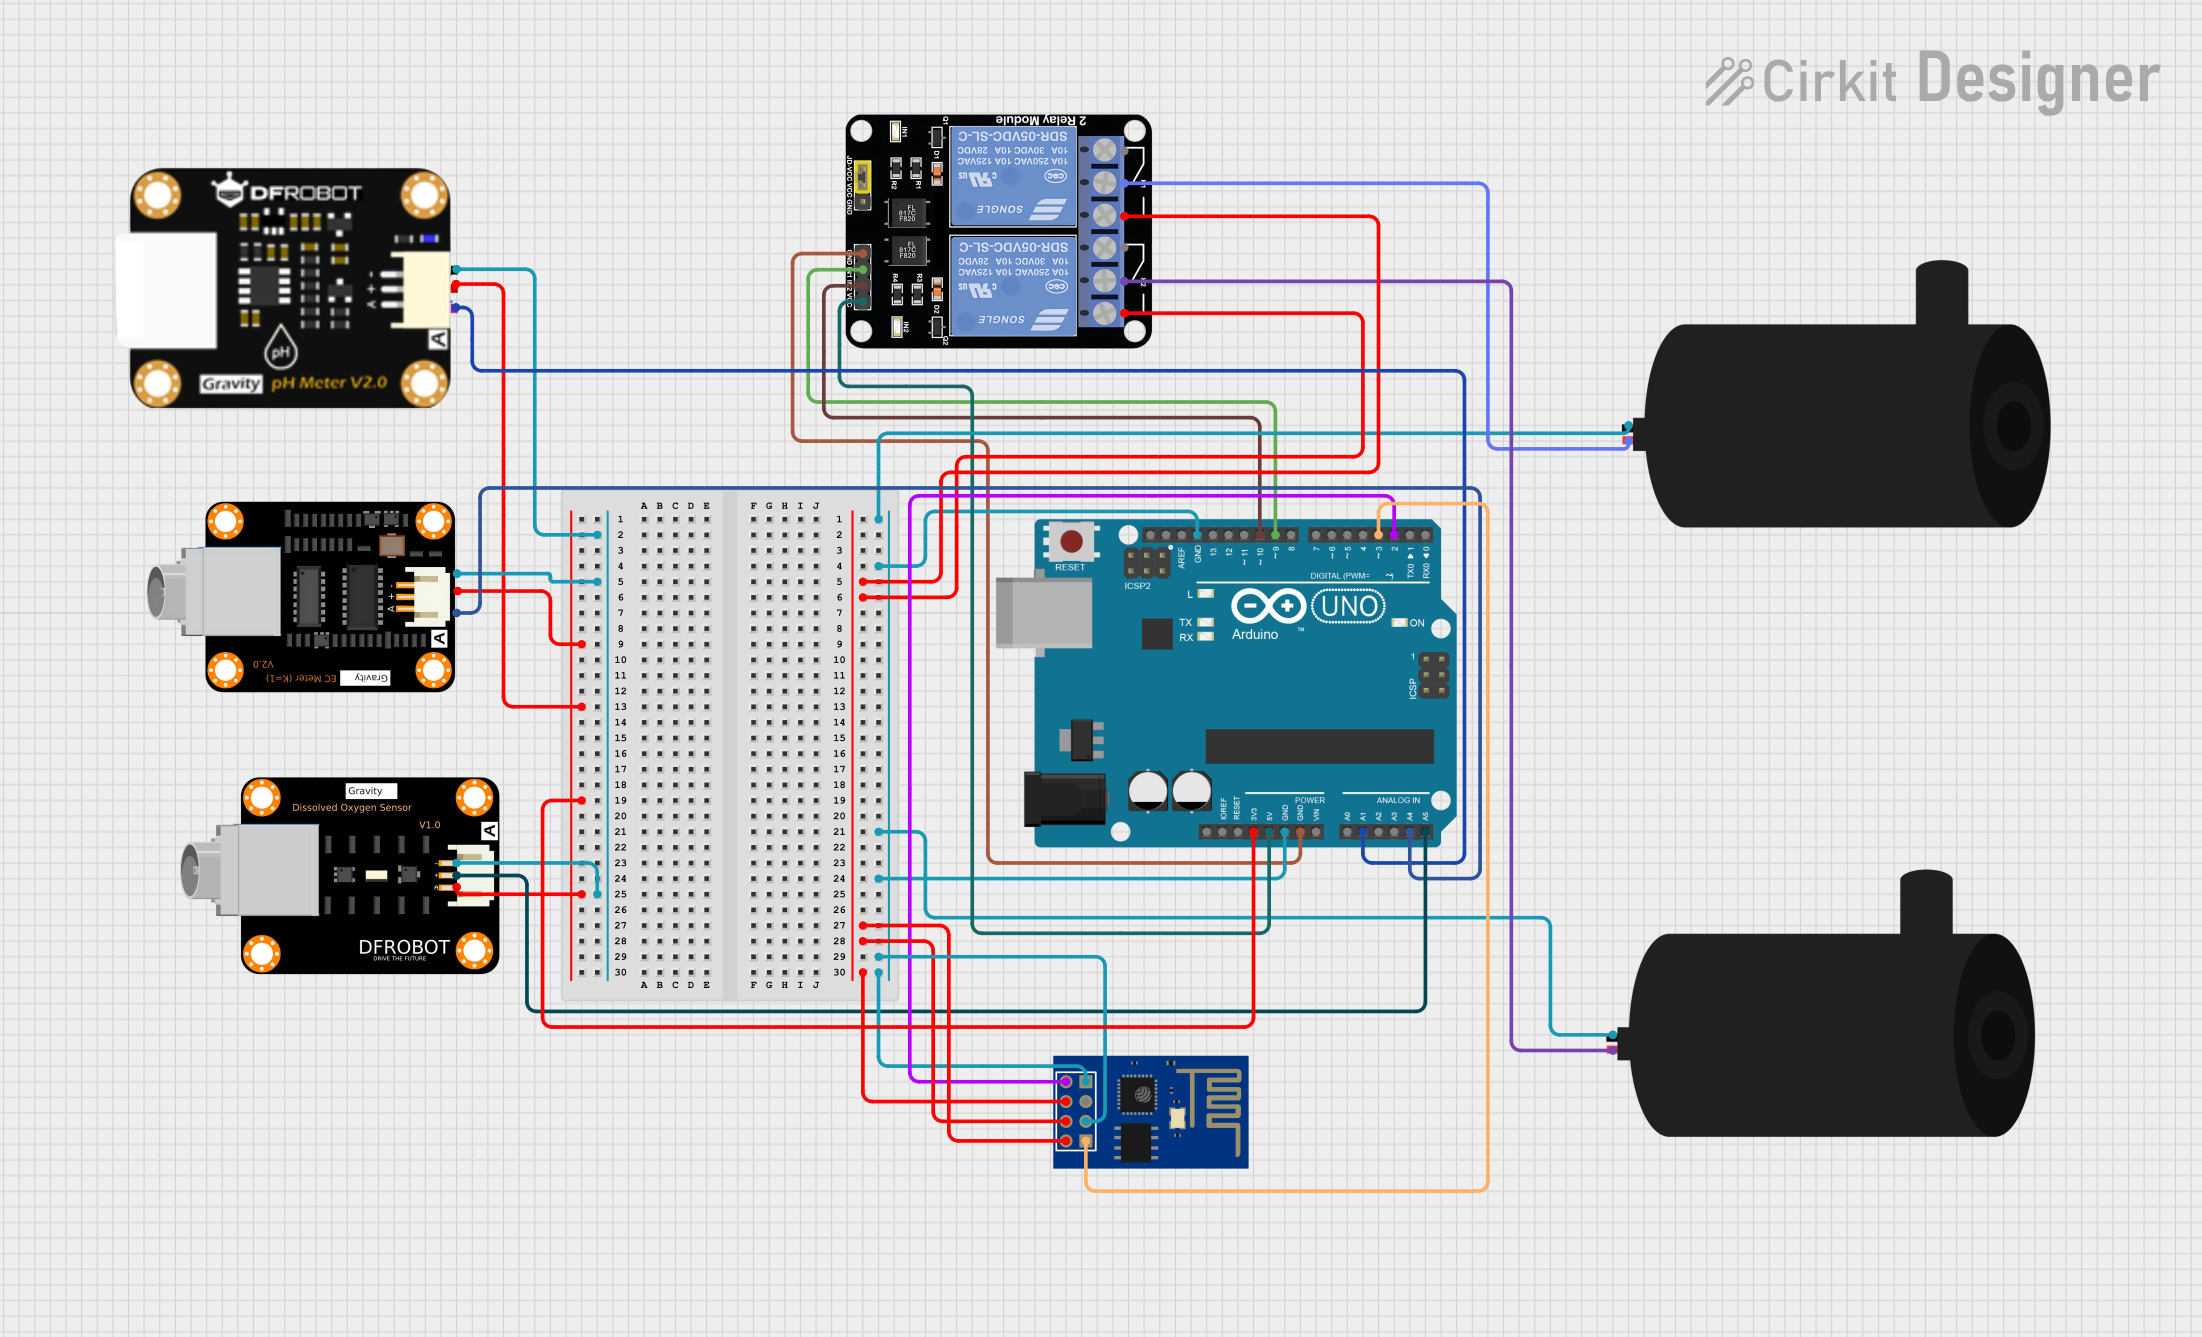
Circuit Documentation
Summary
The circuit in question is designed to monitor and control an aquatic environment, utilizing various sensors to measure pH levels, dissolved oxygen, and electrical conductivity. It also includes a WiFi module for potential remote communication and two water pumps controlled via a relay module. An Arduino UNO serves as the central microcontroller, interfacing with the sensors and controlling the relay module based on the sensor inputs.
Component List
pH Degree Sensor Module
- Description: Measures the pH level of the water.
- Pins: pH Negative, pH Positive, pH A
DFRobot Dissolved Oxygen Sensor
- Description: Measures the dissolved oxygen in the water.
- Pins: -, +, A
Modulo Sensor Conductividad Electrica / Electrical Conductivity
- Description: Measures the electrical conductivity of the water, which can be an indicator of the water's total ion count.
- Pins: A, +, -, SEN
ESP8266 ESP-01 WiFi Module
- Description: Provides WiFi connectivity for the circuit, allowing for remote data transmission and control.
- Pins: TXD, CH_PD, RST, VCC, GND, GPIO_2, GPIO_0, RXD
Water Pump
- Description: Pumps water in or out of the aquatic environment.
- Pins: positive, negative
Arduino UNO
- Description: The main microcontroller unit that processes sensor data and controls the relay module for the water pumps.
- Pins: UNUSED, IOREF, Reset, 3.3V, 5V, GND, Vin, A0, A1, A2, A3, A4, A5, SCL, SDA, AREF, D13, D12, D11, D10, D9, D8, D7, D6, D5, D4, D3, D2, D1, D0
Relay Module 2 Channel
- Description: Controls the on/off state of the water pumps.
- Pins: GND, IN1, IN2, VCC, NC1, COM, NO1, NC2, NO2
Wiring Details
pH Degree Sensor Module
- pH Negative: Connected to the negative terminals of other sensors.
- pH Positive: Connected to the 3.3V power supply from the Arduino UNO.
- pH A: Connected to the A1 analog input on the Arduino UNO.
DFRobot Dissolved Oxygen Sensor
- -: Connected to the negative terminals of other sensors.
- +: Connected to the A5 analog input on the Arduino UNO.
- A: Connected to the 3.3V power supply from the Arduino UNO.
Modulo Sensor Conductividad Electrica / Electrical Conductivity
- A: Connected to the A4 analog input on the Arduino UNO.
- +: Connected to the 3.3V power supply from the Arduino UNO.
- -: Connected to the negative terminals of other sensors.
ESP8266 ESP-01 WiFi Module
- TXD: Connected to the D2 digital pin on the Arduino UNO.
- CH_PD, RST, VCC: Connected to the VCC power supply from the Relay Module.
- GND: Connected to the GND pin on the Arduino UNO.
- GPIO_0: Connected to the negative terminals of other sensors.
- RXD: Connected to the D3 digital pin on the Arduino UNO.
Water Pump
- positive: Connected to the common (COM) terminal of the Relay Module.
- negative: Connected to the GND pin on the Arduino UNO.
Arduino UNO
- 3.3V: Provides power to the sensors.
- 5V: Provides power to the Relay Module.
- GND: Common ground for the circuit.
- A0, A1, A2: Analog inputs connected to the sensors.
- D9, D10: Digital outputs controlling the Relay Module.
- D2, D3: Digital communication with the ESP8266 module.
Relay Module 2 Channel
- VCC: Connected to the 5V power supply from the Arduino UNO.
- GND: Connected to the GND pin on the Arduino UNO.
- IN1, IN2: Controlled by the D9 and D10 digital outputs on the Arduino UNO.
- COM: Connected to the positive terminals of the water pumps.
- NO1, NO2: Normally open contacts for the relay, not used in this circuit.
Documented Code
Arduino UNO Code
void setup() {
  // Initialize serial communication for debugging
  Serial.begin(9600);
  pinMode(9, OUTPUT);
  pinMode(A0, INPUT);
  pinMode(A1, INPUT);
  pinMode(A2, INPUT);
}

void loop() {
  // Read sensor values
  int pHValue = analogRead(A0);
  int oxygenValue = analogRead(A1);
  int conductivityValue = analogRead(A2);

  // Print sensor values to the serial monitor
  Serial.print("pH Value: ");
  Serial.println(pHValue);
  Serial.print("Oxygen Value: ");
  Serial.println(oxygenValue);
  Serial.print("Conductivity Value: ");
  Serial.println(conductivityValue);

  // Control the water pumps
  digitalWrite(9, HIGH); // Turn the water pumps on
  delay(1000); // Keep the pumps on for 1 second
  digitalWrite(9, LOW); // Turn the water pumps off
  delay(1000); // Keep the pumps off for 1 second
}
Note: The code for the other microcontrollers is not provided with specific functionality, hence not included in the documentation.