
Arduino UNO-Based Water Quality Monitoring System with TDS, pH, and Turbidity Sensors
View and Edit Project In Cirkit Designer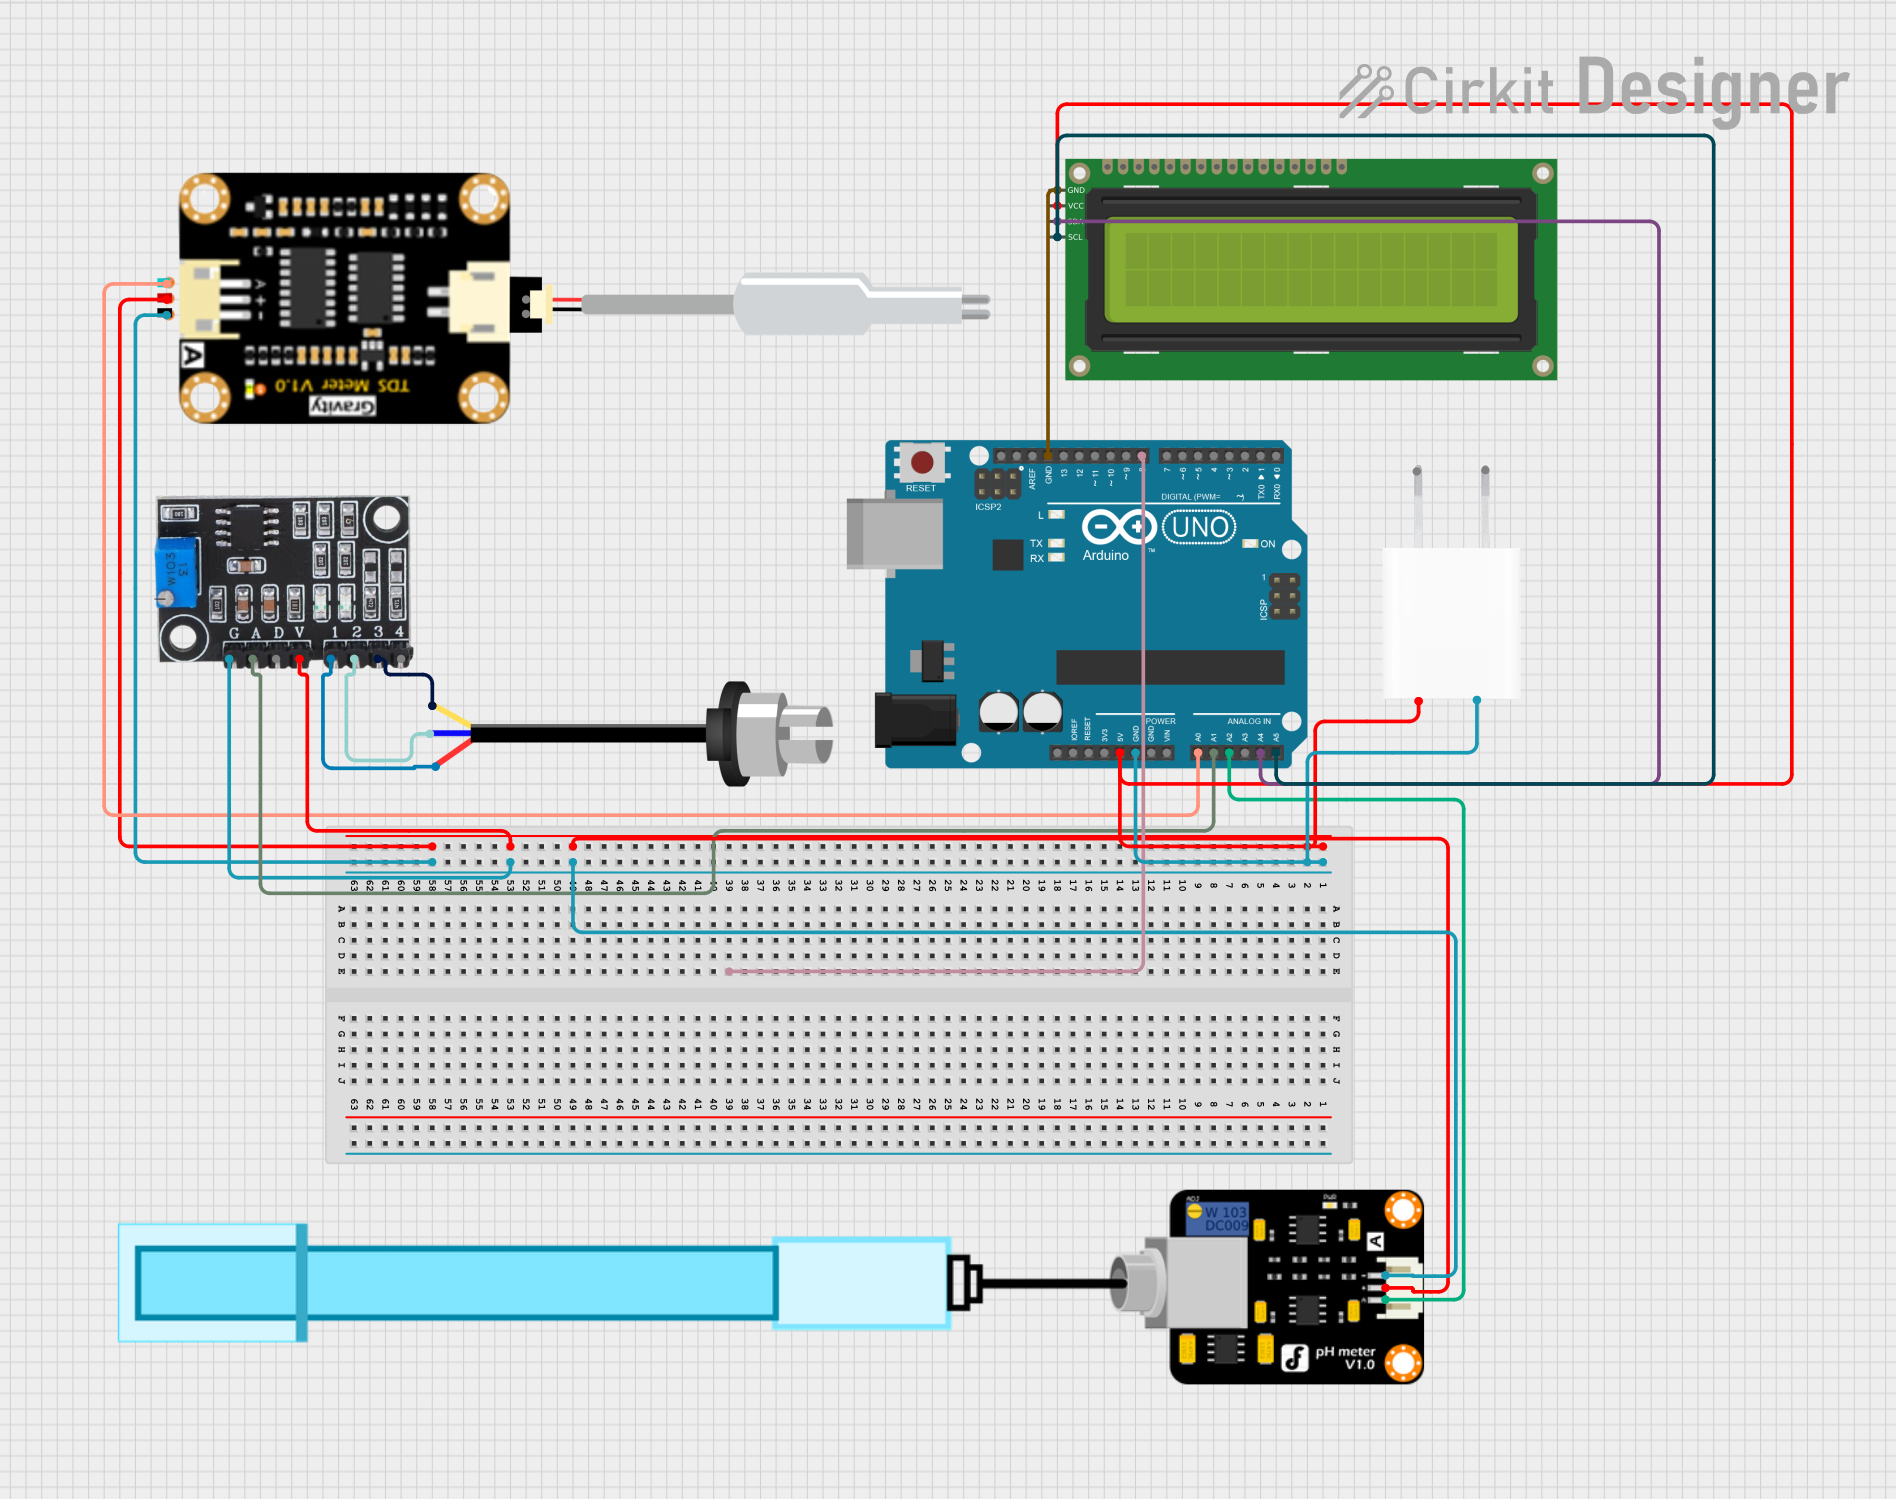
Circuit Documentation
Summary
This document provides a detailed overview of a circuit involving an Arduino UNO microcontroller, various sensors (TDS, Turbidity, and pH), a 16x2 I2C LCD, and a 5V adapter. The circuit is designed to measure and display water quality parameters such as TDS, turbidity, and pH levels.
Component List
Arduino UNO
- Description: A microcontroller board based on the ATmega328P.
- Pins: UNUSED, IOREF, Reset, 3.3V, 5V, GND, Vin, A0, A1, A2, A3, A4, A5, SCL, SDA, AREF, D13, D12, D11, D10, D9, D8, D7, D6, D5, D4, D3, D2, D1, D0
TDS Sensor Module
- Description: Measures the Total Dissolved Solids (TDS) in water.
- Pins: TDS Negative, TDS Positive, TDS A
Sonda Sensor TDS
- Description: A probe for measuring TDS.
- Pins: +, -
Turbidity Module
- Description: Measures the turbidity (cloudiness) of water.
- Pins: GND, AO, DO, VCC, S+, SO, S-
Sonda Sensor Turbidez / Turbidity
- Description: A probe for measuring turbidity.
- Pins: S, -, +
5V Adapter
- Description: Provides a 5V power supply.
- Pins: AC In 1, AC In 2, 5V, GND
PH Meter
- Description: Measures the pH level of water.
- Pins: Signal, VCC, GND
16x2 I2C LCD
- Description: A 16x2 character LCD with I2C interface.
- Pins: GND, VCC, SDA, SCL
Wiring Details
Arduino UNO
- D8: Not connected
- 5V: Connected to VCC of 16x2 I2C LCD, 5V Adapter, VCC of PH Meter, VCC of Turbidity Module, TDS Positive of TDS Sensor Module
- GND: Connected to GND of 5V Adapter, GND of PH Meter, GND of Turbidity Module, TDS Negative of TDS Sensor Module, GND of 16x2 I2C LCD
- A0: Connected to TDS A of TDS Sensor Module
- A1: Connected to AO of Turbidity Module
- A2: Connected to Signal of PH Meter
- A4: Connected to SDA of 16x2 I2C LCD
- A5: Connected to SCL of 16x2 I2C LCD
TDS Sensor Module
- TDS Negative: Connected to GND of Arduino UNO
- TDS Positive: Connected to 5V of Arduino UNO
- TDS A: Connected to A0 of Arduino UNO
Sonda Sensor TDS
- +: Not connected
- -: Not connected
Turbidity Module
- GND: Connected to GND of Arduino UNO
- AO: Connected to A1 of Arduino UNO
- DO: Not connected
- VCC: Connected to 5V of Arduino UNO
- S+: Connected to + of Sonda Sensor Turbidez / Turbidity
- SO: Connected to - of Sonda Sensor Turbidez / Turbidity
- S-: Connected to S of Sonda Sensor Turbidez / Turbidity
Sonda Sensor Turbidez / Turbidity
- S: Connected to S- of Turbidity Module
- -: Connected to SO of Turbidity Module
- +: Connected to S+ of Turbidity Module
5V Adapter
- AC In 1: Not connected
- AC In 2: Not connected
- 5V: Connected to 5V of Arduino UNO
- GND: Connected to GND of Arduino UNO
PH Meter
- Signal: Connected to A2 of Arduino UNO
- VCC: Connected to 5V of Arduino UNO
- GND: Connected to GND of Arduino UNO
16x2 I2C LCD
- GND: Connected to GND of Arduino UNO
- VCC: Connected to 5V of Arduino UNO
- SDA: Connected to A4 of Arduino UNO
- SCL: Connected to A5 of Arduino UNO
Documented Code
Arduino UNO Code
void setup() {
  // put your setup code here, to run once:

}

void loop() {
  // put your main code here, to run repeatedly:

}
Sonda Sensor TDS Code
void setup() {
  // put your setup code here, to run once:

}

void loop() {
  // put your main code here, to run repeatedly:

}
This documentation provides a comprehensive overview of the circuit, including the components used, their wiring details, and the code for the microcontrollers.