
Circuit Documentation
Summary
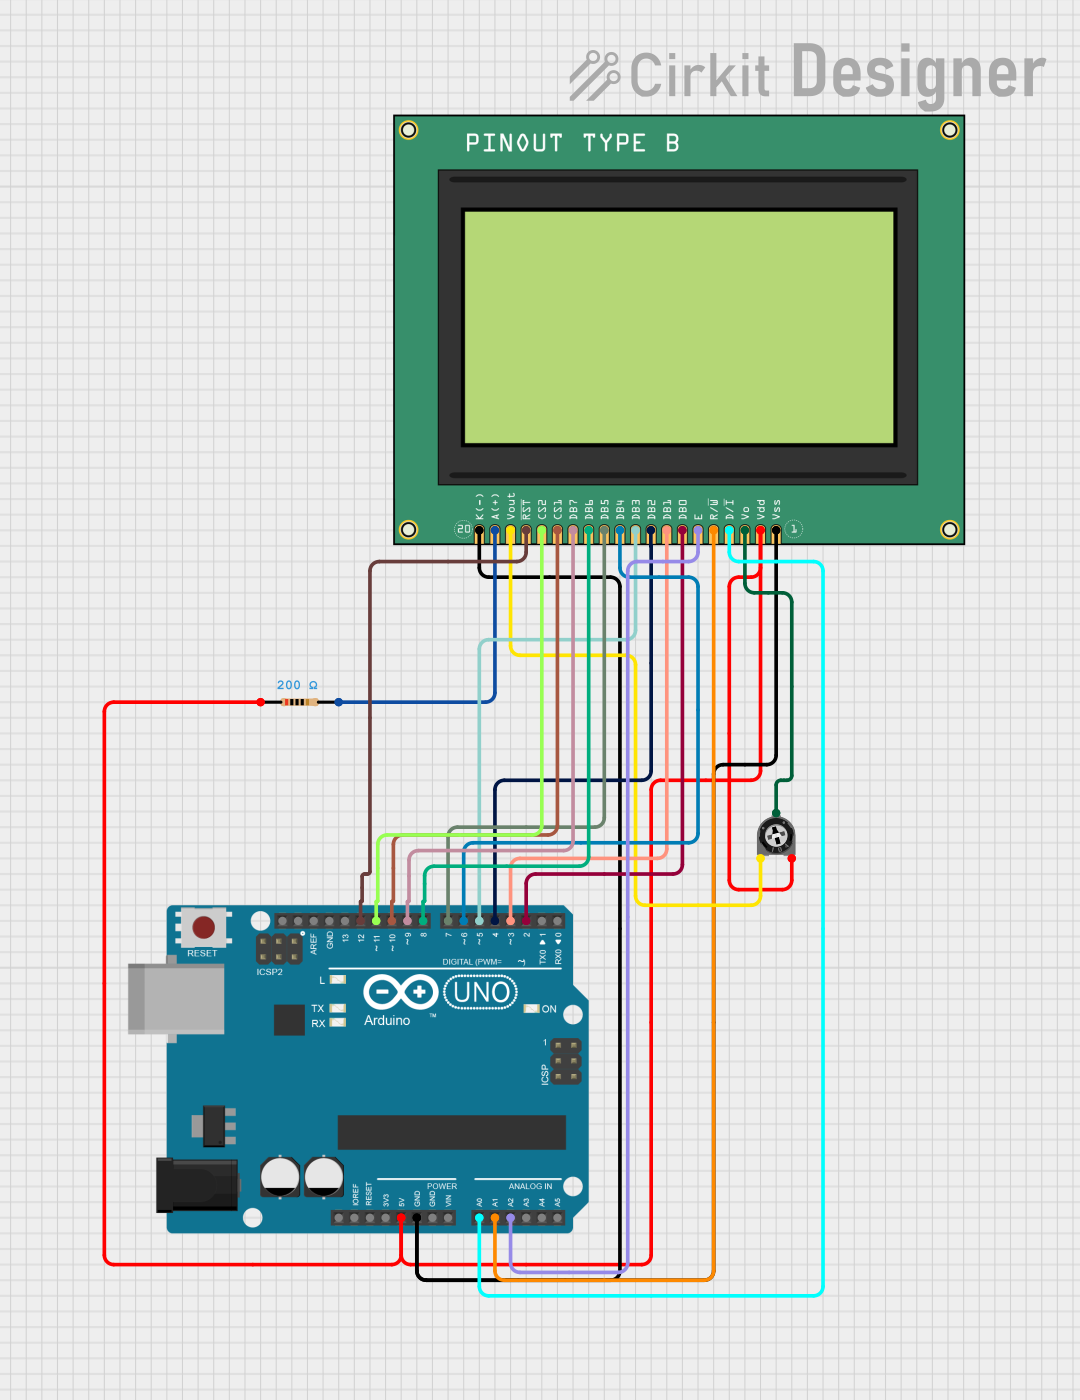
This circuit is designed to interface an Arduino UNO with a Graphic LCD Display (GLCD 128x64) and a Trimmer Potentiometer. The Arduino serves as the microcontroller, controlling the display and reading the potentiometer's value. The circuit includes a resistor to limit current and ensure proper operation of the components.
Component List
1. Arduino UNO
- Description: A microcontroller board based on the ATmega328P.
- Purpose: Acts as the main control unit for the circuit, managing the display and reading inputs from the potentiometer.
2. Trimmer Potentiometer
- Description: A variable resistor used to adjust voltage levels.
- Purpose: Allows for manual adjustment of a voltage level, which can be read by the Arduino.
3. Resistor
- Description: A passive electrical component that resists the flow of current.
- Purpose: Used to limit current to the GLCD and the potentiometer, ensuring safe operation.
4. Graphic LCD Display (GLCD 128x64)
- Description: A graphical display module with a resolution of 128x64 pixels.
- Purpose: Displays graphical information and data from the Arduino.
Wiring Details
Arduino UNO
5V: Connected to the resistor (pin1) and the GLCD (VDD).
GND: Connected to the GLCD (K(-)) and (VSS).
A0: Connected to the GLCD (D/I).
A1: Connected to the GLCD (R/W).
A2: Connected to the GLCD (Enable).
D12: Connected to the GLCD (RST).
D11: Connected to the GLCD (CS2).
D10: Connected to the GLCD (CS1).
D9: Connected to the GLCD (DB7).
D8: Connected to the GLCD (DB6).
D7: Connected to the GLCD (DB5).
D6: Connected to the GLCD (DB4).
D5: Connected to the GLCD (DB3).
D4: Connected to the GLCD (DB2).
D3: Connected to the GLCD (DB1).
D2: Connected to the GLCD (DB0).
Trimmer Potentiometer
leg1: Connected to the GLCD (Vout).
wiper: Connected to the GLCD (VO).
leg2: Connected to the Arduino (5V).
Resistor
pin1: Connected to the Arduino (5V) and the GLCD (VDD).
pin2: Connected to the GLCD (A(+)).
Graphic LCD Display (GLCD 128x64)
VDD: Connected to the resistor (pin1) and the Arduino (5V).
K(-): Connected to the Arduino (GND).
VSS: Connected to the Arduino (GND).
D/I: Connected to the Arduino (A0).
R/W: Connected to the Arduino (A1).
Enable: Connected to the Arduino (A2).
RST: Connected to the Arduino (D12).
CS2: Connected to the Arduino (D11).
CS1: Connected to the Arduino (D10).
DB0: Connected to the Arduino (D2).
DB1: Connected to the Arduino (D3).
DB2: Connected to the Arduino (D4).
DB3: Connected to the Arduino (D5).
DB4: Connected to the Arduino (D6).
DB5: Connected to the Arduino (D7).
DB6: Connected to the Arduino (D8).
DB7: Connected to the Arduino (D9).
Documented Code
#include <Adafruit_GFX.h>   // include adafruit GFX library
#include <KS0108_GLCD.h>    // include KS0108 GLCD library

// KS0108 GLCD library initialization according to the following connection:
// KS0108_GLCD(DI, RW, E, DB0, DB1, DB2, DB3, DB4, DB5, DB6, DB7, CS1, CS2, RES);
KS0108_GLCD display = KS0108_GLCD(A0, A1, A2, 2, 3, 4, 5, 6, 7, 8, 9, 10, 11, 12);

#define NUMFLAKES     10 // Number of snowflakes in the animation example

#define LOGO_HEIGHT   16
#define LOGO_WIDTH    16
static const unsigned char PROGMEM logo_bmp[] =
{ 0b00000000, 0b11000000,
  0b00000001, 0b11000000,
  0b00000001, 0b11000000,
  0b00000011, 0b11100000,
  0b11110011, 0b11100000,
  0b11111110, 0b11111000,
  0b01111110, 0b11111111,
  0b00110011, 0b10011111,
  0b00011111, 0b11111100,
  0b00001101, 0b01110000,
  0b00011011, 0b10100000,
  0b00111111, 0b11100000,
  0b00111111, 0b11110000,
  0b01111100, 0b11110000,
  0b01110000, 0b01110000,
  0b00000000, 0b00110000 };

void setup() {
  Serial.begin(9600);

  // initialize KS0108 GLCD module with active high CS pins
  if ( display.begin(KS0108_CS_ACTIVE_HIGH) == false ) {
    Serial.println( F("display initialization failed!") );    // lack of RAM space
    while(true);  // stay here forever!
  }

  display.display();
  delay(2000); // Pause for 2 seconds

  // Clear the buffer
  display.clearDisplay();

  // Draw a single pixel in white
  display.drawPixel(10, 10, KS0108_ON);

  // Show the display buffer on the screen. You MUST call display() after
  // drawing commands to make them visible on screen!
  display.display();
  delay(2000);

  // display.display() is NOT necessary after every single drawing command,
  // unless that's what you want...rather, you can batch up a bunch of
  // drawing operations and then update the screen all at once by calling
  // display.display(). These examples demonstrate both approaches...

  testdrawline();      // Draw many lines

  testdrawrect();      // Draw rectangles (outlines)

  testfillrect();      // Draw rectangles (filled)

  testdrawcircle();    // Draw circles (outlines)

  testfillcircle();    // Draw circles (filled)

  testdrawroundrect(); // Draw rounded rectangles (outlines)

  testfillroundrect(); // Draw rounded rectangles (filled)

  testdrawtriangle();  // Draw triangles (outlines)

  testfilltriangle();  // Draw triangles (filled)

  testdrawchar();      // Draw characters of the default font

  testdrawstyles();    // Draw 'stylized' characters

  testscrolltext();    // Draw scrolling text

  display.invertDisp(true);
  display.display();
  delay(1000);
  display.invertDisp(false);
  display.display();
  delay(1000);

  testdrawbitmap();    // Draw a small bitmap image

  testanimate(logo_bmp, LOGO_WIDTH, LOGO_HEIGHT); // Animate bitmaps

}

// main loop (nothing here!)
void loop() {

}

void testdrawline() {
  int16_t i;

  display.clearDisplay(); // Clear display buffer

  for(i=0; i<display.width(); i+=4) {
    display.drawLine(0, 0, i, display.height()-1, KS0108_ON);
    display.display(); // Update screen with each newly-drawn line
    delay(1);
  }
  for(i=0; i<display.height(); i+=4) {
    display.drawLine(0, 0, display.width()-1, i, KS0108_ON);
    display.display();
    delay(1);
  }
  delay(250);

  display.clearDisplay();

  for(i=0; i<display.width(); i+=4) {
    display.drawLine(0, display.height()-1, i, 0, KS0108_ON);
    display.display();
    delay(1);
  }
  for(i=display.height()-1; i>=0; i-=4) {
    display.drawLine(0, display.height()-1, display.width()-1, i