
Circuit Documentation
Summary
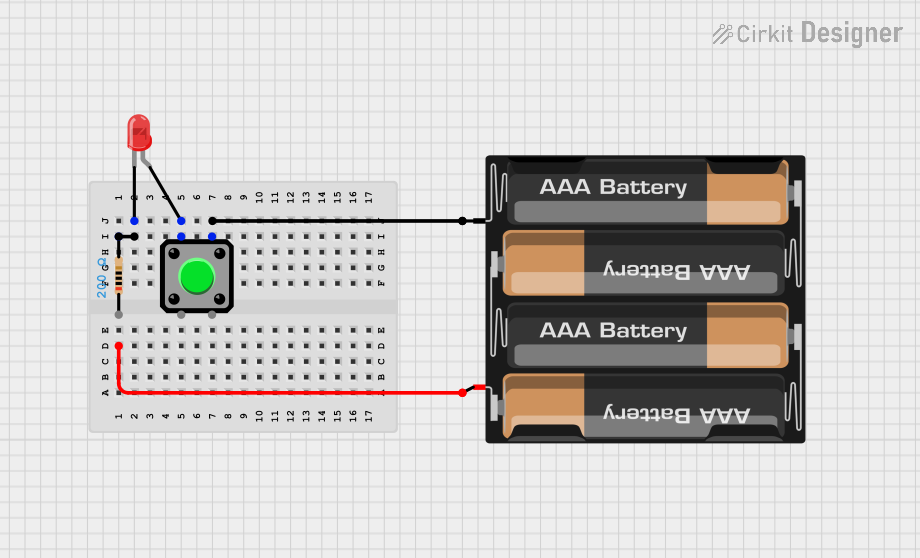
This circuit consists of a pushbutton, a red LED, a 4 x AAA battery mount, and a resistor. The circuit is designed to light up the LED when the pushbutton is pressed. The resistor is used to limit the current flowing through the LED to prevent damage.
Component List
Pushbutton
- Description: A simple pushbutton switch.
- Pins: Pin 1, Pin 2, Pin 3, Pin 4
- Purpose in Circuit: Used to control the flow of current to the LED.
LED: Two Pin (red)
- Description: A red LED with two pins.
- Pins: Anode, Cathode
- Purpose in Circuit: Emits light when current flows through it.
4 x AAA Battery Mount
- Description: A battery holder for four AAA batteries.
- Pins: +, -
- Purpose in Circuit: Provides power to the circuit.
Resistor
- Description: A resistor with a resistance of 200 Ohms.
- Pins: Pin 1, Pin 2
- Purpose in Circuit: Limits the current flowing through the LED.
Wiring Details
Pushbutton
- Pin 1: Connected to the anode of the LED.
- Pin 4: Connected to the negative terminal of the battery mount.
LED: Two Pin (red)
- Anode: Connected to Pin 1 of the pushbutton.
- Cathode: Connected to Pin 2 of the resistor.
4 x AAA Battery Mount
- + (Positive): Not connected in this circuit.
- - (Negative): Connected to Pin 4 of the pushbutton.
Resistor
- Pin 1: Not connected in this circuit.
- Pin 2: Connected to the cathode of the LED.
Code
There is no microcontroller code associated with this circuit.
This documentation provides a comprehensive overview of the circuit, including a summary, detailed component descriptions, wiring details, and any associated code.