
Arduino UNO-Based Inductive Sensor and 7-Segment Display System
View and Edit Project In Cirkit Designer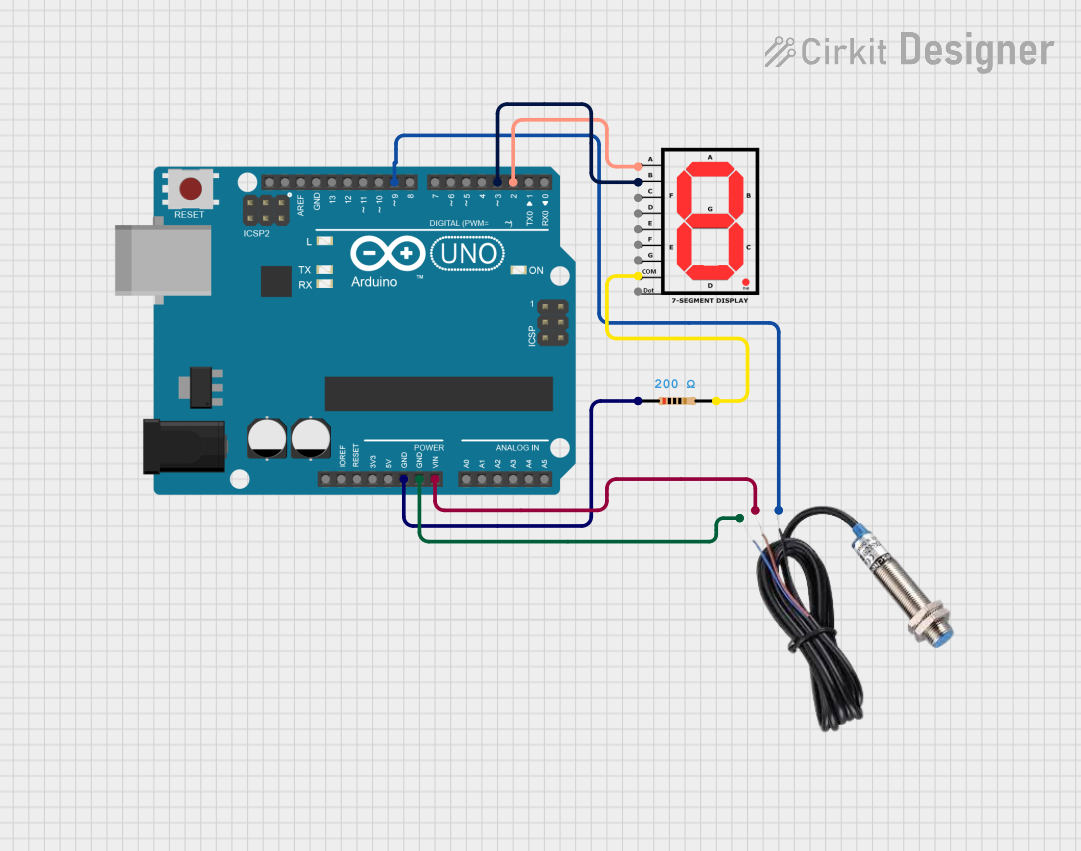
Circuit Documentation
Summary
This document provides a detailed overview of a circuit that includes an Arduino UNO microcontroller, an inductive sensor, a 7-segment display, and a resistor. The circuit is designed to interface the inductive sensor and the 7-segment display with the Arduino UNO, which controls the operation of these components.
Component List
Arduino UNO
- Description: A microcontroller board based on the ATmega328P.
- Pins: UNUSED, IOREF, Reset, 3.3V, 5V, GND, Vin, A0, A1, A2, A3, A4, A5, SCL, SDA, AREF, D13, D12, D11, D10, D9, D8, D7, D6, D5, D4, D3, D2, D1, D0
Inductive Sensor
- Description: A sensor that detects metal objects without physical contact.
- Pins: Signal, VCC, GND
7-segment Display
- Description: A display device used to display decimal numerals.
- Pins: A, B, C, D, E, F, G, COM, dot
Resistor
- Description: A passive electrical component that implements electrical resistance.
- Pins: pin1, pin2
- Properties:
- Resistance: 200 Ohms
Wiring Details
Arduino UNO
- GND: Connected to Resistor pin1 and Inductive Sensor GND
- Vin: Connected to Inductive Sensor VCC
- D9: Connected to Inductive Sensor Signal
- D3: Connected to 7-segment Display pin B
- D2: Connected to 7-segment Display pin A
Inductive Sensor
- GND: Connected to Arduino UNO GND
- VCC: Connected to Arduino UNO Vin
- Signal: Connected to Arduino UNO D9
7-segment Display
- A: Connected to Arduino UNO D2
- B: Connected to Arduino UNO D3
- COM: Connected to Resistor pin2
Resistor
- pin1: Connected to Arduino UNO GND
- pin2: Connected to 7-segment Display COM
Code Documentation
Arduino UNO Code
void setup() {
  // put your setup code here, to run once:

}

void loop() {
  // put your main code here, to run repeatedly:

}
This code is a basic template for the Arduino UNO. The setup() function is used to initialize any settings or configurations, and the loop() function contains the main code that runs repeatedly. Currently, both functions are empty and need to be populated with the specific logic for the circuit's operation.
This document provides a comprehensive overview of the circuit, including the components used, their wiring details, and the initial code for the Arduino UNO. Further development and testing are required to implement the desired functionality of the circuit.