
Arduino UNO Controlled Stepper Motor with Pushbutton Interface
View and Edit Project In Cirkit Designer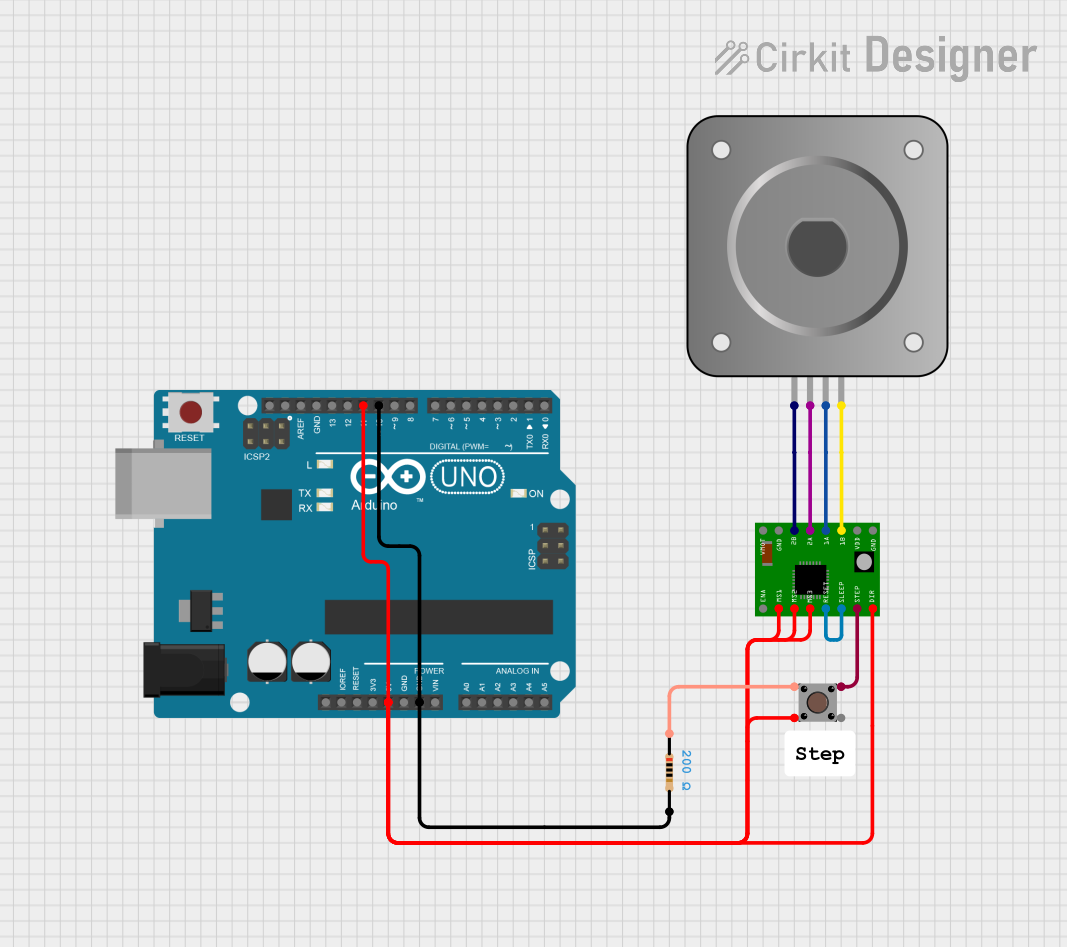
Circuit Documentation
Summary
This circuit involves an Arduino UNO microcontroller, a pushbutton, an A4988 stepper motor driver, a bipolar stepper motor (NEMA 17), and a resistor. The Arduino UNO controls the stepper motor driver, which in turn drives the stepper motor. The pushbutton is used to provide input to the Arduino, and the resistor is used to limit current.
Component List
Arduino UNO
- Description: A microcontroller board based on the ATmega328P.
- Pins: UNUSED, IOREF, Reset, 3.3V, 5V, GND, Vin, A0, A1, A2, A3, A4, A5, SCL, SDA, AREF, D13, D12, D11, D10, D9, D8, D7, D6, D5, D4, D3, D2, D1, D0
Pushbutton
- Description: A simple pushbutton switch.
- Pins: Pin 3 (out), Pin 4 (out), Pin 1 (in), Pin 2 (in)
A4988 Stepper Motor Driver Carrier
- Description: A carrier board for the A4988 stepper motor driver.
- Pins: ENABLE, MS1, MS2, MS3, RESET, SLEEP, STEP, DIR, GND, VCC, 1B, 1A, 2A, 2B, VMOT
Bipolar Stepper Motor (NEMA 17)
- Description: A bipolar stepper motor.
- Pins: A-, A+, B+, B-
Resistor
- Description: A resistor with a resistance of 200 Ohms.
- Pins: pin1, pin2
- Properties:
- Resistance: 200 Ohms
Wiring Details
Arduino UNO
- D11: Connected to MS1, MS2, MS3, DIR of A4988 Stepper Motor Driver Carrier and Pin 4 (out) of Pushbutton
- 5V: Connected to MS1, MS2, MS3, DIR of A4988 Stepper Motor Driver Carrier and Pin 4 (out) of Pushbutton
- D10: Connected to GND of Arduino UNO and pin2 of Resistor
- GND: Connected to D10 of Arduino UNO and pin2 of Resistor
Pushbutton
- Pin 4 (out): Connected to MS1, MS2, MS3, DIR of A4988 Stepper Motor Driver Carrier and D11, 5V of Arduino UNO
- Pin 1 (in): Connected to STEP of A4988 Stepper Motor Driver Carrier
- Pin 2 (in): Connected to pin1 of Resistor
A4988 Stepper Motor Driver Carrier
- MS1, MS2, MS3, DIR: Connected to D11, 5V of Arduino UNO and Pin 4 (out) of Pushbutton
- STEP: Connected to Pin 1 (in) of Pushbutton
- RESET, SLEEP: Connected together
- 1B: Connected to B- of Bipolar Stepper Motor (NEMA 17)
- 1A: Connected to B+ of Bipolar Stepper Motor (NEMA 17)
- 2A: Connected to A+ of Bipolar Stepper Motor (NEMA 17)
- 2B: Connected to A- of Bipolar Stepper Motor (NEMA 17)
Bipolar Stepper Motor (NEMA 17)
- B-: Connected to 1B of A4988 Stepper Motor Driver Carrier
- B+: Connected to 1A of A4988 Stepper Motor Driver Carrier
- A+: Connected to 2A of A4988 Stepper Motor Driver Carrier
- A-: Connected to 2B of A4988 Stepper Motor Driver Carrier
Resistor
- pin1: Connected to Pin 2 (in) of Pushbutton
- pin2: Connected to D10, GND of Arduino UNO
Code Documentation
Arduino UNO Code
void setup() {
  // put your setup code here, to run once:
  pinMode(10, OUTPUT);
  pinMode(11, OUTPUT);

  digitalWrite(10, LOW);
  digitalWrite(11, HIGH);
}

void loop() {
  // put your main code here, to run repeatedly:

}
This code sets up the Arduino UNO to control the stepper motor driver. Pins 10 and 11 are configured as outputs. Pin 10 is set to LOW, and Pin 11 is set to HIGH. The loop function is currently empty and can be filled with the main logic to control the stepper motor.