Arduino Nano Controlled Servo with Ultrasonic Sensor
Circuit Documentation
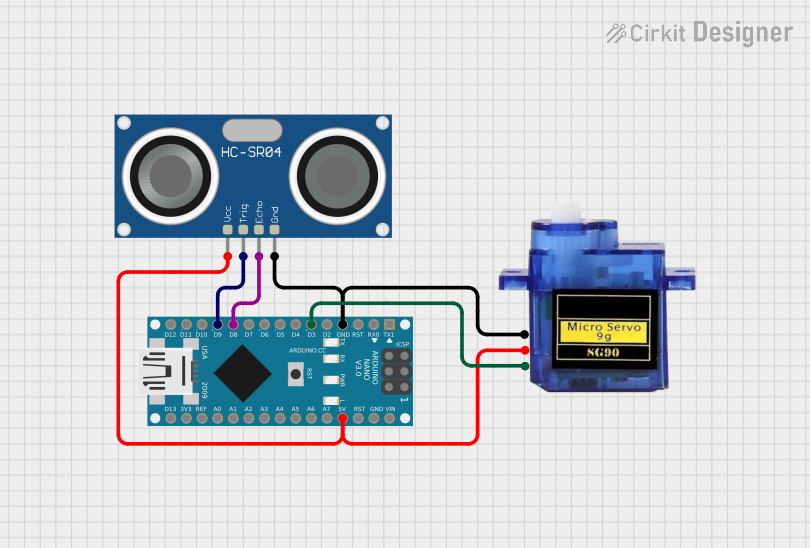
Summary of the Circuit
This circuit integrates an Arduino Nano microcontroller with a Micro servo 9G and an HC-SR04 Ultrasonic Sensor. The Arduino Nano serves as the central processing unit, controlling the servo based on input from the ultrasonic sensor. The servo is actuated by a PWM signal from the Arduino, and the ultrasonic sensor provides distance measurements by sending and receiving ultrasonic pulses. The circuit is powered by the 5V output from the Arduino Nano, which is distributed to both the servo and the ultrasonic sensor. Ground connections are shared among all components to complete the circuit.
Component List
Arduino Nano
- Description: A compact microcontroller board based on the ATmega328P.
- Pins: D1/TX, D0/RX, RESET, GND, D2, D3, D4, D5, D6, D7, D8, D9, D10, D11/MOSI, D12/MISO, VIN, 5V, A7, A6, A5, A4, A3, A2, A1, A0, AREF, 3V3, D13/SCK
- Purpose: Acts as the central controller for the circuit, processing inputs and outputs.
Micro servo 9G
- Description: A small and lightweight servo motor suitable for small-scale projects.
- Pins: GND, +5V, PWM
- Purpose: Provides actuation based on the PWM signal from the Arduino Nano.
HC-SR04 Ultrasonic Sensor
- Description: An ultrasonic distance sensor capable of measuring distances by emitting and detecting ultrasonic waves.
- Pins: VCC, TRIG, ECHO, GND
- Purpose: Measures the distance to an object and sends this information to the Arduino Nano.
Wiring Details
Arduino Nano
- GND: Connected to the GND pins of the Micro servo 9G and HC-SR04 Ultrasonic Sensor.
- D3: Connected to the PWM pin of the Micro servo 9G.
- D8: Connected to the ECHO pin of the HC-SR04 Ultrasonic Sensor.
- D9: Connected to the TRIG pin of the HC-SR04 Ultrasonic Sensor.
- 5V: Provides power to the +5V pins of the Micro servo 9G and VCC pin of the HC-SR04 Ultrasonic Sensor.
Micro servo 9G
- GND: Connected to the GND pin of the Arduino Nano.
- +5V: Powered by the 5V pin of the Arduino Nano.
- PWM: Receives PWM signal from D3 pin of the Arduino Nano.
HC-SR04 Ultrasonic Sensor
- GND: Connected to the GND pin of the Arduino Nano.
- VCC: Powered by the 5V pin of the Arduino Nano.
- TRIG: Connected to the D9 pin of the Arduino Nano.
- ECHO: Connected to the D8 pin of the Arduino Nano.
Documented Code
Arduino Nano Code (sketch.ino)
void setup() {
  // put your setup code here, to run once:

}

void loop() {
  // put your main code here, to run repeatedly:

}
Note: The provided code is a template and does not contain any functional code specific to the operation of the circuit. The user is expected to fill in the setup and loop functions with code to initialize the pins and implement the control logic for the servo and ultrasonic sensor.