
Arduino UNO Based pH Meter with LCD Display and Indicator LEDs
View and Edit Project In Cirkit Designer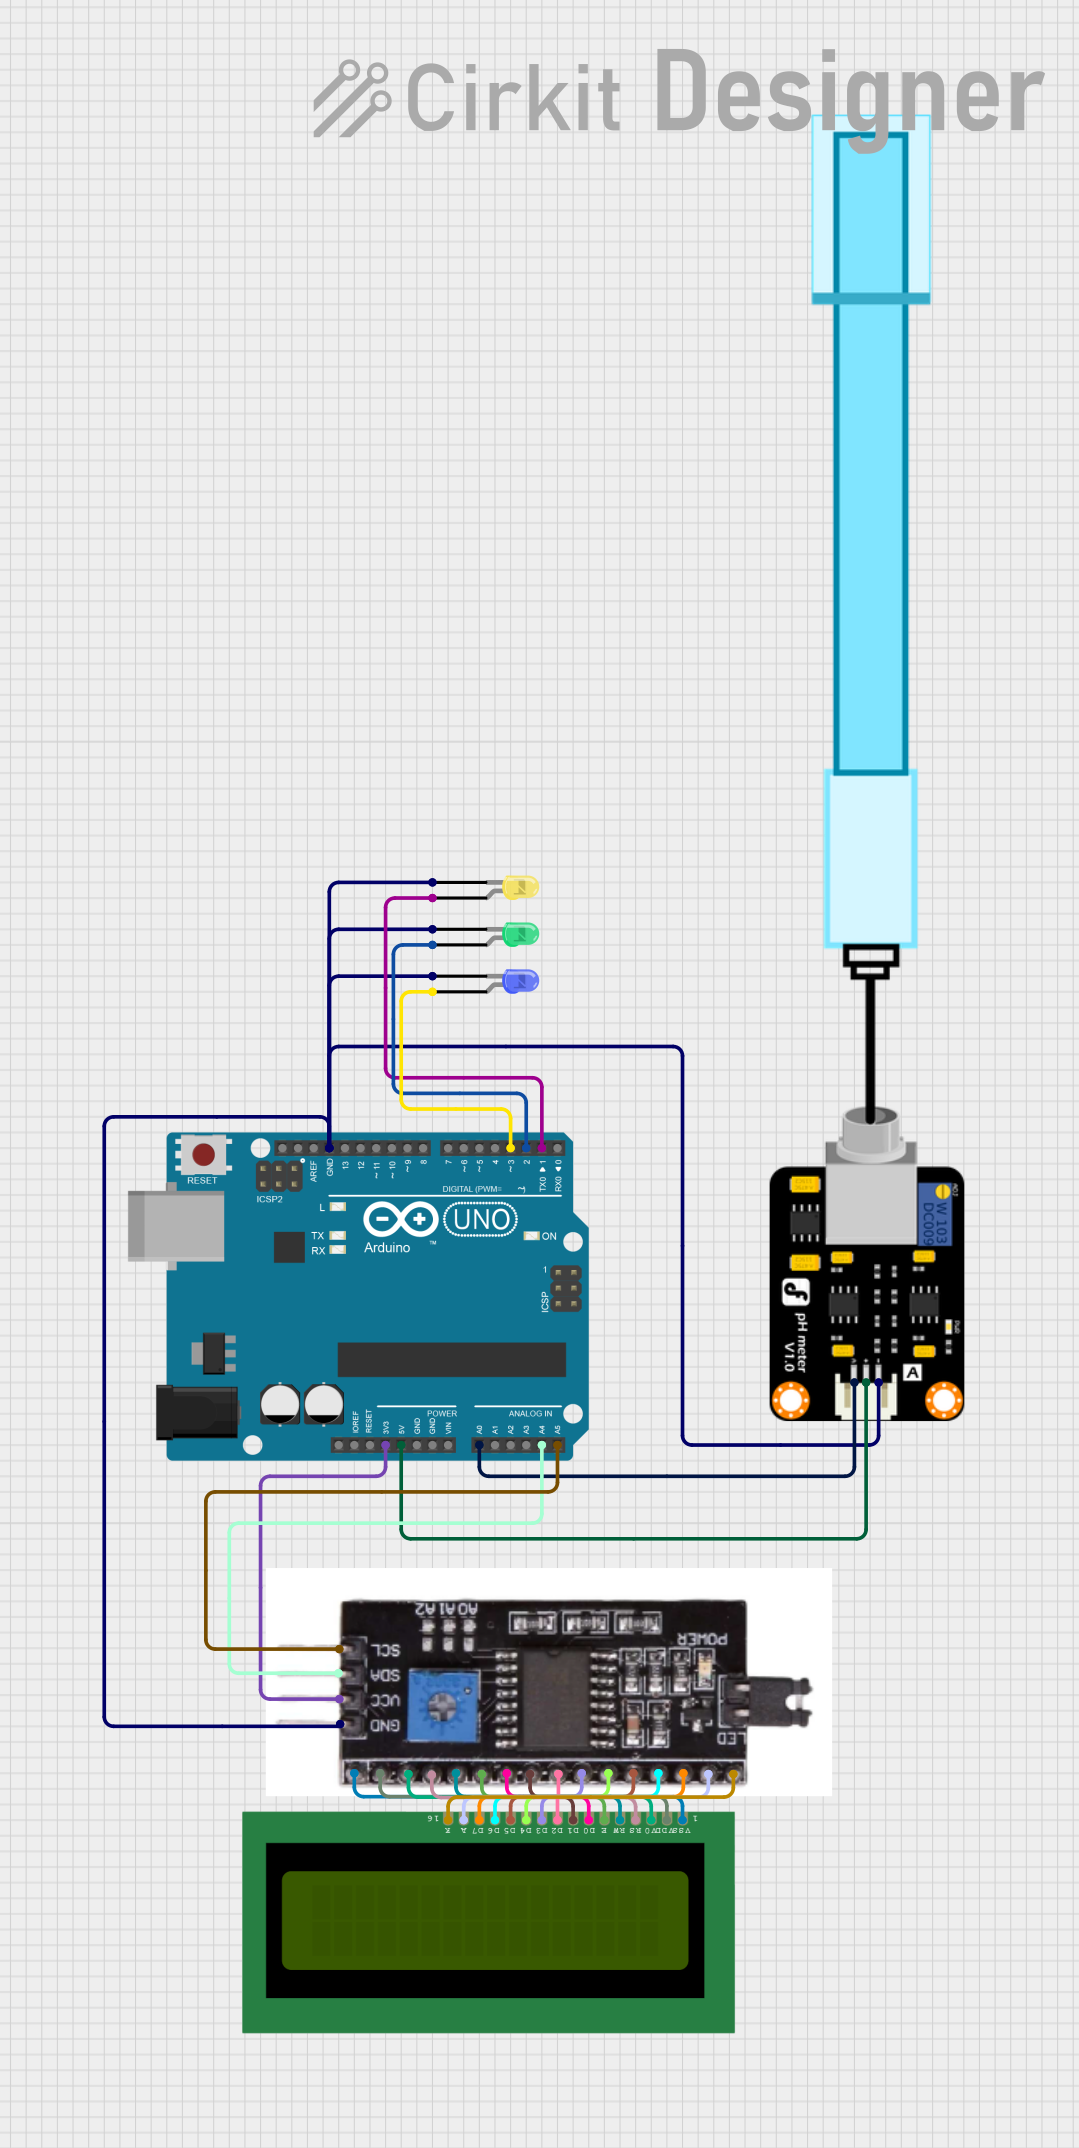
Circuit Documentation
Summary
This circuit is designed to measure the pH level of a solution and display the value on an LCD screen. It also includes a visual indicator system using LEDs: a yellow LED lights up for acidic solutions (pH < 5), a green LED for neutral to slightly alkaline solutions (pH 5-8), and a blue LED for alkaline solutions (pH > 8). Upon powering up, the system displays a welcome message on the LCD. The core of the circuit is an Arduino UNO microcontroller, which reads the pH level from a pH meter sensor, processes the data, and controls the LCD and LEDs accordingly.
Component List
Arduino UNO
- Microcontroller board based on the ATmega328P
- Provides the main control and processing for the circuit
LED: Two Pin (yellow)
- Visual indicator for acidic solutions (pH < 5)
LED: Two Pin (green)
- Visual indicator for neutral to slightly alkaline solutions (pH 5-8)
LED: Two Pin (blue)
- Visual indicator for alkaline solutions (pH > 8)
PH Meter
- Sensor for measuring the pH level of a solution
- Outputs an analog signal proportional to the pH level
LCD 16x2 (Wokwi Compatible)
- Alphanumeric liquid crystal display for showing messages and pH values
I2C Module
- Interface module for the LCD to communicate with the Arduino UNO via I2C protocol
Wiring Details
Arduino UNO
3.3Vconnected to I2C ModuleVCC5Vconnected to PH MeterVCCGNDconnected to PH MeterGND, I2C ModuleGND, and all LED cathodesA0connected to PH MeterSignalA4(SDA) connected to I2C ModuleSDAA5(SCL) connected to I2C ModuleSCLD1connected to Yellow LEDanodeD2connected to Green LEDanodeD3connected to Blue LEDanode
LED: Two Pin (yellow)
cathodeconnected to common groundanodeconnected to Arduino UNOD1
LED: Two Pin (green)
cathodeconnected to common groundanodeconnected to Arduino UNOD2
LED: Two Pin (blue)
cathodeconnected to common groundanodeconnected to Arduino UNOD3
PH Meter
Signalconnected to Arduino UNOA0VCCconnected to Arduino UNO5VGNDconnected to common ground
LCD 16x2 (Wokwi Compatible)
- Connected via I2C Module using the following pins:
VSSto I2C ModuleVSSVDDto I2C ModuleVDDV0to I2C ModuleVORSto I2C ModuleRSRWto I2C ModuleRWEto I2C ModuleED0-D7to I2C ModuleDB0-DB7Ato I2C ModuleLEDAKto I2C ModuleLEDK
I2C Module
VCCconnected to Arduino UNO3.3VGNDconnected to common groundSDAconnected to Arduino UNOA4SCLconnected to Arduino UNOA5- All other pins connected to corresponding pins on the LCD 16x2
Documented Code
/*
 * Alat pengukur pH air dengan output nilai pH pada LCD.
 * Lampu kuning menyala jika pH < 5.
 * Lampu hijau menyala jika pH 5-8.
 * Lampu biru menyala jika pH > 8.
 * Saat alat dinyalakan, tampilkan pesan selamat datang.
 */

#include <Wire.h>
#include <LiquidCrystal_I2C.h>

LiquidCrystal_I2C lcd(0x27, 16, 2);

const int yellowLED = 1; // Pin connected to the anode of the yellow LED
const int greenLED = 2;  // Pin connected to the anode of the green LED
const int blueLED = 3;   // Pin connected to the anode of the blue LED
const int phSensorPin = A0; // Pin connected to the pH meter sensor

void setup() {
  pinMode(yellowLED, OUTPUT);
  pinMode(greenLED, OUTPUT);
  pinMode(blueLED, OUTPUT);
  lcd.begin(); // Initialize the LCD
  lcd.backlight(); // Turn on the backlight
  // Display welcome message
  lcd.setCursor(0, 0);
  lcd.print("pH meter ");
  lcd.setCursor(0, 1);
  lcd.print("Arduino");
  delay(2000); // Wait for 2 seconds
  lcd.clear(); // Clear the display
  // Display group information
  lcd.setCursor(0, 0);
  lcd.print("Pend Kimia 5-A");
  lcd.setCursor(0, 1);
  lcd.print("Kelompok 07");
  delay(2000); // Wait for 2 seconds
  lcd.clear(); // Clear the display
  // Display motivational message
  lcd.setCursor(0, 0);
  lcd.print("Semangat");
  delay(2000); // Wait for 2 seconds
  lcd.clear(); // Clear the display
}

void loop() {
  int phValue = analogRead(phSensorPin); // Read the pH sensor value
  float voltage = phValue * (5.0 / 1023.0); // Convert to voltage
  float ph = 7 - ((2.5 - voltage) / 0.18); // Calculate pH value
  // Display the pH value on the LCD
  lcd.setCursor(0, 0);
  lcd.print("pH: ");
  lcd.print(ph);
  // Control the LEDs based on the pH value
  if (ph < 5) {
    digitalWrite(yellowLED, HIGH);
    digitalWrite(greenLED, LOW);
    digitalWrite(blueLED, LOW);
  } else if (ph >= 5 && ph <= 8) {
    digitalWrite(yellowLED, LOW);
    digitalWrite(greenLED, HIGH);
    digitalWrite(blueLED, LOW);
  } else {
    digitalWrite(yellowLED, LOW);
    digitalWrite(greenLED, LOW);
    digitalWrite(blueLED, HIGH);
  }
  delay(1000); // Wait for 1 second before the next reading
}
This code is responsible for initializing the system, reading the pH sensor data, calculating the pH value, displaying the value on the LCD, and controlling the LEDs based on the pH level. It also includes a startup sequence with welcome and group messages.