
Arduino-Controlled Fingerprint-Activated Solenoid Lock with I2C LCD Interface
View and Edit Project In Cirkit Designer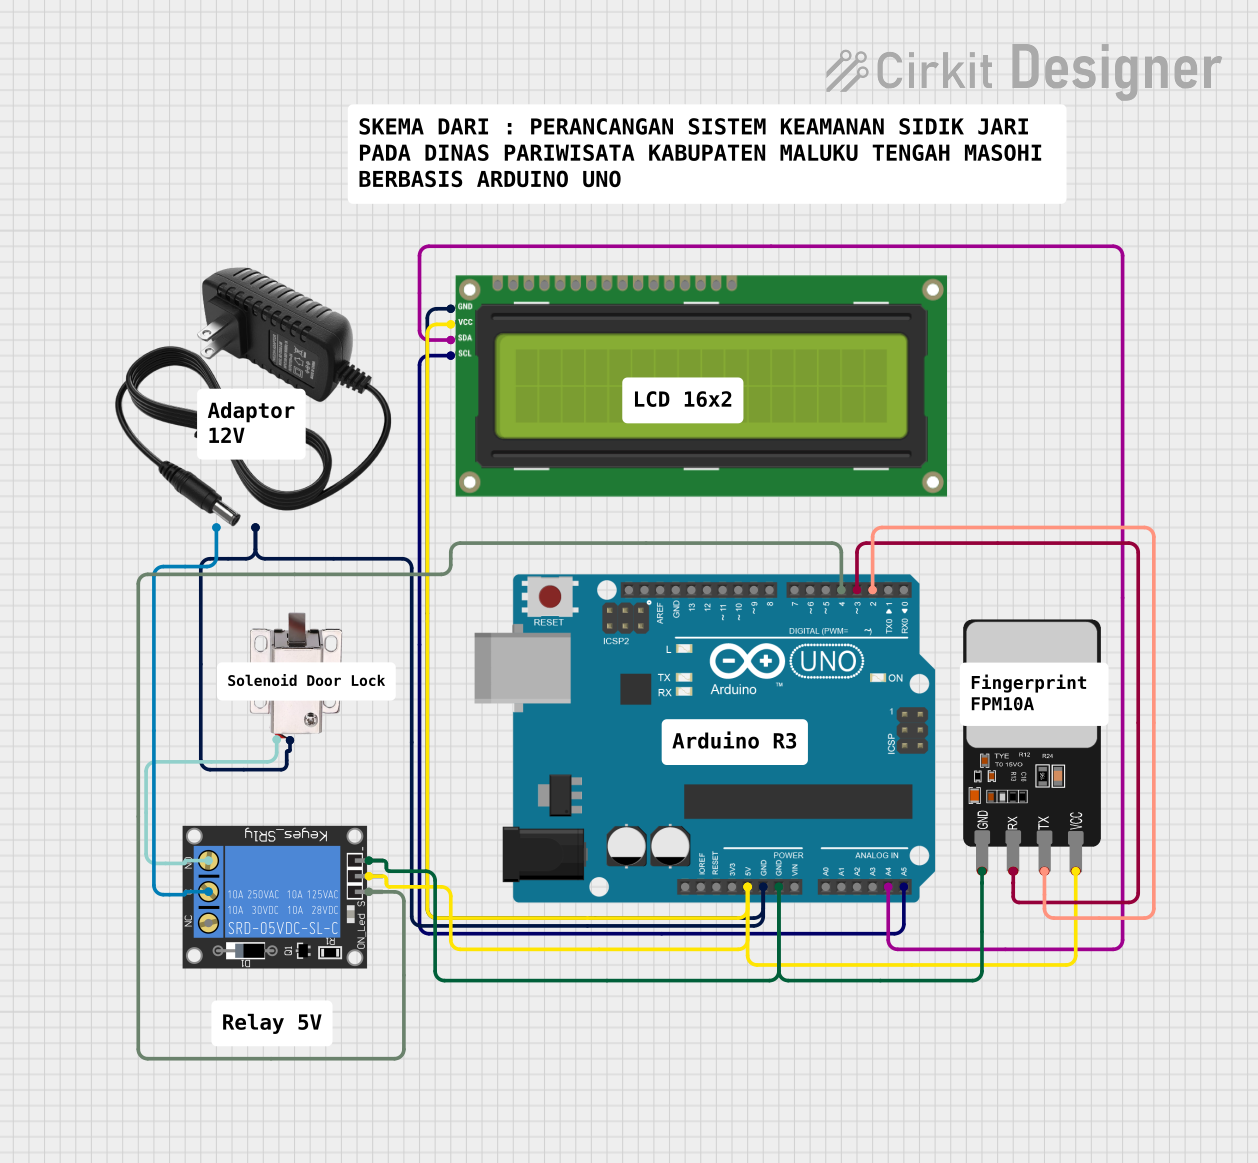
Circuit Documentation
Summary of the Circuit
This circuit is designed to interface an Arduino UNO with several peripheral devices including a 1-Channel Relay, an I2C LCD 16x2 Screen, a 12V solenoid lock, and a Fingerprint Scanner. The Arduino UNO acts as the central controller, managing the input from the Fingerprint Scanner and controlling the state of the solenoid lock through the relay based on the authentication result. The I2C LCD screen is used to display messages or status information. The 12V power supply provides the necessary voltage for the solenoid lock, while the Arduino and other 5V components are powered by the Arduino's onboard voltage regulator.
Component List
12v Power Supply
- Description: Provides a 12V power source for the circuit.
- Pins:
+,-
1-Channel Relay (5V 10A)
- Description: Acts as an electrically operated switch to control the solenoid lock.
- Pins:
NC,signal,C,power,NO,ground
Arduino UNO
- Description: Microcontroller board based on the ATmega328P, used as the main controller for the circuit.
- Pins:
UNUSED,IOREF,Reset,3.3V,5V,GND,Vin,A0toA5,SCL,SDA,AREF,D0toD13
I2C LCD 16x2 Screen
- Description: Alphanumeric liquid crystal display capable of displaying 16 characters per 2 lines.
- Pins:
SCL,SDA,VCC (5V),GND,VDD,VO,RS,RW,E,D0toD7,BLA,BLK
12V Solenoid Lock
- Description: Electromechanical lock that can be controlled by the relay.
- Pins:
VCC,GND
Fingerprint Scanner
- Description: Biometric sensor for scanning fingerprints.
- Pins:
VCC,TX,RX,GND
Wiring Details
12v Power Supply
+connected to RelayC-connected to common ground net
1-Channel Relay (5V 10A)
NCnot connectedsignalconnected to Arduino UNOD4Cconnected to 12v Power Supply+powerconnected to 5V netNOconnected to 12V Solenoid LockVCCgroundconnected to common ground net
Arduino UNO
5Vconnected to 5V netGNDconnected to common ground netA4connected to I2C LCD ScreenSDAA5connected to I2C LCD ScreenSCLD2connected to Fingerprint ScannerTXD3connected to Fingerprint ScannerRXD4connected to Relaysignal
I2C LCD 16x2 Screen
SCLconnected to Arduino UNOA5SDAconnected to Arduino UNOA4VCC (5V)connected to 5V netGNDconnected to common ground net
12V Solenoid Lock
VCCconnected to RelayNOGNDconnected to common ground net
Fingerprint Scanner
VCCconnected to 5V netTXconnected to Arduino UNOD2RXconnected to Arduino UNOD3GNDconnected to common ground net
Documented Code
Arduino UNO Code (sketch.ino)
void setup() {
  // put your setup code here, to run once:

}

void loop() {
  // put your main code here, to run repeatedly:

}
Note: The code provided is a template and does not contain any functional code. It needs to be populated with the logic for interfacing with the Fingerprint Scanner, controlling the Relay, and updating the I2C LCD Screen based on the system state.