
Arduino UNO Controlled Ultrasonic Distance Measurement with Traffic Light Indicator
View and Edit Project In Cirkit Designer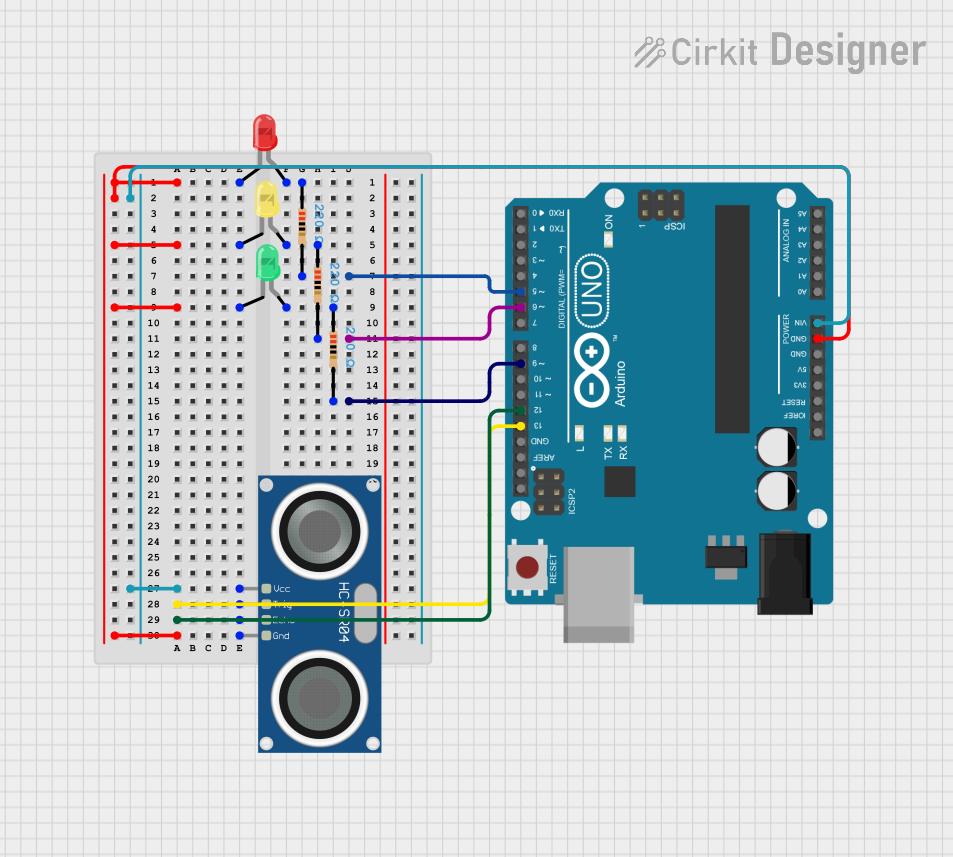
Circuit Documentation
Summary
The circuit in question is designed to measure distance using an HC-SR04 Ultrasonic Sensor and display the measurement status through a set of three LEDs (red, yellow, and green). The Arduino UNO microcontroller is used to control the sensor and LEDs, as well as to manage the power-saving mode of the system. The circuit includes resistors to limit the current through the LEDs, ensuring their safe operation.
Component List
LEDs
- Red LED: A two-pin red LED used to indicate a certain range of distance as part of the measurement feedback.
- Yellow LED: A two-pin yellow LED used to indicate a different range of distance as part of the measurement feedback.
- Green LED: A two-pin green LED used to indicate another range of distance as part of the measurement feedback.
Resistors
- 220 Ohm Resistor: Three resistors each with a resistance of 220 Ohms, used to limit the current through the LEDs.
Microcontroller
- Arduino UNO: A microcontroller board based on the ATmega328P, used to control the LEDs and the ultrasonic sensor, as well as to process the distance measurements.
Sensor
- HC-SR04 Ultrasonic Sensor: An ultrasonic ranging module used to measure distances by emitting ultrasonic waves and measuring the time taken for the echo to return.
Wiring Details
Red LED
- Cathode: Connected to the GND pin on the Arduino UNO.
- Anode: Connected to one end of a 220 Ohm resistor, whose other end is connected to pin D5 on the Arduino UNO.
Yellow LED
- Cathode: Connected to the GND pin on the Arduino UNO.
- Anode: Connected to one end of a 220 Ohm resistor, whose other end is connected to pin D6 on the Arduino UNO.
Green LED
- Cathode: Connected to the GND pin on the Arduino UNO.
- Anode: Connected to one end of a 220 Ohm resistor, whose other end is connected to pin D9 on the Arduino UNO.
HC-SR04 Ultrasonic Sensor
- VCC: Connected to the Vin pin on the Arduino UNO.
- GND: Connected to the GND pin on the Arduino UNO.
- TRIG: Connected to pin D13 on the Arduino UNO.
- ECHO: Connected to pin D12 on the Arduino UNO.
Documented Code
#include <LowPower.h>

const int TRIG_PIN = 13;
const int ECHO_PIN = 12;

#define depthOfTote 100

long duration;
float distance, distanceTot, distanceAvg, speedOfSound;
int count;

int red_led = 5;
int yellow_led = 6;
int green_led  = 9;

void setup() {

  Serial.begin(9600);

  pinMode(TRIG_PIN, OUTPUT);
  pinMode(ECHO_PIN, INPUT);

  pinMode(red_led, OUTPUT);
  pinMode(yellow_led,  OUTPUT);
  pinMode(green_led, OUTPUT);

}

float readDistance() {

  digitalWrite(TRIG_PIN, LOW);
  delayMicroseconds(2);
  digitalWrite(TRIG_PIN, HIGH);
  delayMicroseconds(10);
  digitalWrite(TRIG_PIN, LOW);
  duration = pulseIn(ECHO_PIN, HIGH);
  return duration;
}

void measurementCycle(){
  count = count + 1;

  if  (count < 5){
    //int temperature = dht11.readTemperature();
    speedOfSound = 343; //+ (0.6 * temperature);

    duration = readDistance();
    distance = duration * (speedOfSound/10000) / 2;
    delay(500);

    Serial.print("Distance: ");
    Serial.println(distance);
    Serial.println(count);
    distanceTot = distanceTot + distance;

  } else if (count == 6) {

    count = 0;
    distanceAvg = distanceTot / 5;

    Serial.print("Distance Average: ");
    Serial.println(distanceAvg);

    distanceTot = 0;
    if (distanceAvg > 68){
      digitalWrite(green_led, LOW);
      digitalWrite(yellow_led, LOW);
      digitalWrite(red_led, HIGH);

      LowPower.powerDown(SLEEP_8S, ADC_OFF, BOD_OFF);
      LowPower.powerDown(SLEEP_8S, ADC_OFF, BOD_OFF);


    } else if (distanceAvg > 40 && distanceAvg < 68){
      digitalWrite(green_led, LOW);
      digitalWrite(yellow_led, HIGH);
      digitalWrite(red_led, LOW);

      LowPower.powerDown(SLEEP_8S, ADC_OFF, BOD_OFF);
      LowPower.powerDown(SLEEP_8S, ADC_OFF, BOD_OFF);


    } else if (distanceAvg < 40){
      digitalWrite(green_led, HIGH);
      digitalWrite(yellow_led, LOW);
      digitalWrite(red_led, LOW);

      LowPower.powerDown(SLEEP_8S, ADC_OFF, BOD_OFF);
      LowPower.powerDown(SLEEP_8S, ADC_OFF, BOD_OFF);

  }
}

}

void loop() {
  measurementCycle();
  delay(100);

}
The code provided is for the Arduino UNO microcontroller. It initializes the pins connected to the HC-SR04 sensor and LEDs, reads the distance measurements, and then lights up the corresponding LED based on the average distance measured. It also includes a power-down feature to save energy between measurements.