
Circuit Documentation
Summary
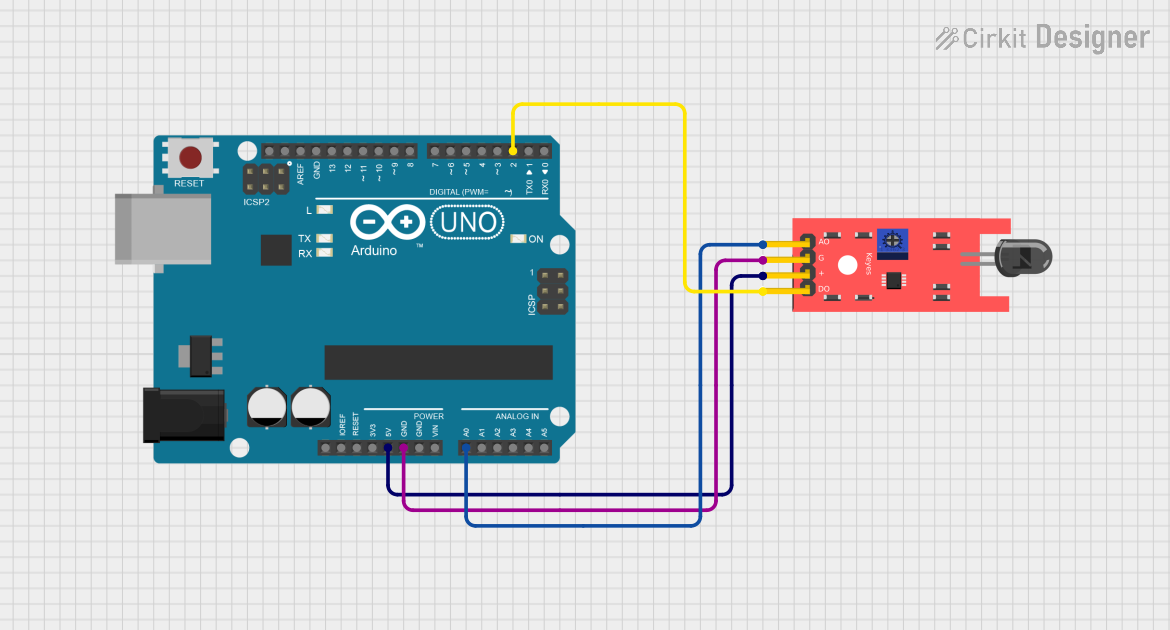
This circuit is designed to interface a Flame Sensor with an Arduino UNO. The Flame Sensor detects the presence of flames and communicates this information to the Arduino, which can then take appropriate actions, such as lighting an LED or logging data. The sensor operates using a digital output pin (D0) that indicates flame detection in an active-low configuration.
Component List
1. Flame Sensor
- Description: A sensor that detects flames and outputs a signal based on the presence of fire.
- Pins:
- A0: Analog output (optional for logging)
- GND: Ground connection
- VCC: Power supply (5V)
- D0: Digital output (active-low)
2. Arduino UNO
- Description: A microcontroller board based on the ATmega328P, used for programming and controlling the Flame Sensor.
- Pins:
- 5V: Power supply output
- GND: Ground connection
- A0: Analog input (optional for logging)
- D2: Digital input (connected to D0 of the Flame Sensor)
Wiring Details
Flame Sensor Wiring
- VCC: Connected to Arduino UNO 5V
- GND: Connected to Arduino UNO GND
- A0: Connected to Arduino UNO A0 (optional for logging)
- D0: Connected to Arduino UNO D2
Arduino UNO Wiring
- 5V: Supplies power to the Flame Sensor
- GND: Common ground for the circuit
- A0: Receives analog signal from the Flame Sensor (optional)
- D2: Receives digital signal from the Flame Sensor (D0)
Documented Code
// Flame Sensor Demo - detection based ONLY on D0 (active-LOW)
// Wiring:
//   Sensor VCC -> UNO 5V
//   Sensor GND -> UNO GND
//   Sensor A0  -> UNO A0 (optional: for logging)
//   Sensor D0  -> UNO D2

const int analogPin  = A0;    // optional: for logging
const int digitalPin = 2;     // DO from sensor (active-LOW)
const int ledPin     = 13;    // onboard LED

const unsigned long printIntervalMs = 200;
unsigned long lastPrintMs = 0;
int lastDigital = -1;

void setup() {
  pinMode(digitalPin, INPUT);  // Use INPUT_PULLUP if your module lacks a pull-up
  pinMode(ledPin, OUTPUT);

  Serial.begin(115200);
  Serial.println("Flame Sensor (D0-only, active-LOW)");
  Serial.println("D2 LOW = flame detected");
}

void loop() {
  int d = digitalRead(digitalPin);   // D0 via D2
  bool flameDetected = (d == LOW);   // active-LOW

  digitalWrite(ledPin, flameDetected ? HIGH : LOW);

  // Edge log
  if (lastDigital != -1 && d != lastDigital) {
    Serial.print("D2 edge: ");
    Serial.println(d == LOW ? "LOW (DETECT)" : "HIGH (no detect)");
  }
  lastDigital = d;

  // Periodic status (includes A0 just for observation)
  unsigned long now = millis();
  if (now - lastPrintMs >= printIntervalMs) {
    lastPrintMs = now;
    int a = analogRead(analogPin);   // optional
    Serial.print("A0=");
    Serial.print(a);
    Serial.print("  D2=");
    Serial.print(d);
    Serial.print(" (LOW=detect)  FlameDetected=");
    Serial.println(flameDetected ? "YES" : "no");
  }

  delay(5);
}
This documentation provides a comprehensive overview of the circuit, detailing the components used, their wiring, and the code that operates the system.