
Bluetooth-Controlled Line Maker with Dual Motor and Pump Operation
View and Edit Project In Cirkit Designer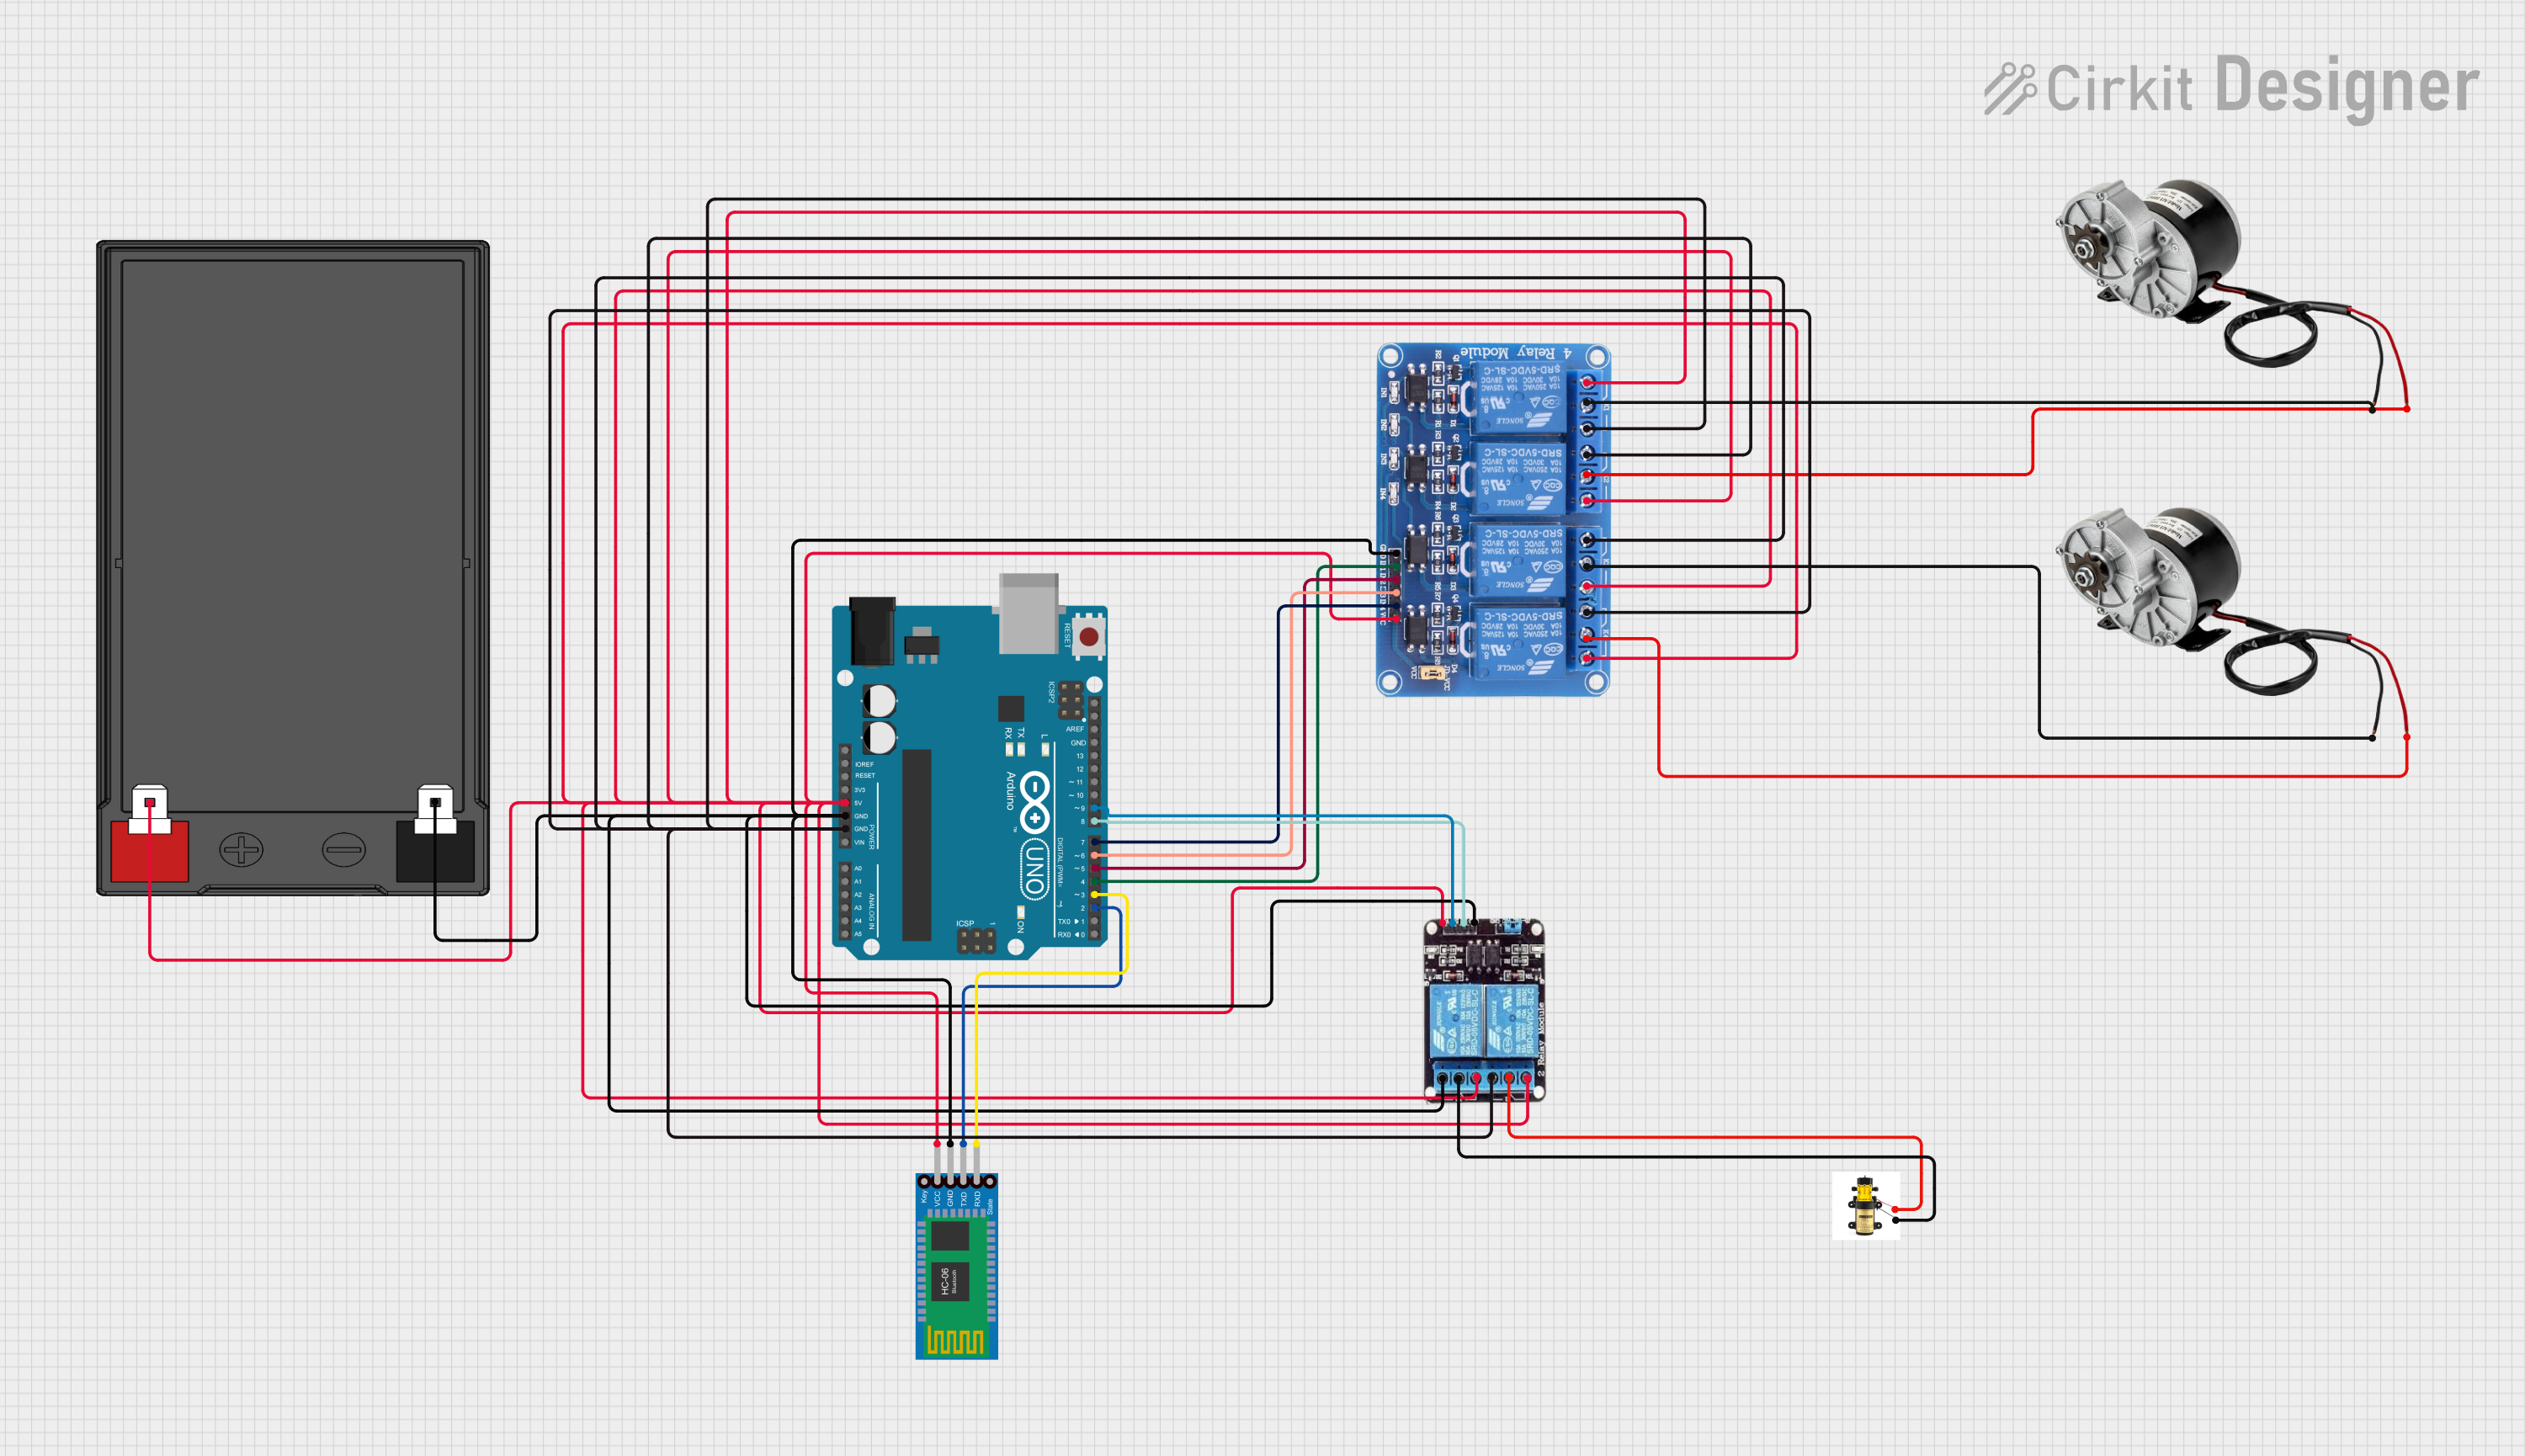
Circuit Documentation
Summary
The circuit in question is designed to control a line maker with two modes of operation: manual and semi-automatic. In manual mode, the pump can be directly controlled via push buttons. In semi-automatic mode, the system is controlled via a smartphone connected through Bluetooth, allowing for the control of both the motors and the pump. The circuit utilizes an Arduino UNO as the main microcontroller, interfaced with a Bluetooth module for wireless communication, a 4-channel relay module for controlling the motors and pump, a 2-channel relay for additional control, and a 12V battery for power supply.
Component List
250W 12V Electric Motor Brush Motor DC
- Description: A DC motor used for driving mechanisms in the line maker.
- Pins: POSITIF, NEGATIF
Pump
- Description: A pump used in the line maker for dispensing materials.
- Pins: +, -
Arduino UNO
- Description: A microcontroller board based on the ATmega328P, used as the main controller for the line maker.
- Pins: UNUSED, IOREF, Reset, 3.3V, 5V, GND, Vin, A0-A5, SCL, SDA, AREF, D0-D13
2-Channel Relay
- Description: A relay module used for controlling high power devices.
- Pins: NC, COM, NO, VCC, IN2, IN1, GND
Bluetooth HC-06
- Description: A Bluetooth module for wireless communication with the Arduino UNO.
- Pins: VCC, GND, TXD, RXD
12V 7Ah Battery
- Description: A battery providing the power supply for the circuit.
- Pins: 12v +, 12v -
Relay 4 Channel 5V
- Description: A 4-channel relay module used for controlling multiple devices such as motors and pumps.
- Pins: GND, IN1-IN4, VCC, COM1-COM4, NO1-NO4, NC1-NC4
Wiring Details
Arduino UNO
- 5V: Connected to VCC of 2-channel relay, VCC of 4-channel relay, VCC of Bluetooth HC-06, and 12v + of the battery.
- GND: Connected to GND of 2-channel relay, GND of 4-channel relay, GND of Bluetooth HC-06, and 12v - of the battery.
- D2: Connected to TXD of Bluetooth HC-06.
- D3: Connected to RXD of Bluetooth HC-06.
- D4-D7: Connected to IN1-IN4 of the 4-channel relay.
- D8, D9: Connected to IN1, IN2 of the 2-channel relay.
250W 12V Electric Motor Brush Motor DC
- POSITIF: Connected to COM2, COM4 of the 4-channel relay.
- NEGATIF: Connected to COM1, COM3 of the 4-channel relay.
Pump
- +: Connected to COM of the 2-channel relay.
- -: Connected to COM of the 2-channel relay.
2-Channel Relay
- NC, NO: Connected to 5V and GND of Arduino UNO.
- VCC: Connected to 5V of Arduino UNO.
- GND: Connected to GND of Arduino UNO.
- IN1, IN2: Connected to D8, D9 of Arduino UNO.
Bluetooth HC-06
- VCC: Connected to 5V of Arduino UNO.
- GND: Connected to GND of Arduino UNO.
- TXD: Connected to D2 of Arduino UNO.
- RXD: Connected to D3 of Arduino UNO.
12V 7Ah Battery
- 12v +: Connected to 5V of Arduino UNO.
- 12v -: Connected to GND of Arduino UNO.
Relay 4 Channel 5V
- GND: Connected to GND of Arduino UNO.
- IN1-IN4: Connected to D4-D7 of Arduino UNO.
- VCC: Connected to 5V of Arduino UNO.
- COM1-COM4: Connected to the positive and negative pins of the electric motors.
- NO1-NO4, NC1-NC4: Not directly connected in the provided net list.
Documented Code
Arduino UNO Code
/*
 * Project: Line Maker
 * Description: This Arduino sketch controls a line maker with two modes: manual and
 * semi-automatic. In manual mode, the pump can be controlled directly via push
 * buttons. In semi-automatic mode, the system is controlled via a smartphone
 * connected through Bluetooth, allowing control of both the motors and the pump.
 */

#include <SoftwareSerial.h>

SoftwareSerial mySerial(2, 3);  // RX, TX

// Declare the Arduino pins for motor control
int lm1 = 4;
int lm2 = 5;
int rm1 = 6;
int rm2 = 7;
int pump1 = 8;  // Pump control pin 1
int pump2 = 9;  // Pump control pin 2
int manualButton = 10;  // Manual mode button
int pumpButton = 11;  // Pump control button
int state;

void setup() {
  // Initialize motor control pins
  pinMode(lm1, OUTPUT);
  pinMode(lm2, OUTPUT);
  pinMode(rm1, OUTPUT);
  pinMode(rm2, OUTPUT);
  // Initialize pump control pins
  pinMode(pump1, OUTPUT);
  pinMode(pump2, OUTPUT);
  // Initialize manual control buttons
  pinMode(manualButton, INPUT_PULLUP);
  pinMode(pumpButton, INPUT_PULLUP);

  // Set initial state for motors and pump (motors and pump off)
  digitalWrite(lm1, HIGH);
  digitalWrite(lm2, HIGH);
  digitalWrite(rm1, HIGH);
  digitalWrite(rm2, HIGH);
  digitalWrite(pump1, LOW);  // Pump off initially
  digitalWrite(pump2, LOW);  // Pump off initially

  // Set the serial communication rate
  Serial.begin(9600);
  mySerial.begin(9600);
}

void loop() {
  // Check if manual mode button is pressed
  if (digitalRead(manualButton) == LOW) {
    // Manual mode
    if (digitalRead(pumpButton) == LOW) {
      // Turn pump on
      digitalWrite(pump1, HIGH);
      digitalWrite(pump2, LOW);
    } else {
      // Turn pump off
      digitalWrite(pump1, LOW);
      digitalWrite(pump2, LOW);
    }
  } else {
    // Semi-automatic mode
    // Save incoming data to variable 'state'
    if (mySerial.available() > 0) {
      state = mySerial.read();
    }

    /*********************** Left ****************************/
    // If state is 'L', car will go left
    if (state == 'L') {
      Serial.println("LEFT");
      digitalWrite(lm1, LOW);
      digitalWrite(lm2, HIGH);
      digitalWrite(rm1, HIGH);
      digitalWrite(rm2, LOW);
    }
    /********************** Forward ************************/
    // If state is 'F', car will go forward
    else if (state == 'F') {
      Serial.println("FORWARD");
      digitalWrite(lm1, LOW);
      digitalWrite(lm2, HIGH);
      digitalWrite(rm1, LOW);
      digitalWrite(rm2, HIGH);
    }
    /********************** Backward ************************/
    // If state is 'B', car will go backward
    else if (state == 'B') {
      Serial.println("BACKWARD");
      digitalWrite(lm1, HIGH);
      digitalWrite(lm2, LOW);
      digitalWrite(rm1, HIGH);
      digitalWrite(rm2, LOW);
    }
    /*********************** Right ****************************/
    // If state is 'R', car will go right
    else if (state == 'R') {
      Serial.println("RIGHT");
      digitalWrite(lm1, HIGH);
      digitalWrite(lm2, LOW);
      digitalWrite(rm1, LOW);
      digitalWrite(rm2, HIGH);
    }
    /*********************** Pump On ****************************/
    // If state is 'P', turn the pump on
    else if (state == 'P') {
      Serial.println("PUMP ON");
      digitalWrite(pump1, HIGH);
      digitalWrite(pump2, LOW);
    }
    /*********************** Pump Off ****************************/
    // If state is 'O', turn the pump off
    else if (state == 'A') {
      Serial.println("PUMP OFF");
      digitalWrite(pump1, LOW);
      digitalWrite(pump2, LOW);
    }
    /********* STOP or Invalid Command *********/
    else {
      Serial.println("Invalid!!!");
      digitalWrite(lm1, HIGH);
      digitalWrite(rm1, HIGH);
      digitalWrite(lm2, HIGH);
      digitalWrite(rm2, HIGH);
    }
  }
}
Note: The code provided for the other microcontroller instances is either empty or a default template without specific functionality. Therefore, it is not included in this documentation.