
Arduino UNO Controlled Robotic Car with IR Sensor and L298N Motor Driver
View and Edit Project In Cirkit Designer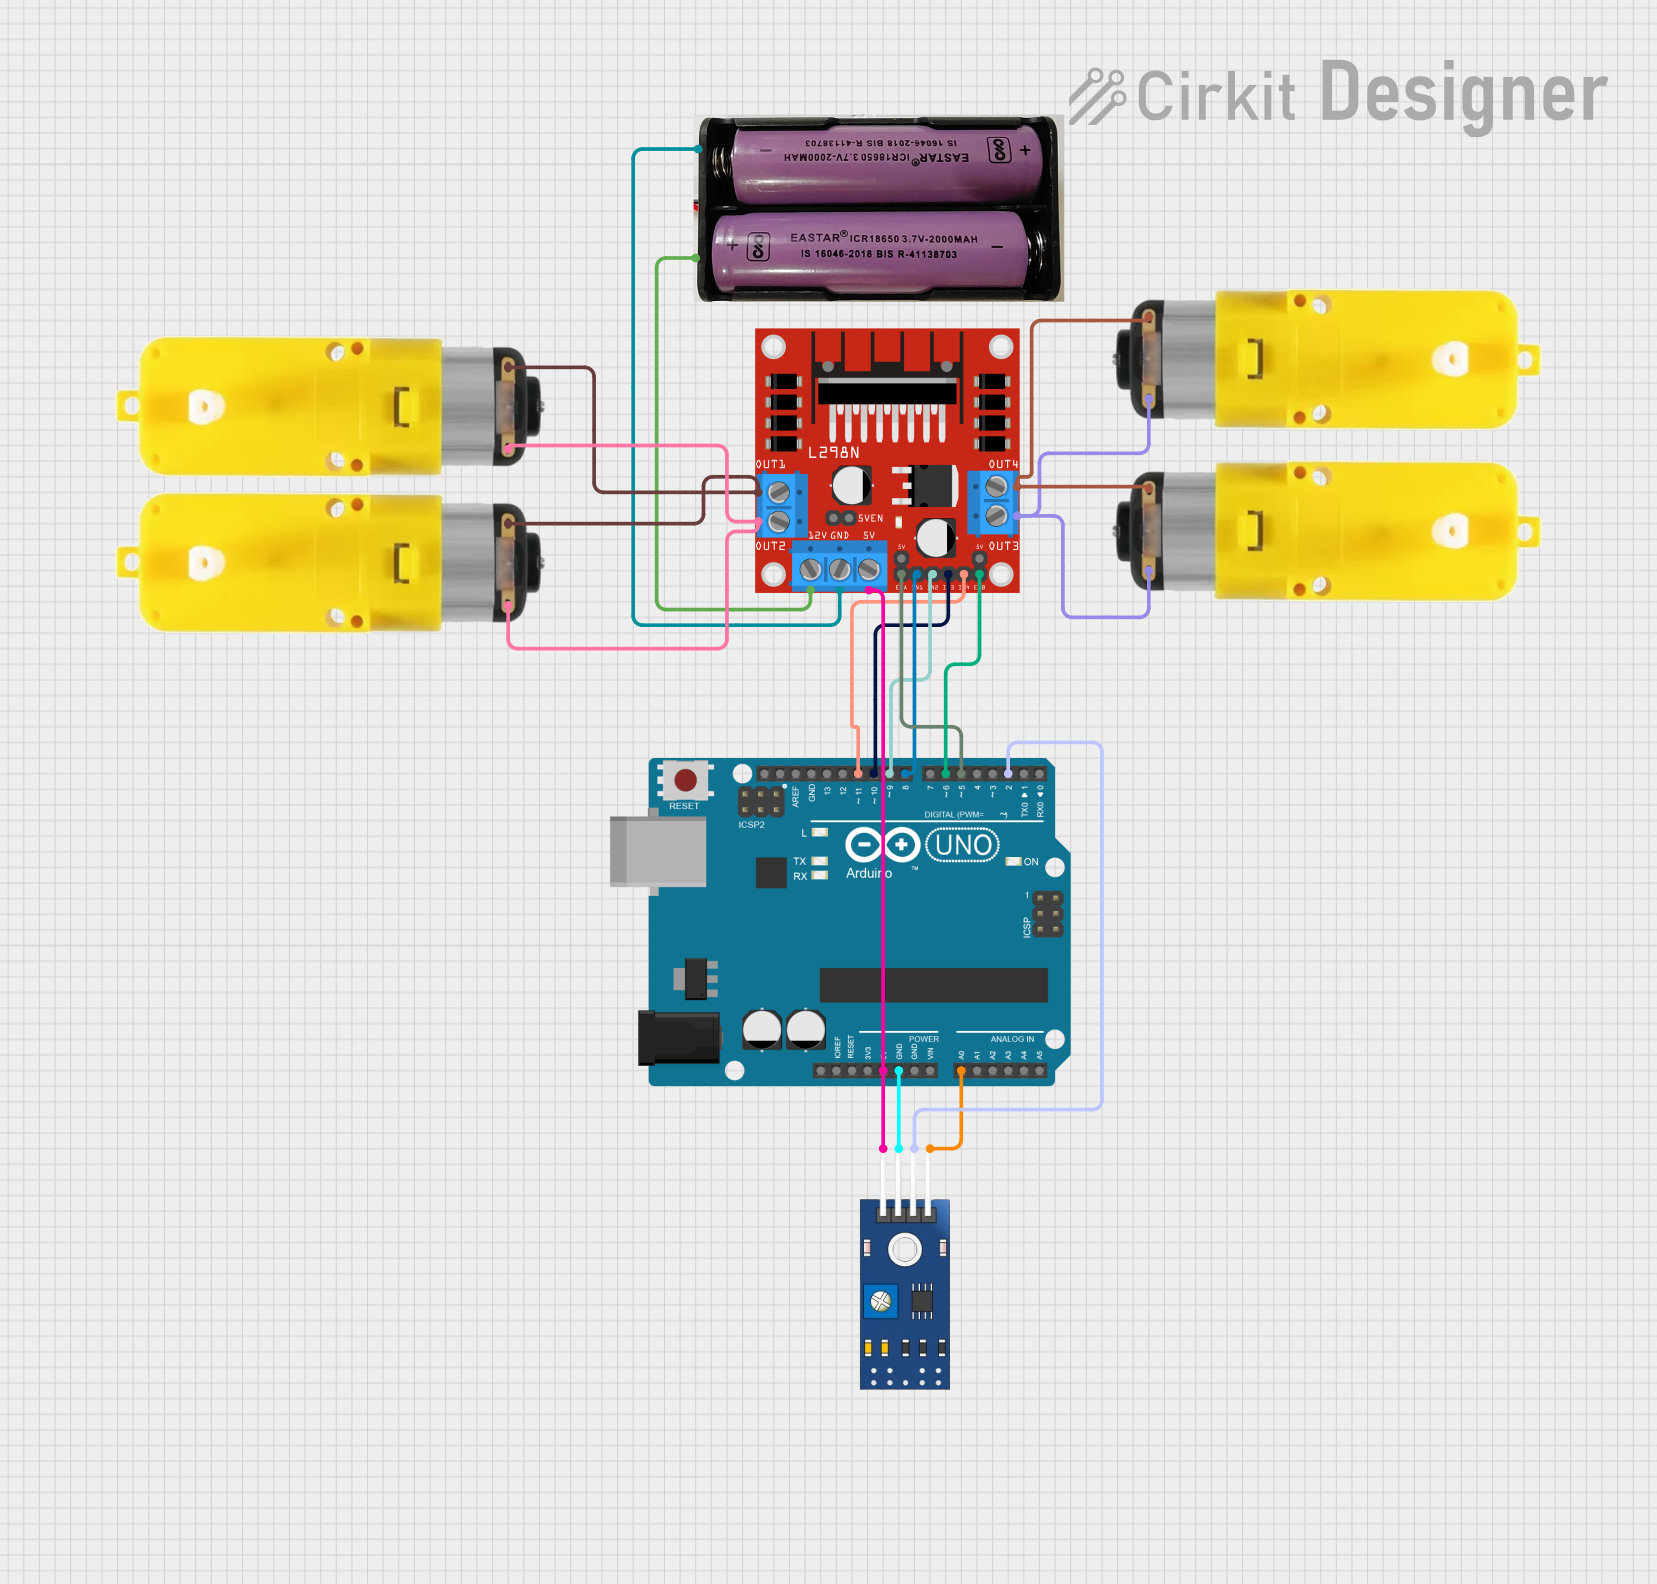
Circuit Documentation
Summary
This document provides a detailed overview of a circuit that includes an Arduino UNO microcontroller, a TCRT 5000 IR sensor, multiple motors with reducers, an L298N DC motor driver, and a 7.4V power supply. The circuit is designed to control the motors based on the input from the IR sensor, with the Arduino UNO serving as the central control unit.
Component List
TCRT 5000 IR Sensor
- Description: Infrared sensor used for detecting objects or distance.
- Pins: VCC, GND, DO, AO
Motor with Reducer
- Description: DC motor with a built-in reducer for controlling speed and torque.
- Pins: 3 - 6 VCC, GND
L298N DC Motor Driver
- Description: Dual H-Bridge motor driver used to control the direction and speed of two DC motors.
- Pins: OUT1, OUT2, 12V, GND, 5V, OUT3, OUT4, 5V-ENA-JMP-I, 5V-ENA-JMP-O, +5V-J1, +5V-J2, ENA, IN1, IN2, IN3, IN4, ENB
Arduino UNO
- Description: Microcontroller board based on the ATmega328P.
- Pins: UNUSED, IOREF, Reset, 3.3V, 5V, GND, Vin, A0, A1, A2, A3, A4, A5, SCL, SDA, AREF, D13, D12, D11, D10, D9, D8, D7, D6, D5, D4, D3, D2, D1, D0
7.4V Power Supply
- Description: Power source providing 7.4V.
- Pins: +, -
Wiring Details
TCRT 5000 IR Sensor
- VCC connected to 5V on the L298N DC motor driver and Arduino UNO
- GND connected to GND on the Arduino UNO
- AO connected to A0 on the Arduino UNO
- DO connected to D2 on the Arduino UNO
Motor with Reducer (Instance 1)
- 3 - 6 VCC connected to OUT1 on the L298N DC motor driver
- GND connected to OUT2 on the L298N DC motor driver
Motor with Reducer (Instance 2)
- 3 - 6 VCC connected to OUT1 on the L298N DC motor driver
- GND connected to OUT2 on the L298N DC motor driver
Motor with Reducer (Instance 3)
- 3 - 6 VCC connected to OUT3 on the L298N DC motor driver
- GND connected to OUT4 on the L298N DC motor driver
Motor with Reducer (Instance 4)
- 3 - 6 VCC connected to OUT3 on the L298N DC motor driver
- GND connected to OUT4 on the L298N DC motor driver
L298N DC Motor Driver
- 12V connected to + on the 7.4V power supply
- GND connected to - on the 7.4V power supply
- 5V connected to VCC on the TCRT 5000 IR sensor and 5V on the Arduino UNO
- ENA connected to D5 on the Arduino UNO
- IN1 connected to D8 on the Arduino UNO
- IN2 connected to D9 on the Arduino UNO
- IN3 connected to D10 on the Arduino UNO
- IN4 connected to D11 on the Arduino UNO
- ENB connected to D6 on the Arduino UNO
Arduino UNO
- 5V connected to 5V on the L298N DC motor driver and VCC on the TCRT 5000 IR sensor
- GND connected to GND on the TCRT 5000 IR sensor
- A0 connected to AO on the TCRT 5000 IR sensor
- D2 connected to DO on the TCRT 5000 IR sensor
- D5 connected to ENA on the L298N DC motor driver
- D6 connected to ENB on the L298N DC motor driver
- D8 connected to IN1 on the L298N DC motor driver
- D9 connected to IN2 on the L298N DC motor driver
- D10 connected to IN3 on the L298N DC motor driver
- D11 connected to IN4 on the L298N DC motor driver
7.4V Power Supply
- + connected to 12V on the L298N DC motor driver
- - connected to GND on the L298N DC motor driver
Documented Code
Arduino UNO Code (sketch.ino)
void setup() {
  // put your setup code here, to run once:

}

void loop() {
  // put your main code here, to run repeatedly:

}
This code is a basic template for the Arduino UNO. The setup() function is used to initialize any settings or configurations, and the loop() function contains the main logic that runs repeatedly. You can add your specific motor control and sensor reading logic within these functions.