
Arduino-Based Bluetooth-Controlled Pill Dispenser with LCD and Servo Mechanism
View and Edit Project In Cirkit Designer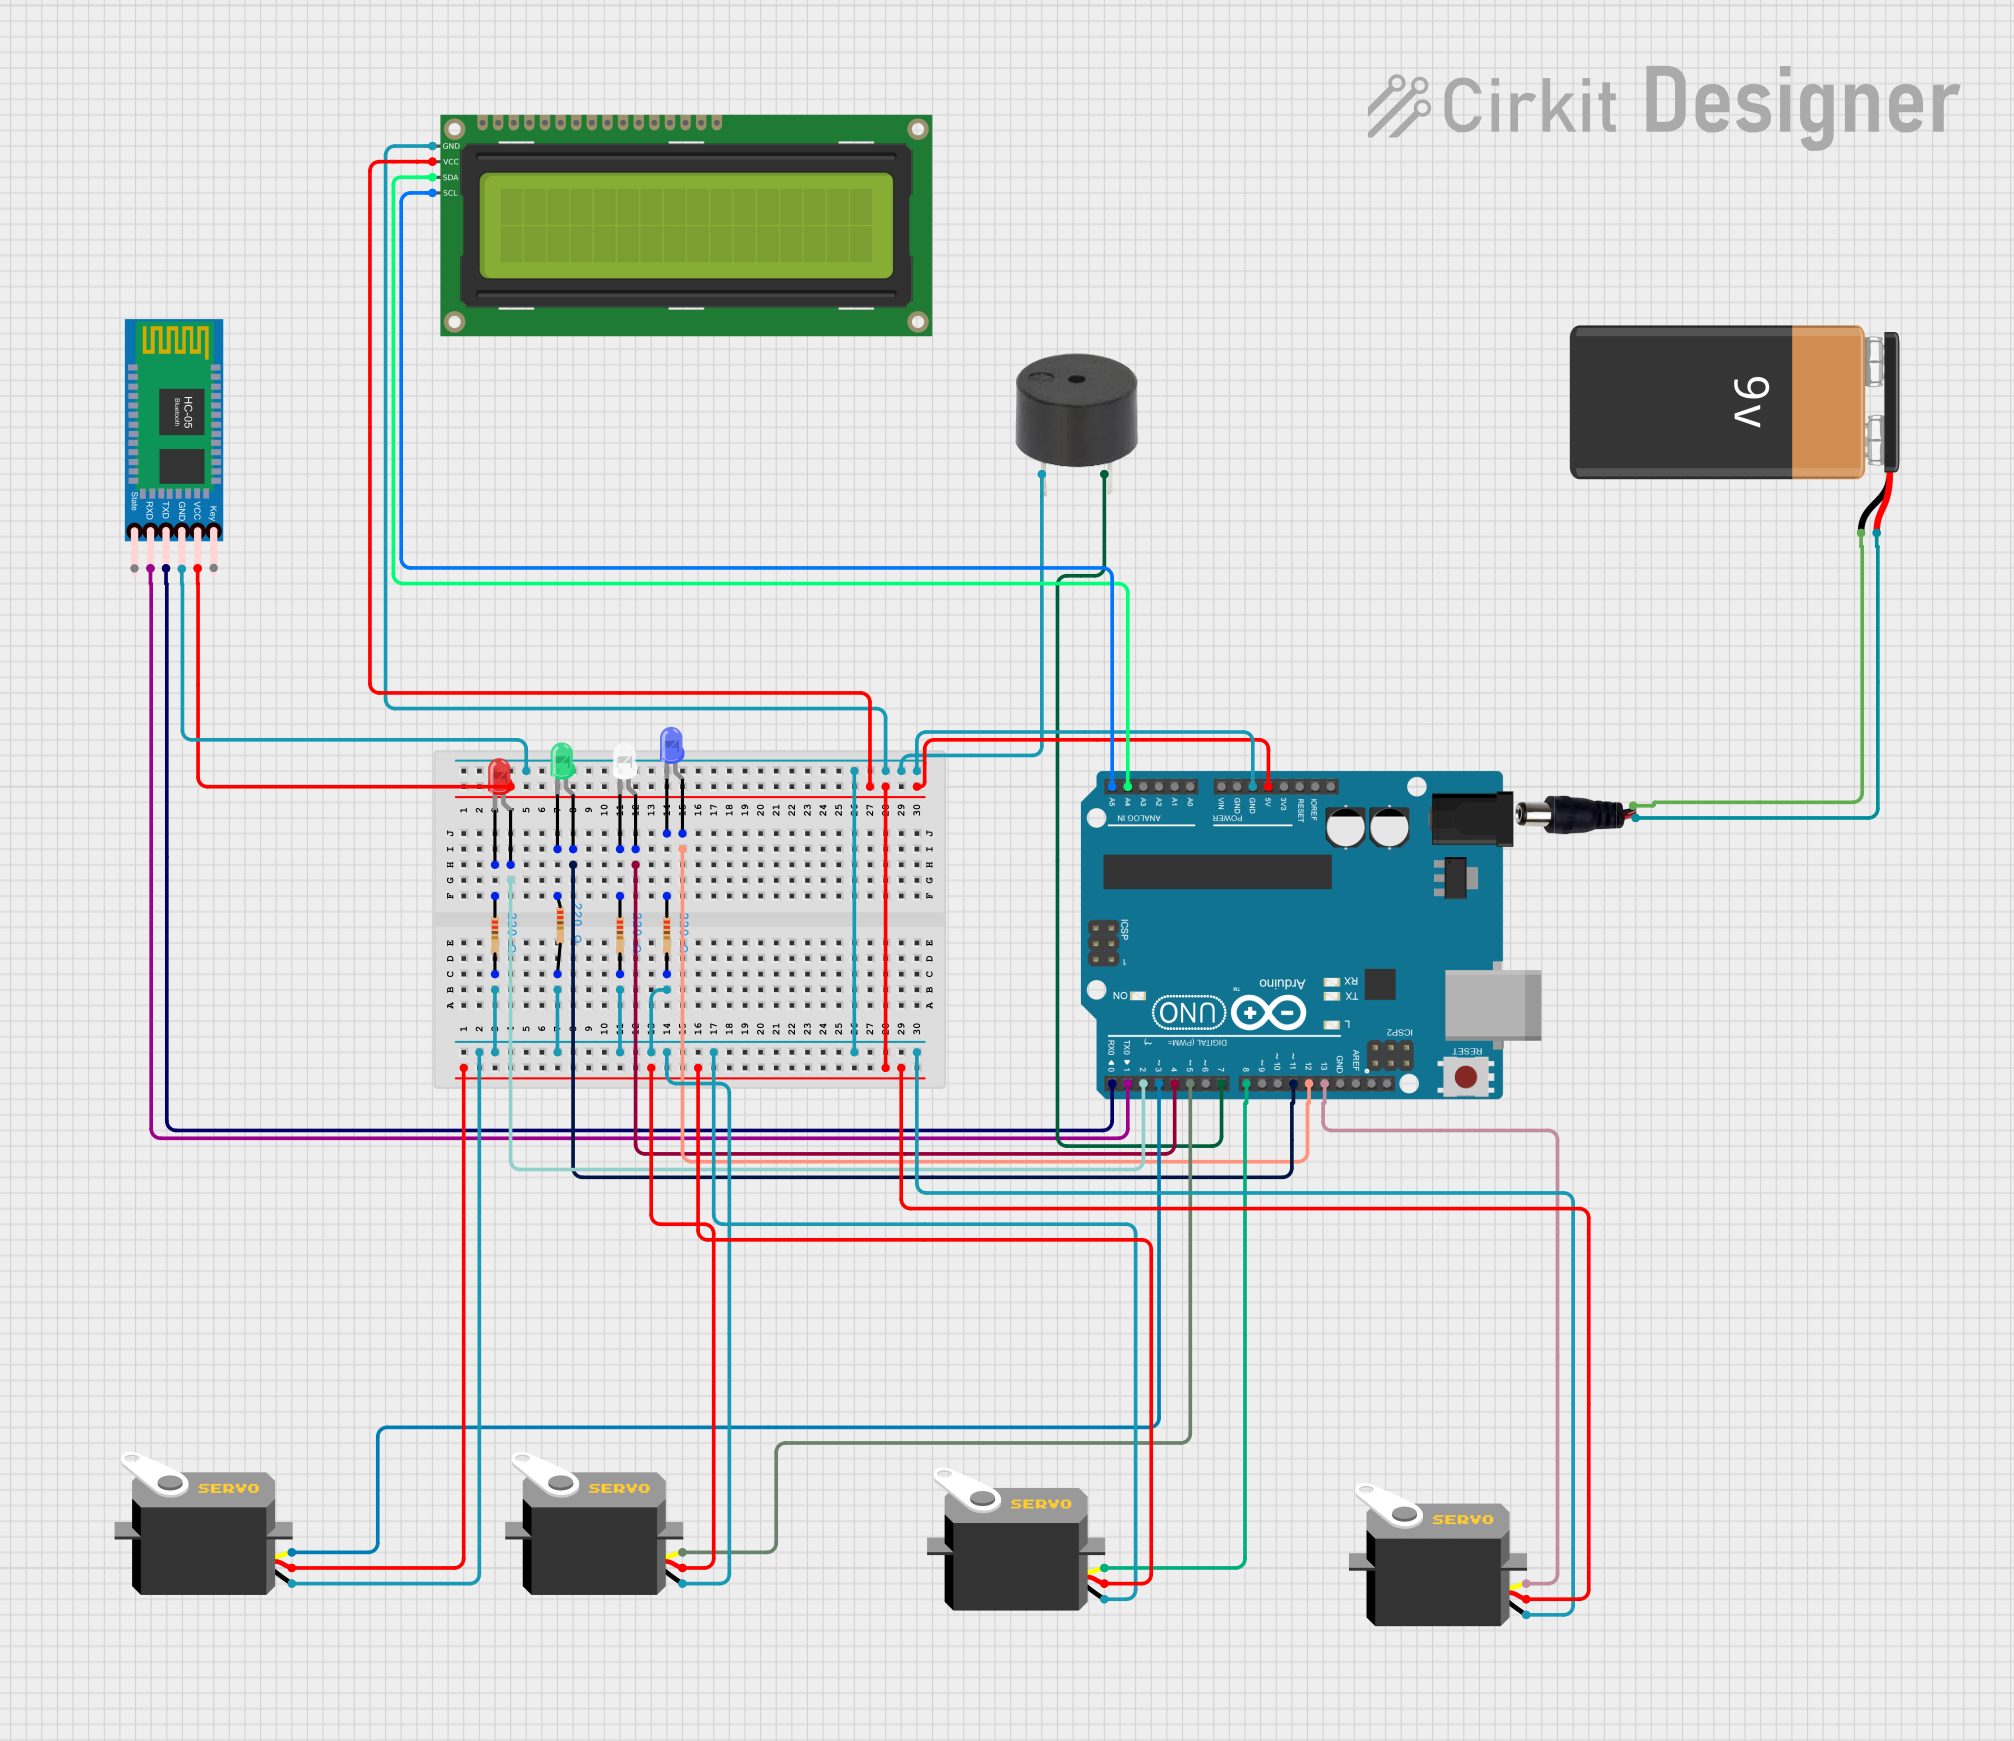
Circuit Documentation
Summary
This document provides a detailed overview of a circuit designed to control a pill dispenser using an Arduino UNO. The circuit includes multiple LEDs, servos, a buzzer, an HC-05 Bluetooth module, and a 16x2 I2C LCD. The Arduino UNO is programmed to receive commands via Bluetooth to dispense pills and provide visual and auditory feedback.
Component List
Resistor (220 Ohms)
- Pins: pin1, pin2
- Description: Limits current to LEDs
LED: Two Pin (red)
- Pins: cathode, anode
- Description: Provides visual feedback
LED: Two Pin (green)
- Pins: cathode, anode
- Description: Provides visual feedback
LED: Two Pin (white)
- Pins: cathode, anode
- Description: Provides visual feedback
LED: Two Pin (blue)
- Pins: cathode, anode
- Description: Provides visual feedback
HC-05 Bluetooth Module
- Pins: Key, VCC, TXD, RXD, State, GND
- Description: Receives commands via Bluetooth
Arduino UNO
- Pins: UNUSED, IOREF, Reset, 3.3V, 5V, GND, Vin, A0, A1, A2, A3, A4, A5, SCL, SDA, AREF, D13, D12, D11, D10, D9, D8, D7, D6, D5, D4, D3, D2, D1, D0
- Description: Microcontroller for controlling the circuit
Buzzer
- Pins: PIN, GND
- Description: Provides auditory feedback
Servo
- Pins: gnd, vcc, pulse
- Description: Controls the dispensing mechanism
9V Battery
- Pins: -, +
- Description: Powers the circuit
Power Jack
- Pins: POSITIF, NEGATIF
- Description: Connects the 9V battery to the circuit
16x2 I2C LCD
- Pins: GND, VCC, SDA, SCL
- Description: Displays messages
Wiring Details
Resistor (220 Ohms)
- pin1: Connected to the cathode of the corresponding LED
- pin2: Connected to the common ground
LED: Two Pin (red)
- cathode: Connected to pin1 of a 220 Ohm resistor
- anode: Connected to D2 of the Arduino UNO
LED: Two Pin (green)
- cathode: Connected to pin1 of a 220 Ohm resistor
- anode: Connected to D11 of the Arduino UNO
LED: Two Pin (white)
- cathode: Connected to pin1 of a 220 Ohm resistor
- anode: Connected to D4 of the Arduino UNO
LED: Two Pin (blue)
- cathode: Connected to pin1 of a 220 Ohm resistor
- anode: Connected to D12 of the Arduino UNO
HC-05 Bluetooth Module
- Key: Not connected
- VCC: Connected to 5V of the Arduino UNO
- TXD: Connected to D0 of the Arduino UNO
- RXD: Connected to D1 of the Arduino UNO
- State: Not connected
- GND: Connected to the common ground
Arduino UNO
- GND: Connected to the common ground
- 5V: Connected to VCC of the HC-05 Bluetooth Module and 16x2 I2C LCD
- D2: Connected to the anode of the red LED
- D11: Connected to the anode of the green LED
- D4: Connected to the anode of the white LED
- D12: Connected to the anode of the blue LED
- D0: Connected to TXD of the HC-05 Bluetooth Module
- D1: Connected to RXD of the HC-05 Bluetooth Module
- A4: Connected to SDA of the 16x2 I2C LCD
- A5: Connected to SCL of the 16x2 I2C LCD
- D13: Connected to pulse of one Servo
- D8: Connected to pulse of another Servo
- D7: Connected to GND of the Buzzer
- D5: Connected to pulse of another Servo
- D3: Connected to pulse of another Servo
Buzzer
- PIN: Connected to D7 of the Arduino UNO
- GND: Connected to the common ground
Servo
- gnd: Connected to the common ground
- vcc: Connected to 5V of the Arduino UNO
- pulse: Connected to D3, D5, D8, or D13 of the Arduino UNO
9V Battery
- -: Connected to NEGATIF of the power jack
- +: Connected to POSITIF of the power jack
Power Jack
- POSITIF: Connected to + of the 9V Battery
- NEGATIF: Connected to - of the 9V Battery
16x2 I2C LCD
- GND: Connected to the common ground
- VCC: Connected to 5V of the Arduino UNO
- SDA: Connected to A4 of the Arduino UNO
- SCL: Connected to A5 of the Arduino UNO
Code Documentation
#include <LiquidCrystal_I2C.h>
#include <Servo.h>
#include <Wire.h>

// Define pins
#define RED_LED_PIN 2
#define GREEN_LED_PIN 11
#define BLUE_LED_PIN 12
#define WHITE_LED_PIN 4
#define BUZZER_PIN 7
#define SERVO1_PIN 3
#define SERVO2_PIN 5
#define SERVO3_PIN 8
#define SERVO4_PIN 13

// Create servo objects
Servo servo1;
Servo servo2;
Servo servo3;
Servo servo4;

// Create LCD object
LiquidCrystal_I2C lcd(0x27, 16, 2);

void setup() {
  // Initialize serial communication
  Serial.begin(9600);

  // Initialize pins
  pinMode(RED_LED_PIN, OUTPUT);
  pinMode(GREEN_LED_PIN, OUTPUT);
  pinMode(BLUE_LED_PIN, OUTPUT);
  pinMode(WHITE_LED_PIN, OUTPUT);
  pinMode(BUZZER_PIN, OUTPUT);

  // Attach servos
  servo1.attach(SERVO1_PIN);
  servo2.attach(SERVO2_PIN);
  servo3.attach(SERVO3_PIN);
  servo4.attach(SERVO4_PIN);

  // Initialize LCD
  lcd.begin(16, 2); // Corrected to include the number of columns and rows
  lcd.backlight();
  lcd.print("Pill Dispenser");
}

void loop() {
  // Check for Bluetooth commands
  if (Serial.available() > 0) {
    char command = Serial.read();
    handleCommand(command);
  }
}

void handleCommand(char command) {
  switch (command) {
    case '1':
      dispensePill(servo1);
      break;
    case '2':
      dispensePill(servo2);
      break;
    case '3':
      dispensePill(servo3);
      break;
    case '4':
      dispensePill(servo4);
      break;
    default:
      lcd.clear();
      lcd.print("Invalid Command");
      tone(BUZZER_PIN, 1000, 500);
      break;
  }
}

void dispensePill(Servo &servo) {
  lcd.clear();
  lcd.print("Dispensing...");
  digitalWrite(GREEN_LED_PIN, HIGH);
  servo.write(90); // Rotate servo to dispense
  delay(1000); // Wait for pill to dispense
  servo.write(0); // Return servo to initial position
  digitalWrite(GREEN_LED_PIN, LOW);
  lcd.clear();
  lcd.print("Done");
  tone(BUZZER_PIN, 2000, 500);
}
This code initializes the Arduino UNO to control LEDs, servos, a buzzer, and an LCD. It listens for commands via Bluetooth to dispense pills and provides visual and auditory feedback.