
Arduino-Controlled Solenoid Valve System with Turbidity Sensing
View and Edit Project In Cirkit Designer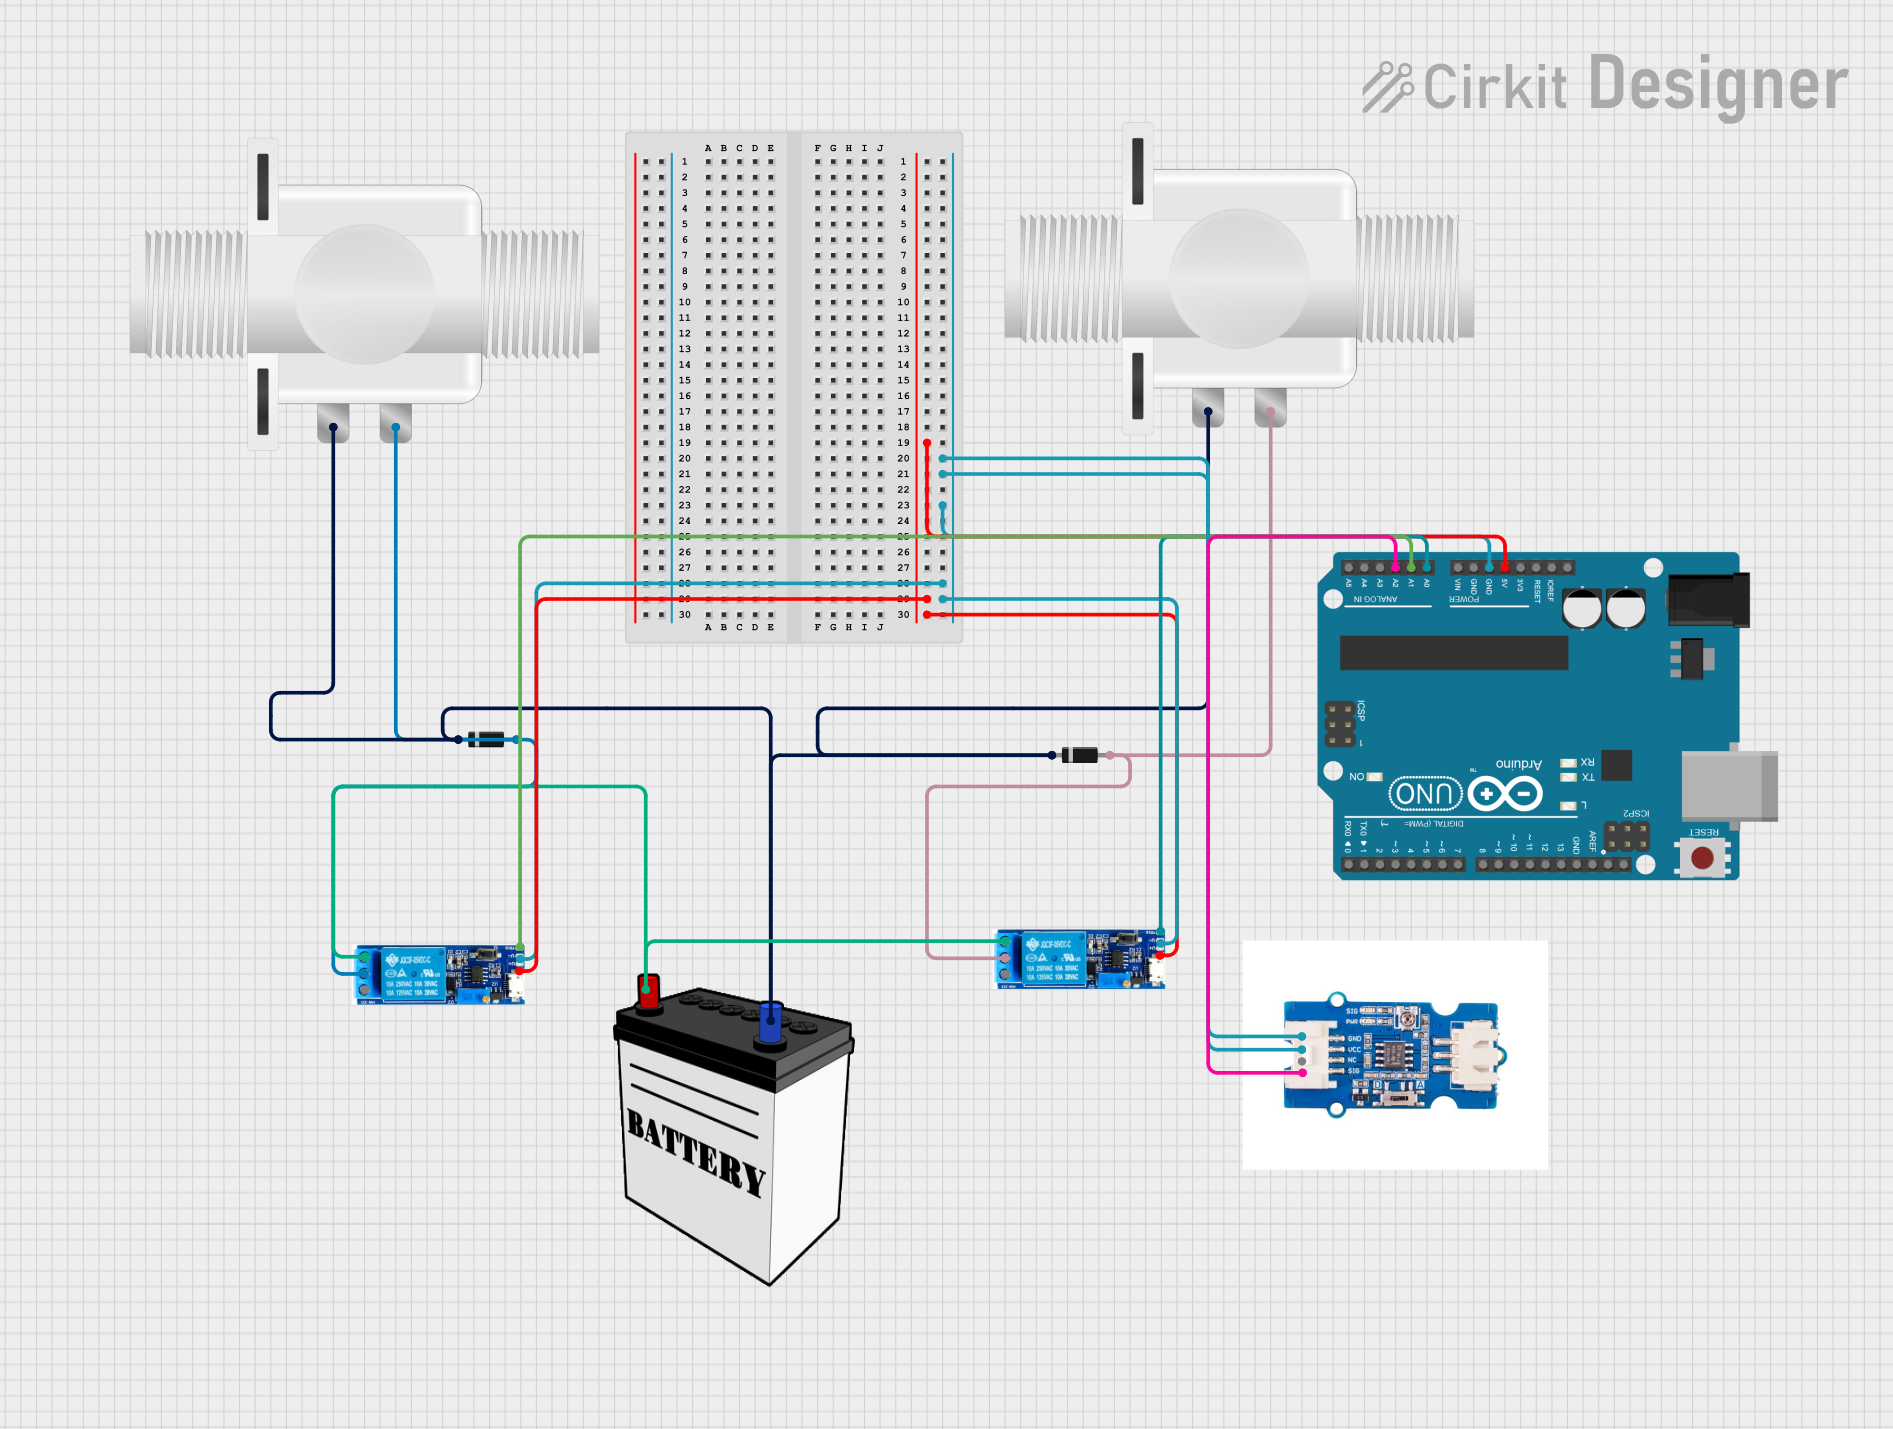
Circuit Documentation
Summary of the Circuit
This circuit is designed to control two plastic solenoid valves using an Arduino UNO microcontroller. The valves are actuated by two relay modules, which are triggered by the Arduino. The circuit also includes a turbidity sensor to monitor the clarity of a liquid and diodes for protecting the circuit from potential back EMF generated by the solenoid valves. A 12V battery provides the power required for the solenoid valves, while the Arduino and other components are powered by the Arduino's onboard 5V regulator.
Component List
Relay Module 5V-30V
- Description: A relay module capable of switching higher voltages and currents using a low voltage control signal.
- Pins: Common Contact, Normally Open, Normally Closed, Trigger, V-, V+
Diode
- Description: A semiconductor device that allows current to flow in one direction only, used for protecting the circuit from reverse current.
- Pins: Cathode, Anode
Plastic Solenoid Valve
- Description: An electrically-controlled valve used for controlling the flow of a liquid.
- Pins: Pin1, Pin2
Arduino UNO
- Description: A microcontroller board based on the ATmega328P, used for controlling the logic of the circuit.
- Pins: UNUSED, IOREF, Reset, 3.3V, 5V, GND, Vin, A0-A5, SCL, SDA, AREF, D13-D0
12V Battery
- Description: A power source used to supply the solenoid valves with the required operating voltage.
- Pins: VCC, GND
Turbidity Sensor
- Description: A sensor used to measure the turbidity (clarity) of a liquid.
- Pins: GND, VCC, NC, SIG
Wiring Details
Relay Module 5V-30V
- V+: Connected to the 5V output of the Arduino UNO.
- V-: Connected to the GND of the Arduino UNO.
- Trigger: Connected to the A0 or A1 pin of the Arduino UNO for relay activation.
- Common Contact: Connected to the anode of a diode, which is connected to a solenoid valve.
- Normally Open: Connected to the VCC of the 12V battery.
Diode
- Anode: Connected to the common contact of a relay module.
- Cathode: Connected to the GND of the 12V battery and pin1 of a solenoid valve.
Plastic Solenoid Valve
- Pin1: Connected to the cathode of a diode and GND of the 12V battery.
- Pin2: Connected to the common contact of a relay module.
Arduino UNO
- 5V: Provides power to the relay modules.
- GND: Common ground for the circuit.
- A0, A1: Used to trigger the relay modules.
- A2: Connected to the SIG pin of the turbidity sensor.
12V Battery
- VCC: Provides power to the solenoid valves through the relay modules.
- GND: Connected to the cathodes of the diodes and pin1 of the solenoid valves.
Turbidity Sensor
- VCC: Connected to the 5V output of the Arduino UNO.
- GND: Connected to the GND of the Arduino UNO.
- SIG: Connected to the A2 pin of the Arduino UNO.
Documented Code
Arduino UNO Code (sketch.ino)
void setup() {
  // put your setup code here, to run once:

}

void loop() {
  // put your main code here, to run repeatedly:

}
Additional Documentation (documentation.txt)
No additional documentation provided in the code input.
This documentation provides an overview of the circuit, including the purpose and connection details of each component, as well as the initial code structure for the Arduino UNO. Further development of the code is required to implement the control logic for the solenoid valves and to process the signal from the turbidity sensor.