
Arduino Nano and RTC DS3231 Based Real-Time Clock with Buzzer Alert
View and Edit Project In Cirkit Designer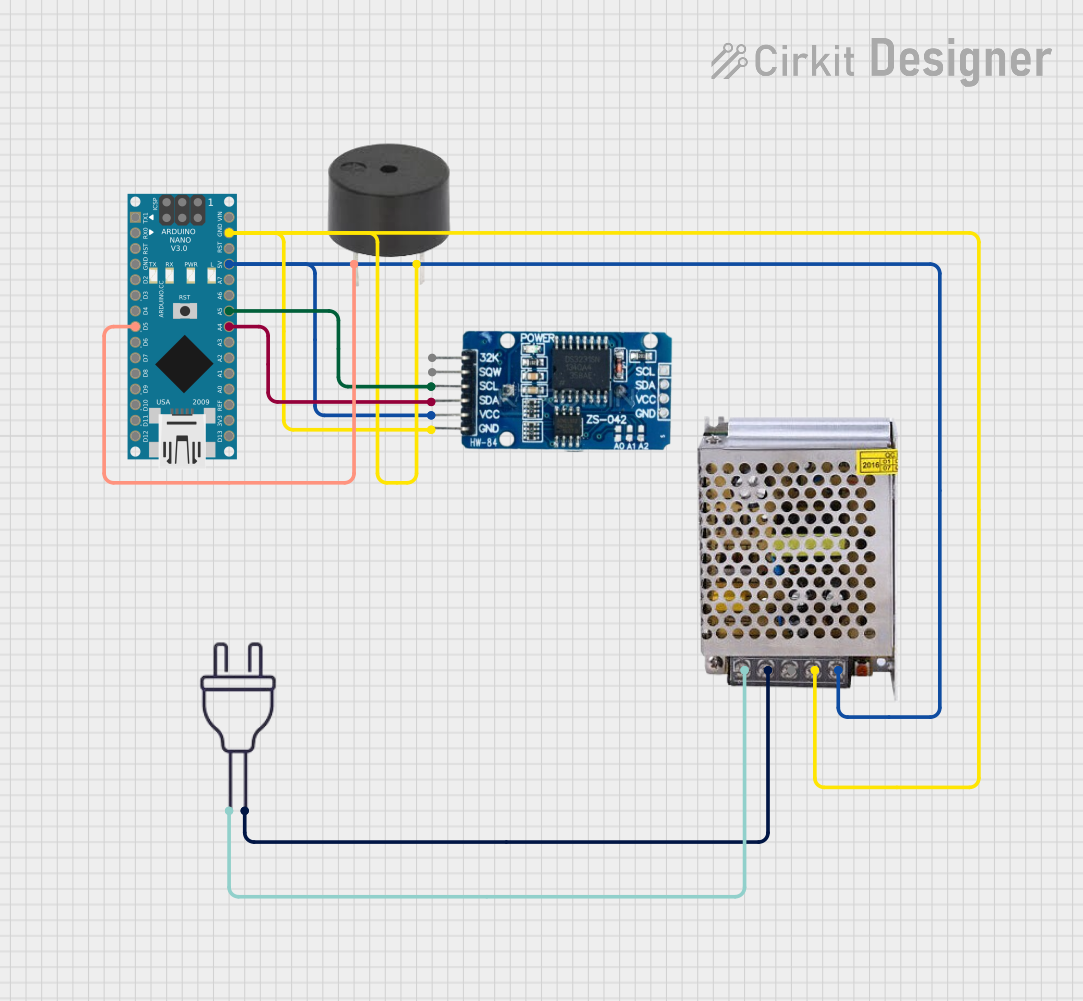
Circuit Documentation
Summary
This circuit consists of an Arduino Nano microcontroller, an RTC DS3231 real-time clock module, a buzzer, and a 5V power supply. The circuit is designed to interface the Arduino Nano with the RTC module for timekeeping and to control a buzzer. The power supply provides the necessary voltage to the components.
Component List
RTC DS3231
- Description: Real-Time Clock Module
- Pins: 32K, SQW, SCL, SDA, VCC, GND
- Purpose: Provides accurate timekeeping for the circuit.
Arduino Nano
- Description: Microcontroller Board
- Pins: D1/TX, D0/RX, RESET, GND, D2, D3, D4, D5, D6, D7, D8, D9, D10, D11/MOSI, D12/MISO, VIN, 5V, A7, A6, A5, A4, A3, A2, A1, A0, AREF, 3V3, D13/SCK
- Purpose: Acts as the main controller for the circuit, executing the embedded code.
Buzzer
- Description: Simple Buzzer
- Pins: PIN, GND
- Purpose: Provides audible alerts.
POWER SUPPLY 5V 5AMP
- Description: Power Supply Unit
- Pins: 220V Positive Pole (AC), 220V Negative Pole (AC), GND, GND (DC), 12V-24V Output (DC)
- Purpose: Supplies 5V DC power to the circuit components.
Power 220V
- Description: AC Power Source
- Pins: hot wire, neutral wire
- Purpose: Provides 220V AC power to the power supply unit.
Wiring Details
RTC DS3231
- SCL connected to A5 of Arduino Nano
- SDA connected to A4 of Arduino Nano
- VCC connected to 12V-24V Output (DC) of Power Supply
- GND connected to GND (DC) of Power Supply
Arduino Nano
- A5 connected to SCL of RTC DS3231
- A4 connected to SDA of RTC DS3231
- 5V connected to 12V-24V Output (DC) of Power Supply
- GND connected to GND (DC) of Power Supply
- D5 connected to PIN of Buzzer
Buzzer
- PIN connected to D5 of Arduino Nano
- GND connected to GND (DC) of Power Supply
POWER SUPPLY 5V 5AMP
- 12V-24V Output (DC) connected to 5V of Arduino Nano and VCC of RTC DS3231
- GND (DC) connected to GND of Arduino Nano, GND of RTC DS3231, and GND of Buzzer
- 220V Positive Pole (AC) connected to hot wire of Power 220V
- 220V Negative Pole (AC) connected to neutral wire of Power 220V
Power 220V
- hot wire connected to 220V Positive Pole (AC) of Power Supply
- neutral wire connected to 220V Negative Pole (AC) of Power Supply
Documented Code
Arduino Nano Code (sketch.ino)
void setup() {
  // put your setup code here, to run once:

}

void loop() {
  // put your main code here, to run repeatedly:

}
Additional Documentation (documentation.txt)