NodeMCU ESP8266 with DHT-22 and HC-SR04 Ultrasonic Sensor Monitoring System
Circuit Documentation
Summary
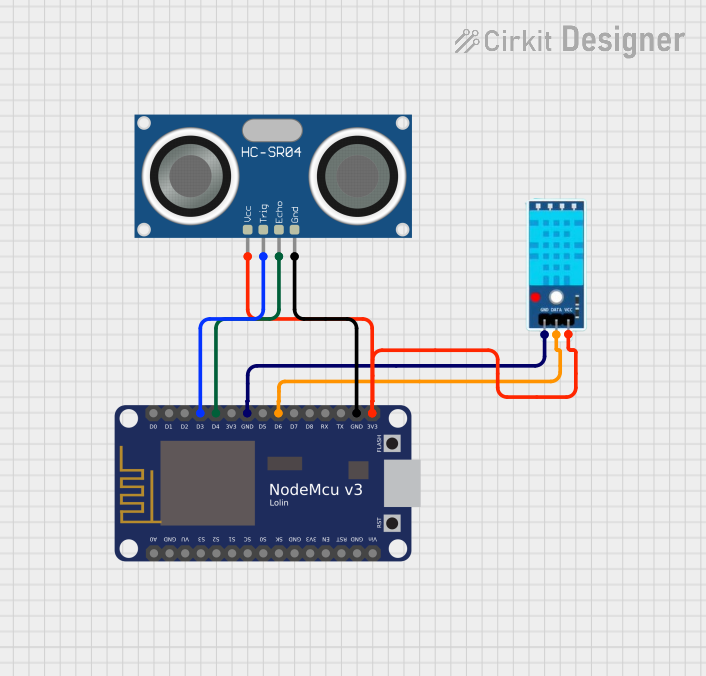
The circuit in question consists of a NodeMCU V3 ESP8266 microcontroller interfaced with a DHT-22 temperature and humidity sensor and an HC-SR04 ultrasonic distance sensor. The NodeMCU V3 ESP8266 serves as the central processing unit, reading data from the DHT-22 sensor and controlling the operation of the HC-SR04 sensor. The circuit is designed to measure environmental parameters and distances, which can be used in a variety of applications such as home automation, environmental monitoring, and proximity detection.
Component List
NodeMCU V3 ESP8266
- Description: A WiFi-enabled microcontroller based on the ESP8266 chipset, featuring digital I/O pins, analog input, and serial communication capabilities.
- Pins: A0, GND, VU, S3, S2, S1, SC, S0, SK, 3V3, EN, RST, Vin, D0, D1, D2, D3, D4, D5, D6, D7, D8, RX, TX
DHT-22
- Description: A digital temperature and humidity sensor with a calibrated digital signal output.
- Pins: GND, DATA, VCC
HC-SR04 Ultrasonic Sensor
- Description: An ultrasonic distance sensor capable of measuring distances by emitting ultrasonic waves and measuring the time taken for the echo to return.
- Pins: VCC, TRIG, ECHO, GND
Wiring Details
NodeMCU V3 ESP8266
- GND connected to DHT-22 GND and HC-SR04 GND
- D3 connected to HC-SR04 TRIG
- D4 connected to HC-SR04 ECHO
- D6 connected to DHT-22 DATA
- 3V3 connected to HC-SR04 VCC and DHT-22 VCC
DHT-22
- GND connected to NodeMCU V3 ESP8266 GND
- DATA connected to NodeMCU V3 ESP8266 D6
- VCC connected to NodeMCU V3 ESP8266 3V3
HC-SR04 Ultrasonic Sensor
- VCC connected to NodeMCU V3 ESP8266 3V3
- TRIG connected to NodeMCU V3 ESP8266 D3
- ECHO connected to NodeMCU V3 ESP8266 D4
- GND connected to NodeMCU V3 ESP8266 GND
Documented Code
The following code is intended for the NodeMCU V3 ESP8266 microcontroller. It is written in the Arduino programming language (based on C/C++) and is used to initialize the microcontroller and define the main operational loop.
void setup() {
  // put your setup code here, to run once:

}

void loop() {
  // put your main code here, to run repeatedly:

}
The setup() function is called once when the microcontroller is first powered on or reset. It is used to initialize the digital pins and set up communication protocols.
The loop() function is called repeatedly after setup() has finished. It is the main part of the program and is used to implement the sensor reading and control logic.
Note: The provided code is a template and does not contain any specific functionality. To make the circuit operational, the code needs to be completed with instructions for reading from the DHT-22 sensor, triggering the HC-SR04 sensor, and processing the signals from both sensors.