
Arduino and ESP32 CAM Controlled Robotic System with Motor and Servo Integration
View and Edit Project In Cirkit Designer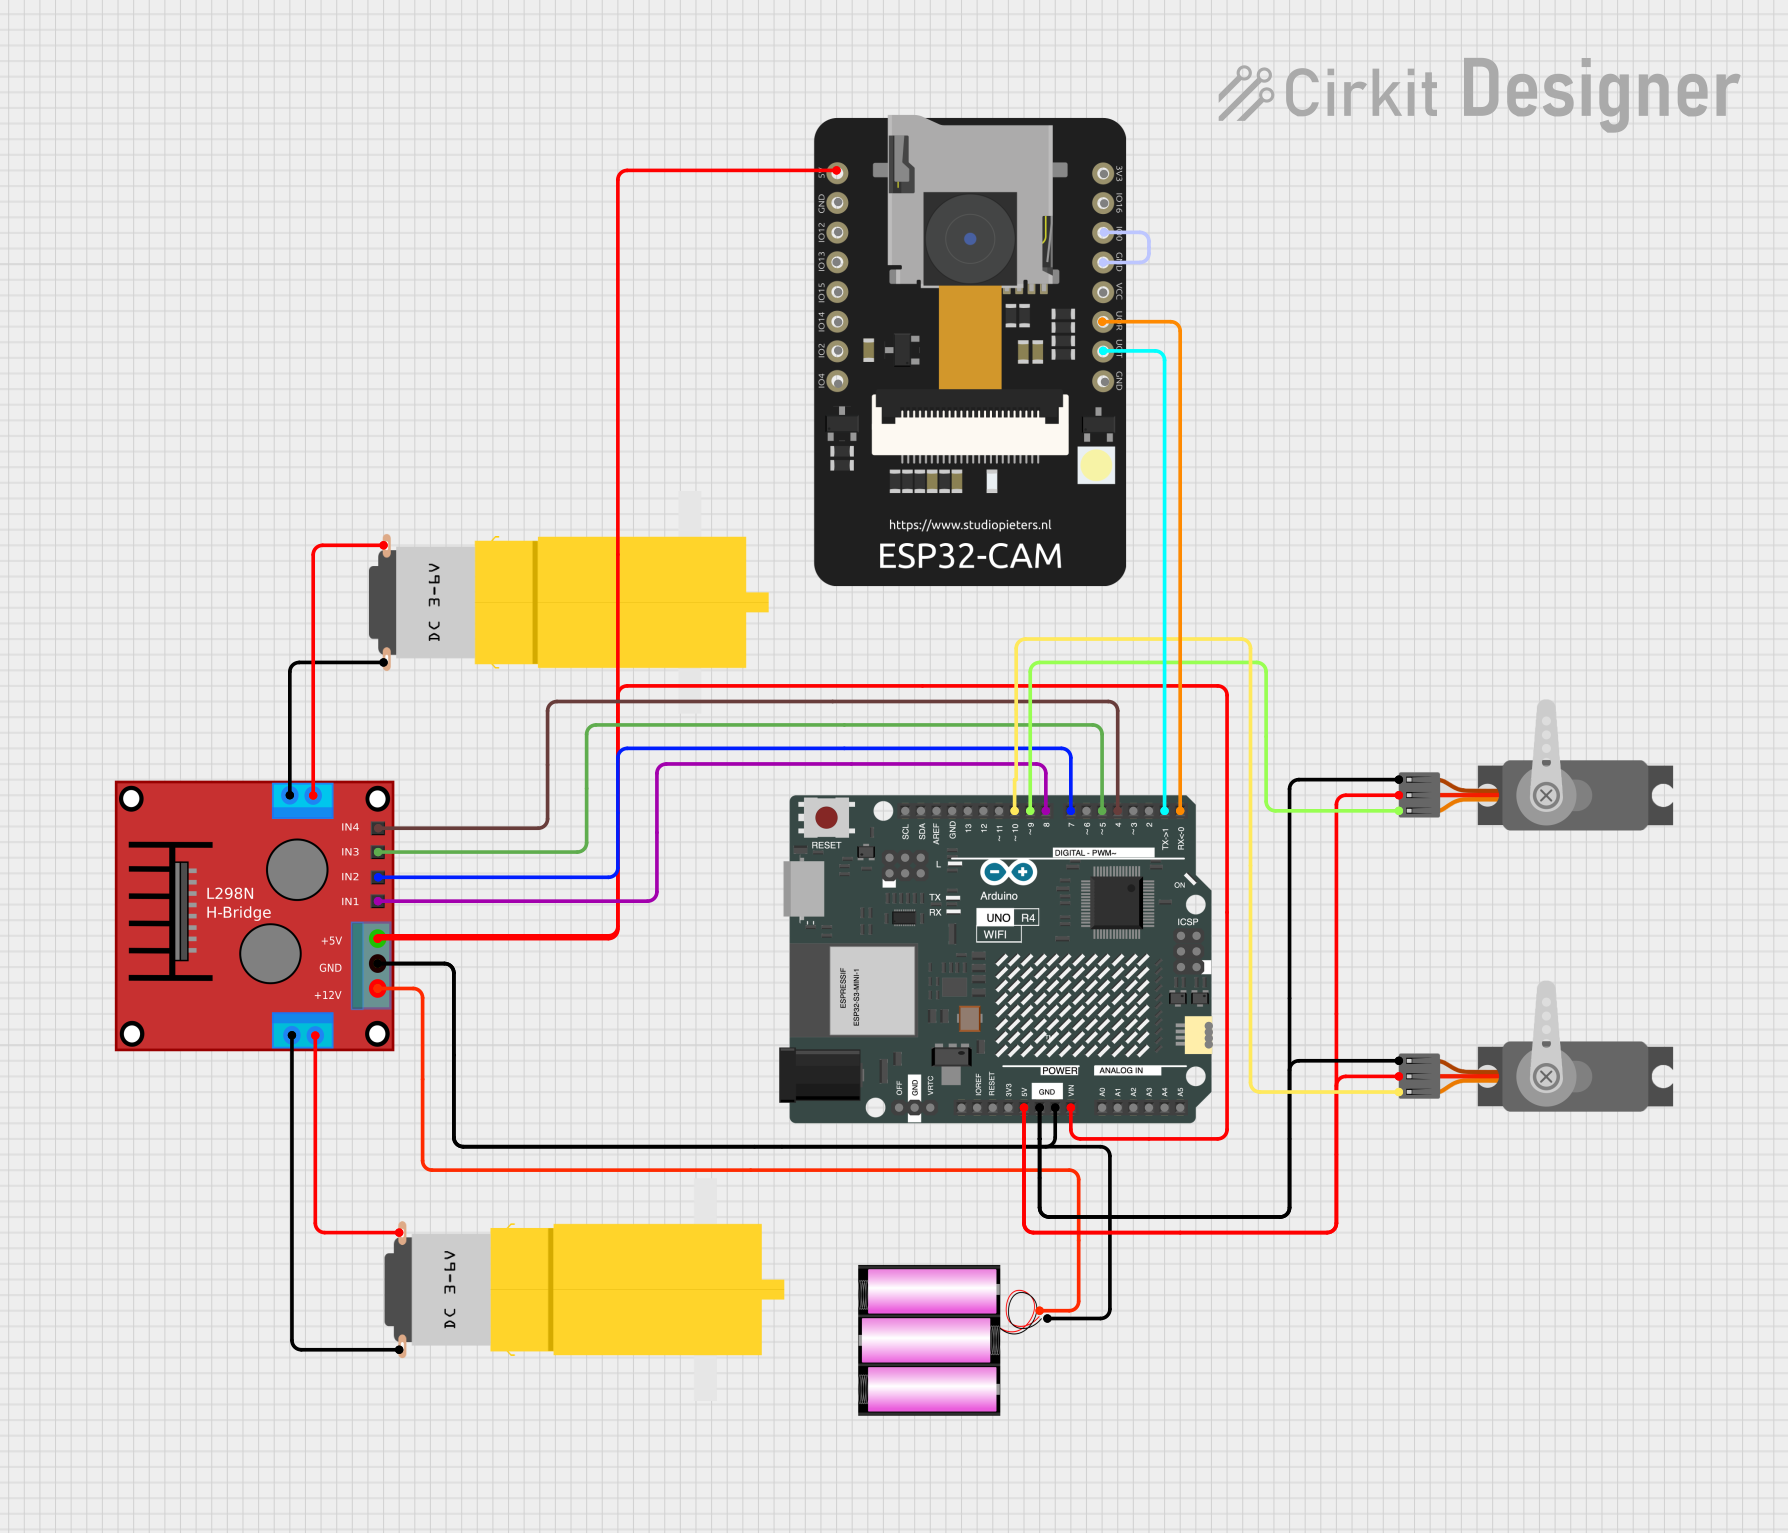
Circuit Documentation
Summary
This document provides a detailed overview of a circuit that includes various components such as an H-bridge motor driver, hobby motors, a 12V battery, servos, an Arduino UNO R4 WiFi, and an ESP32 CAM. The circuit is designed to control motors and servos using the Arduino and ESP32 microcontrollers.
Component List
H-Bridge Motor Driver (ponte h)
- Description: Motor driver for controlling two DC motors.
- Pins: OUT4-Motor2, OUT3-Motor2, OUT2-Motor1, OUT1-Motor1, 5V, GND, 12V, IN3, IN1, IN2, IN4
Hobby Motor (Motor amarillo motorreductor hobby)
- Description: Small DC motor with gear reduction.
- Pins: vcc, GND
12V Battery (battery 12v)
- Description: Power source for the circuit.
- Pins: +, -
Servo (Wokwi Compatible)
- Description: Servo motor for precise control of angular position.
- Pins: GND, V+, PWM
Arduino UNO R4 WiFi
- Description: Microcontroller board with WiFi capabilities.
- Pins: OFF, GND, VRTC, IIC0_SCL, IIC0_SDA, 3V3, GPIO 41, GPIO 0, GPIO 42, GPIO 43, GPIO 44, BOOT, IOREF, RESET, 5V, VIN, A0, A1, A2, A3, A4, A5, RSPCKA, CIPO, COPI, D0/RX, D1/TX, D2, D3, D4, D5, D6, D7, D8, D9, D10, D11, D12, D13, AREF, SDA, SCL
ESP32 CAM
- Description: Camera module with WiFi capabilities.
- Pins: 5V, GND, GPIO12, GPIO13, GPIO15, GPIO14, GPIO2, GPIO4, 3.3V, GPIO16, GPIO0, 3.3V / 5V / P_OUT, GPIO3 / RX, GPIO1 / TX
Wiring Details
H-Bridge Motor Driver (ponte h)
- GND connected to GND of 12V Battery and GND of Arduino UNO R4 WiFi
- 5V connected to 5V of ESP32 CAM and VIN of Arduino UNO R4 WiFi
- IN4 connected to D4 of Arduino UNO R4 WiFi
- IN3 connected to D5 of Arduino UNO R4 WiFi
- IN2 connected to D7 of Arduino UNO R4 WiFi
- IN1 connected to D8 of Arduino UNO R4 WiFi
- OUT4-Motor2 connected to GND of Hobby Motor
- OUT3-Motor2 connected to vcc of Hobby Motor
- OUT2-Motor1 connected to GND of Hobby Motor
- OUT1-Motor1 connected to vcc of Hobby Motor
- 12V connected to + of 12V Battery
Hobby Motor (Motor amarillo motorreductor hobby)
- GND connected to OUT4-Motor2 of H-Bridge Motor Driver
- vcc connected to OUT3-Motor2 of H-Bridge Motor Driver
Hobby Motor (Motor amarillo motorreductor hobby)
- GND connected to OUT2-Motor1 of H-Bridge Motor Driver
- vcc connected to OUT1-Motor1 of H-Bridge Motor Driver
12V Battery (battery 12v)
- - connected to GND of H-Bridge Motor Driver and GND of Arduino UNO R4 WiFi
- + connected to 12V of H-Bridge Motor Driver
Servo (Wokwi Compatible)
- V+ connected to 5V of Arduino UNO R4 WiFi
- GND connected to GND of Arduino UNO R4 WiFi
- PWM connected to D9 of Arduino UNO R4 WiFi
Servo (Wokwi Compatible)
- V+ connected to 5V of Arduino UNO R4 WiFi
- GND connected to GND of Arduino UNO R4 WiFi
- PWM connected to D10 of Arduino UNO R4 WiFi
Arduino UNO R4 WiFi
- GND connected to GND of 12V Battery and GND of H-Bridge Motor Driver
- VIN connected to 5V of H-Bridge Motor Driver
- D0/RX connected to GPIO3 / RX of ESP32 CAM
- D1/TX connected to GPIO1 / TX of ESP32 CAM
- D4 connected to IN4 of H-Bridge Motor Driver
- D5 connected to IN3 of H-Bridge Motor Driver
- D7 connected to IN2 of H-Bridge Motor Driver
- D8 connected to IN1 of H-Bridge Motor Driver
- D9 connected to PWM of Servo
- D10 connected to PWM of Servo
ESP32 CAM
- 5V connected to 5V of H-Bridge Motor Driver
- GND connected to GND of Arduino UNO R4 WiFi
- GPIO3 / RX connected to D0/RX of Arduino UNO R4 WiFi
- GPIO1 / TX connected to D1/TX of Arduino UNO R4 WiFi
- GPIO0 connected to GND of ESP32 CAM
Documented Code
Arduino UNO R4 WiFi Code (sketch.ino)
void setup() {
  // put your setup code here, to run once:

}

void loop() {
  // put your main code here, to run repeatedly:

}
Additional Documentation (documentation.txt)