
Arduino UNO Controlled Servo with Ultrasonic Sensor and Buzzer Feedback
View and Edit Project In Cirkit Designer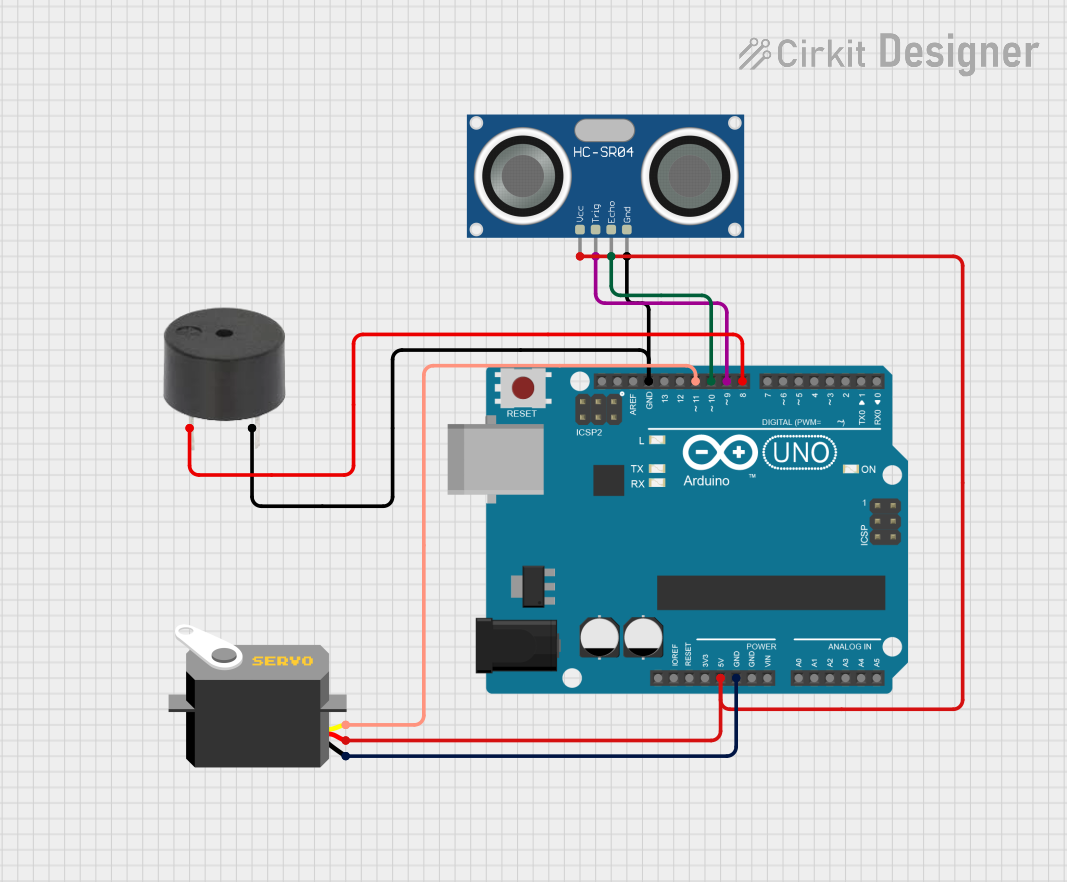
Circuit Documentation
Summary
The circuit in question is designed around an Arduino UNO microcontroller, which serves as the central processing unit. The circuit includes a servo motor, a buzzer, and an HC-SR04 ultrasonic sensor. The Arduino UNO controls the servo and receives input from the ultrasonic sensor, while the buzzer is used for audible feedback. The power for the servo and the sensor is supplied by the Arduino's 5V output, and all components share a common ground.
Component List
Arduino UNO
- Description: A microcontroller board based on the ATmega328P.
- Purpose: Acts as the central controller for the circuit, interfacing with the sensor, driving the servo, and controlling the buzzer.
- Pins: UNUSED, IOREF, Reset, 3.3V, 5V, GND, Vin, A0-A5, SCL, SDA, AREF, D0-D13.
Servo
- Description: A rotary actuator or linear actuator that allows for precise control of angular or linear position.
- Purpose: Receives PWM signals from the Arduino to move to a specified position.
- Pins: gnd, vcc, pulse.
Buzzer
- Description: An electronic device that emits sound.
- Purpose: Provides audible feedback when triggered by the Arduino.
- Pins: PIN, GND.
HC-SR04 Ultrasonic Sensor
- Description: An ultrasonic ranging module that provides 2cm to 400cm non-contact measurement functionality.
- Purpose: Measures distances by emitting ultrasonic waves and measuring the time taken for the echo to return.
- Pins: VCC, TRIG, ECHO, GND.
Wiring Details
Arduino UNO
- 5V connected to Servo (vcc) and HC-SR04 Ultrasonic Sensor (VCC).
- GND connected to Servo (gnd), Buzzer (GND), and HC-SR04 Ultrasonic Sensor (GND).
- D11 connected to Servo (pulse).
- D10 connected to HC-SR04 Ultrasonic Sensor (ECHO).
- D9 connected to HC-SR04 Ultrasonic Sensor (TRIG).
- D8 connected to Buzzer (PIN).
Servo
- vcc connected to Arduino UNO (5V).
- gnd connected to Arduino UNO (GND).
- pulse connected to Arduino UNO (D11).
Buzzer
- PIN connected to Arduino UNO (D8).
- GND connected to Arduino UNO (GND).
HC-SR04 Ultrasonic Sensor
- VCC connected to Arduino UNO (5V).
- TRIG connected to Arduino UNO (D9).
- ECHO connected to Arduino UNO (D10).
- GND connected to Arduino UNO (GND).
Documented Code
Arduino UNO Code (sketch.ino)
void setup() {
  // put your setup code here, to run once:

}

void loop() {
  // put your main code here, to run repeatedly:

}
Note: The provided code is a template and does not include specific functionality. It needs to be populated with the logic to control the servo, read the ultrasonic sensor, and activate the buzzer based on the desired application.