
Arduino UNO-Based Smart Car Parking System with IR Sensors and Servo Control
View and Edit Project In Cirkit Designer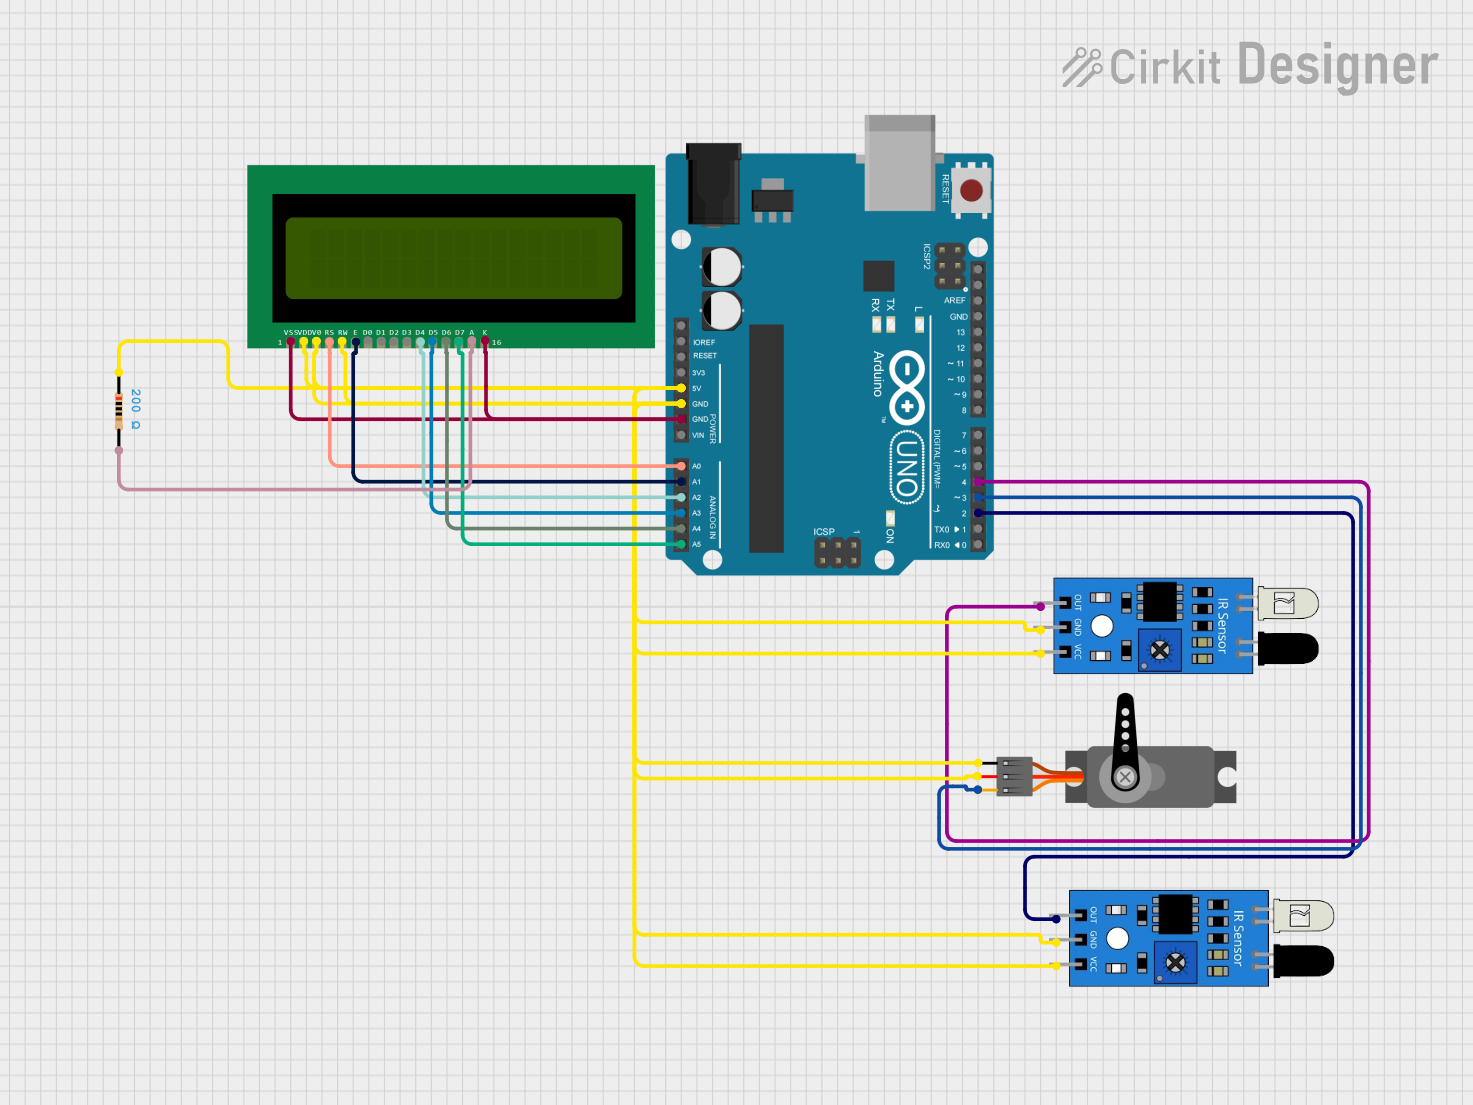
Circuit Documentation
Summary
This circuit is designed to manage a car parking system. It uses two IR sensors to detect the presence of cars, a servo motor to control a gate, and an LCD to display the status of available parking spaces. The entire system is controlled by an Arduino UNO microcontroller.
Component List
IR Sensor
- Description: Infrared sensor used to detect the presence of a car.
- Pins: out, gnd, vcc
Servo
- Description: Servo motor used to control the gate.
- Pins: GND, VCC, PWM
Arduino UNO
- Description: Microcontroller used to control the entire system.
- Pins: UNUSED, IOREF, Reset, 3.3V, 5V, GND, Vin, A0, A1, A2, A3, A4, A5, SCL, SDA, AREF, D13, D12, D11, D10, D9, D8, D7, D6, D5, D4, D3, D2, D1, D0
16X2 LCD
- Description: LCD display used to show the status of available parking spaces.
- Pins: VSS, VDD, V0, RS, RW, E, D1, D0, D2, D3, D4, D6, D5, D7, A, K
Resistor
- Description: Resistor used to limit current.
- Pins: pin1, pin2
- Properties: Resistance: 200 Ohms
Wiring Details
IR Sensor 1
- out connected to D2 of Arduino UNO
- gnd connected to GND of Arduino UNO
- vcc connected to 5V of Arduino UNO
IR Sensor 2
- out connected to D4 of Arduino UNO
- gnd connected to GND of Arduino UNO
- vcc connected to 5V of Arduino UNO
Servo
- GND connected to GND of Arduino UNO
- VCC connected to 5V of Arduino UNO
- PWM connected to D3 of Arduino UNO
Arduino UNO
- 5V connected to VCC of IR Sensor 1, IR Sensor 2, Servo, and 16X2 LCD
- GND connected to GND of IR Sensor 1, IR Sensor 2, Servo, and 16X2 LCD
- A0 connected to RS of 16X2 LCD
- A1 connected to E of 16X2 LCD
- A2 connected to D4 of 16X2 LCD
- A3 connected to D5 of 16X2 LCD
- A4 connected to D6 of 16X2 LCD
- A5 connected to D7 of 16X2 LCD
- D2 connected to out of IR Sensor 1
- D3 connected to PWM of Servo
- D4 connected to out of IR Sensor 2
16X2 LCD
- VSS connected to GND of Arduino UNO
- VDD connected to 5V of Arduino UNO
- V0 connected to 5V of Arduino UNO
- RS connected to A0 of Arduino UNO
- RW connected to 5V of Arduino UNO
- E connected to A1 of Arduino UNO
- D4 connected to A2 of Arduino UNO
- D5 connected to A3 of Arduino UNO
- D6 connected to A4 of Arduino UNO
- D7 connected to A5 of Arduino UNO
- A connected to pin2 of Resistor
- K connected to GND of Arduino UNO
Resistor
- pin1 connected to 5V of Arduino UNO
- pin2 connected to A of 16X2 LCD
Code Documentation
#include <LiquidCrystal.h> // initialize the library with the numbers of the interface pins
LiquidCrystal lcd(A0, A1, A2, A3, A4, A5);
#include <Servo.h> // includes the servo library

Servo myservo1;

int ir_s1 = 2;
int ir_s2 = 4;

int Total = 5;
int Space;

int flag1 = 0;
int flag2 = 0;

void setup() {
    pinMode(ir_s1, INPUT);
    pinMode(ir_s2, INPUT);

    myservo1.attach(3);
    myservo1.write(100);

    lcd.begin(16, 2);
    lcd.setCursor(0, 0);
    lcd.print("  Car  Parking  ");
    lcd.setCursor(0, 1);
    lcd.print("     System     ");
    delay(2000);
    lcd.clear();

    Space = Total;
}

void loop() {
    if (digitalRead(ir_s1) == LOW && flag1 == 0) {
        if (Space > 0) {
            flag1 = 1;
            if (flag2 == 0) {
                myservo1.write(0);
                Space = Space - 1;
            }
        } else {
            lcd.setCursor(0, 0);
            lcd.print(" Sorry not Space ");
            lcd.setCursor(0, 1);
            lcd.print("    Available    ");
            delay(1000);
            lcd.clear();
        }
    }

    if (digitalRead(ir_s2) == LOW && flag2 == 0) {
        flag2 = 1;
        if (flag1 == 0) {
            myservo1.write(0);
            Space = Space + 1;
        }
    }

    if (flag1 == 1 && flag2 == 1) {
        delay(1000);
        myservo1.write(100);
        flag1 = 0;
        flag2 = 0;
    }

    lcd.setCursor(0, 0);
    lcd.print("Total Space: ");
    lcd.print(Total);

    lcd.setCursor(0, 1);
    lcd.print("Have  Space: ");
    lcd.print(Space);
}
This code initializes the LCD and servo motor, sets up the IR sensors as inputs, and continuously checks the status of the IR sensors to update the available parking spaces and control the servo motor accordingly. The LCD displays the total and available parking spaces.