
Arduino UNO RFID Security System with LCD Display and Buzzer
View and Edit Project In Cirkit Designer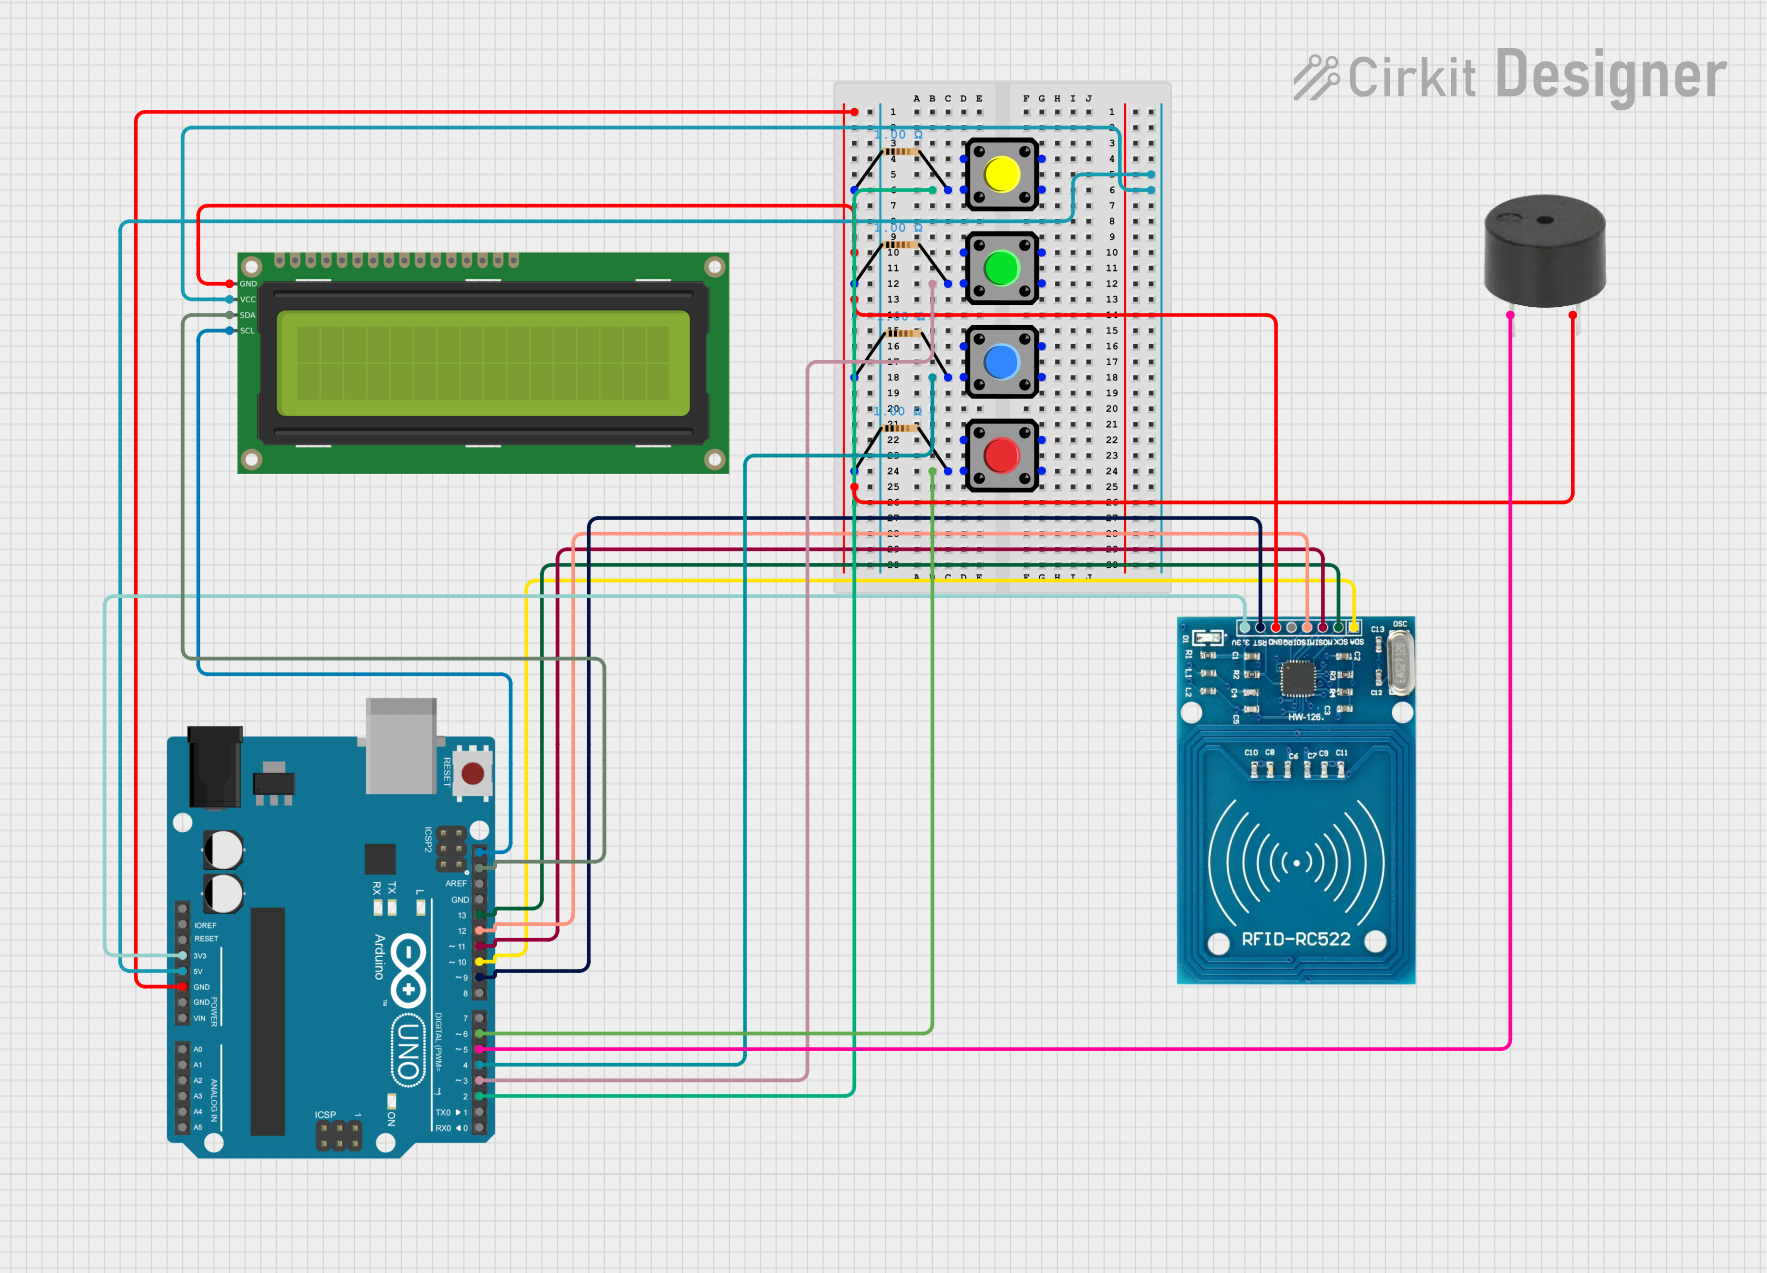
Circuit Documentation
Summary
This circuit is designed to interface an RFID reader (RFID-RC522) with an Arduino UNO, along with a 16x2 I2C LCD display, multiple pushbuttons, a buzzer, and several resistors. The Arduino UNO serves as the central microcontroller, managing inputs from the pushbuttons and RFID reader, and outputs to the LCD display and buzzer.
Component List
RFID-RC522
- Pins: VCC (3.3V), RST, GND, IRQ, MISO, MOSI, SCK, SDA
- Description: RFID reader module
- Purpose: To read RFID tags
Buzzer
- Pins: PIN, GND
- Description: Piezoelectric buzzer
- Purpose: To provide audible feedback
Pushbutton
- Pins: Pin 2, Pin 1, Pin 3, Pin 4
- Description: Momentary pushbutton switch
- Purpose: To provide user input
Resistor (1 Ohm)
- Pins: pin1, pin2
- Description: Resistor with 1 Ohm resistance
- Purpose: To limit current
Resistor (100 Ohms)
- Pins: pin1, pin2
- Description: Resistor with 100 Ohms resistance
- Purpose: To limit current
Arduino UNO
- Pins: UNUSED, IOREF, Reset, 3.3V, 5V, GND, Vin, A0, A1, A2, A3, A4, A5, SCL, SDA, AREF, D13, D12, D11, D10, D9, D8, D7, D6, D5, D4, D3, D2, D1, D0
- Description: Microcontroller board
- Purpose: To control the circuit
16x2 I2C LCD
- Pins: GND, VCC, SDA, SCL
- Description: 16x2 character LCD with I2C interface
- Purpose: To display information
Wiring Details
RFID-RC522
- VCC (3.3V) connected to Arduino UNO 3.3V
- RST connected to Arduino UNO D9
- GND connected to Arduino UNO GND
- MISO connected to Arduino UNO D12
- MOSI connected to Arduino UNO D11
- SCK connected to Arduino UNO D13
- SDA connected to Arduino UNO D10
Buzzer
- PIN connected to Arduino UNO D5
- GND connected to Arduino UNO GND
Pushbutton 1
- Pin 3 connected to Resistor pin2 and Arduino UNO D2
- Pin 1 connected to GND
Pushbutton 2
- Pin 3 connected to Resistor pin2 and Arduino UNO D3
- Pin 1 connected to GND
Pushbutton 3
- Pin 3 connected to Resistor pin2 and Arduino UNO D4
- Pin 1 connected to GND
Pushbutton 4
- Pin 3 connected to Resistor pin2 and Arduino UNO D6
- Pin 1 connected to GND
Resistors
- Resistor 1 (1 Ohm) pin1 connected to GND, pin2 connected to Pushbutton 1 Pin 3
- Resistor 2 (100 Ohms) pin1 connected to GND, pin2 connected to Pushbutton 2 Pin 3
- Resistor 3 (1 Ohm) pin1 connected to GND, pin2 connected to Pushbutton 3 Pin 3
- Resistor 4 (1 Ohm) pin1 connected to GND, pin2 connected to Pushbutton 4 Pin 3
Arduino UNO
- GND connected to Resistor pin1, 16x2 I2C LCD GND, RFID-RC522 GND, Buzzer GND
- 5V connected to 16x2 I2C LCD VCC
- 3.3V connected to RFID-RC522 VCC (3.3V)
- SCL connected to 16x2 I2C LCD SCL
- SDA connected to 16x2 I2C LCD SDA
16x2 I2C LCD
- GND connected to Arduino UNO GND
- VCC connected to Arduino UNO 5V
- SCL connected to Arduino UNO SCL
- SDA connected to Arduino UNO SDA
Code Documentation
Arduino UNO Code
void setup() {
  // put your setup code here, to run once:

}

void loop() {
  // put your main code here, to run repeatedly:

}
This code is a basic template for the Arduino UNO. The setup() function is where you initialize your components and settings, and the loop() function is where the main logic of your program runs repeatedly.