Arduino Nano Based Weighing Scale with LCD Display
Circuit Documentation
Summary
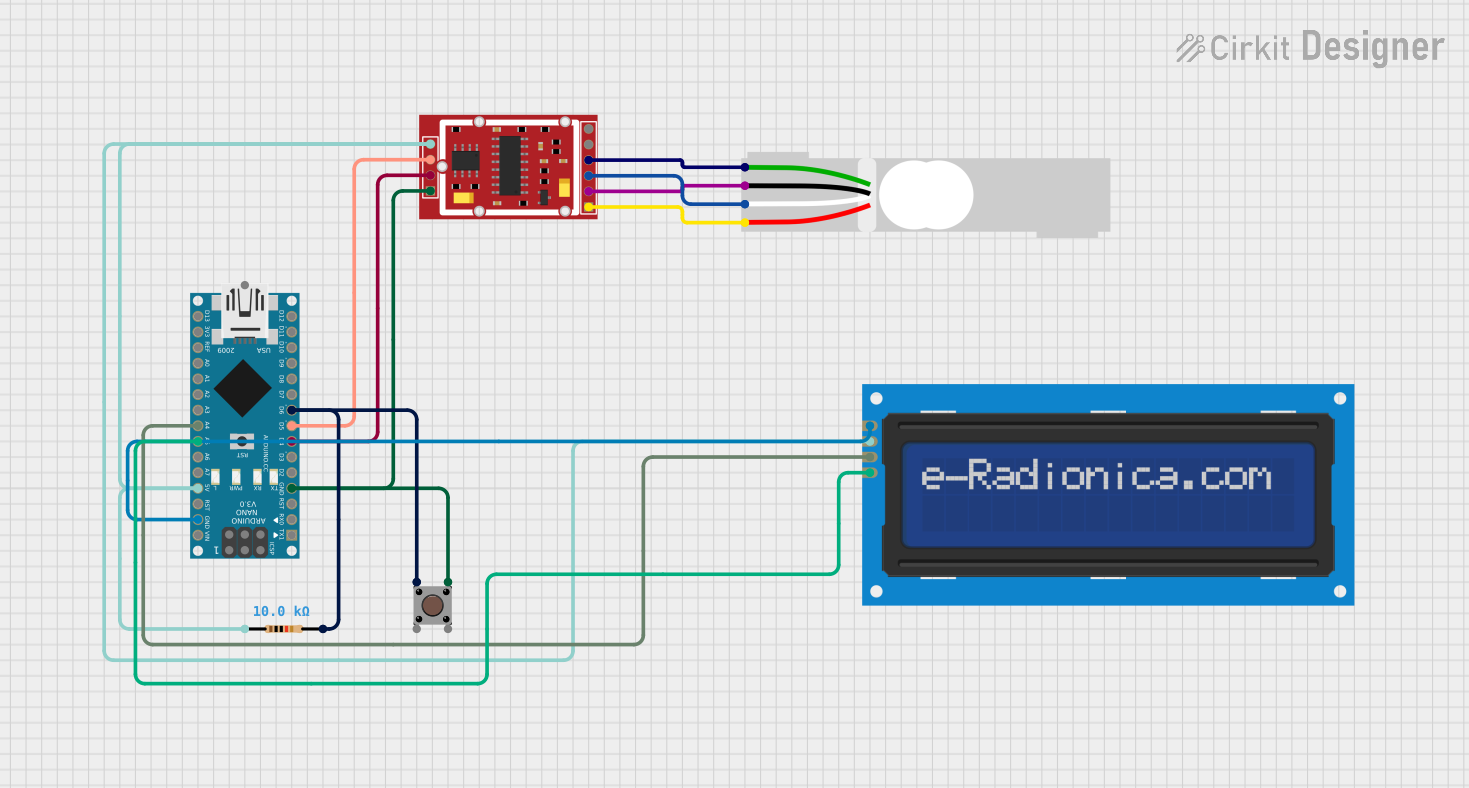
This circuit integrates an Arduino Nano microcontroller with an HX711 Weighing Sensor Module and a Load Cell to create a digital weighing system. The system also includes a 16x2 LCD screen with an I2C interface for displaying measurements and a pushbutton for user interaction. A resistor is used for pull-up or pull-down purposes on the pushbutton. The Arduino Nano is programmed to control the HX711 for reading the Load Cell measurements and to update the LCD screen accordingly.
Component List
Arduino Nano
- Microcontroller board based on the ATmega328P
- Provides a variety of digital and analog I/O pins
- Can be powered via USB or an external power supply
HX711 Weighing Sensor Module
- 24-bit analog-to-digital converter (ADC) designed for weigh scales
- Interfaces with the Load Cell to measure weight
- Provides digital output to the Arduino Nano
Load Cell - Red/white/black/green
- Transducer that converts force into an electrical signal
- Used in conjunction with the HX711 to measure weight
LCD screen 16x2 I2C
- Alphanumeric liquid crystal display
- 16 characters by 2 lines display
- I2C interface for communication with the Arduino Nano
Resistor
- 10,000 Ohms resistance
- Used for pull-up or pull-down configurations
Pushbutton
- Standard tactile switch
- Used for user input to trigger actions in the circuit
Wiring Details
Arduino Nano
GNDconnected to HX711 GND, Pushbutton Pin 3 (out), and LCD GNDD4connected to HX711 DO/RXD5connected to HX711 CK/TXD6connected to one side of the Resistor and Pushbutton Pin 1 (in)5Vconnected to the other side of the Resistor, HX711 VCC, and LCD VCCA5connected to LCD SCLA4connected to LCD SDA
HX711 Weighing Sensor Module
GNDconnected to Arduino Nano GND and Pushbutton Pin 3 (out)DO/RXconnected to Arduino Nano D4CK/TXconnected to Arduino Nano D5VCCconnected to one side of the Resistor and Arduino Nano 5VA-connected to Load Cell A+A+connected to Load Cell A-E-connected to Load Cell E-E+connected to Load Cell E+
Load Cell - Red/white/black/green
E+connected to HX711 E+A-connected to HX711 A+E-connected to HX711 E-A+connected to HX711 A-
LCD screen 16x2 I2C
SCLconnected to Arduino Nano A5SDAconnected to Arduino Nano A4VCCconnected to Arduino Nano 5VGNDconnected to Arduino Nano GND
Resistor
pin1connected to Arduino Nano 5V and HX711 VCCpin2connected to Pushbutton Pin 1 (in) and Arduino Nano D6
Pushbutton
Pin 3 (out)connected to Arduino Nano GND and HX711 GNDPin 1 (in)connected to one side of the Resistor and Arduino Nano D6
Documented Code
Arduino Nano - sketch.ino
void setup() {
  // put your setup code here, to run once:

}

void loop() {
  // put your main code here, to run repeatedly:

}
Arduino Nano - documentation.txt
(No additional documentation provided for the code)
This concludes the documentation for the provided circuit. The code for the Arduino Nano is currently a template and will need to be completed with the logic for interfacing with the HX711 module, reading the Load Cell, debouncing the pushbutton, and updating the LCD screen with the weight measurements.