
ESP8266 NodeMCU Controlled LED Display with TP4056 Battery Charging
View and Edit Project In Cirkit Designer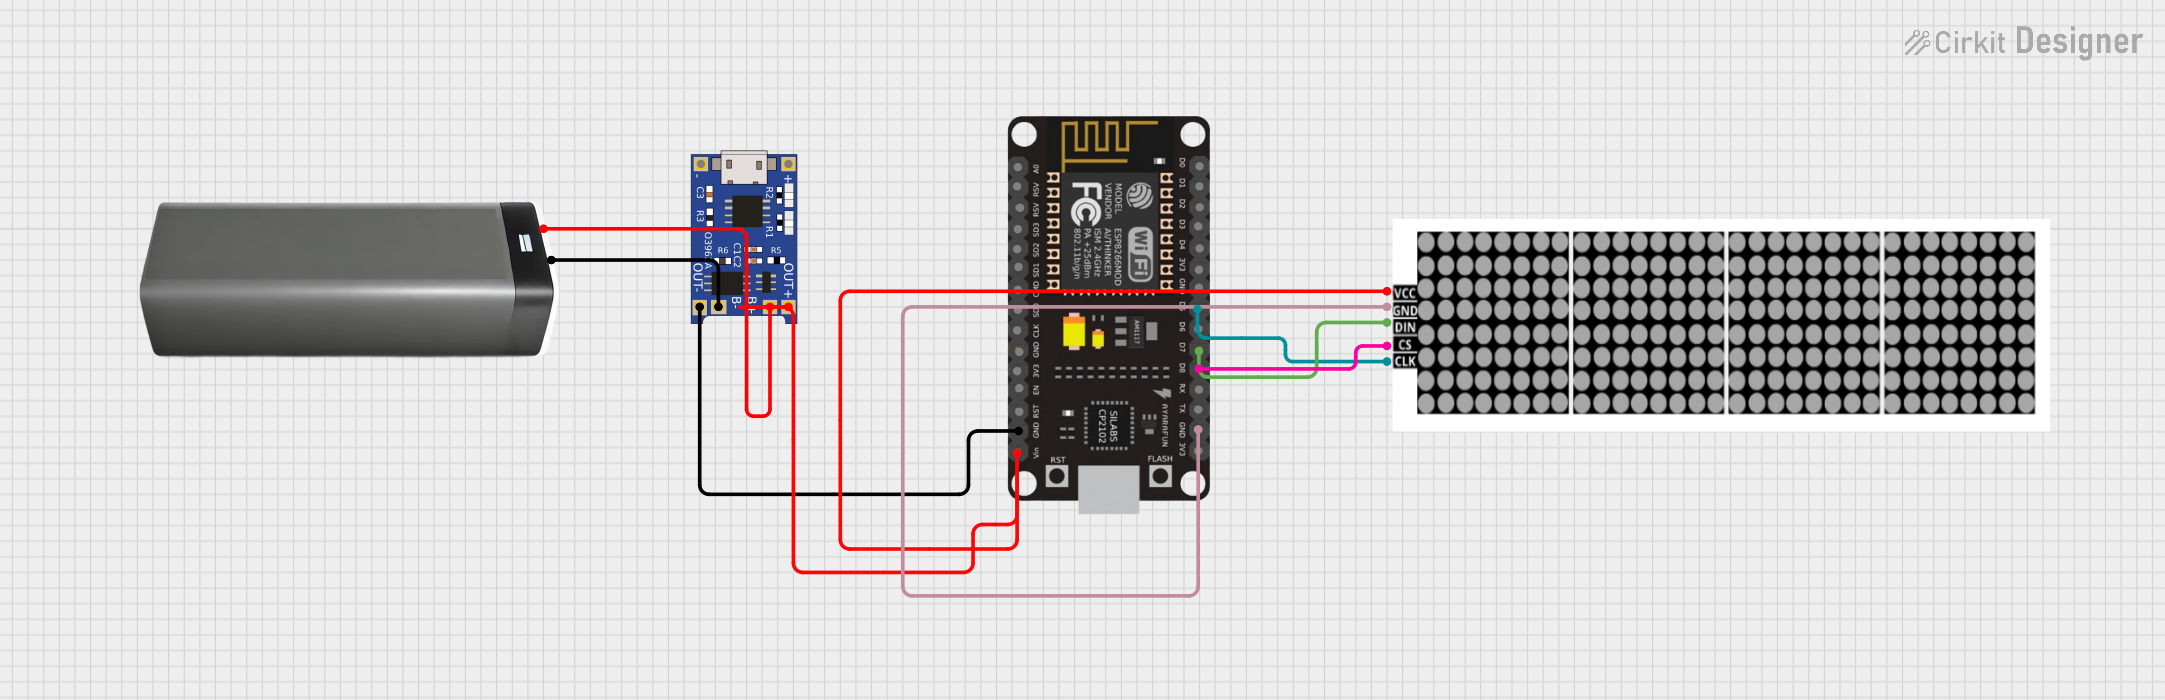
Circuit Documentation
Summary
The circuit in question is designed to interface an ESP8266 NodeMCU microcontroller with a LED Dot Display and a TP4056 lithium battery charger module. The ESP8266 NodeMCU is responsible for controlling the LED Dot Display, while the TP4056 module manages the charging of a connected battery pack. The battery pack provides power to the circuit, and the TP4056 ensures a stable voltage output to power both the microcontroller and the LED display.
Component List
ESP8266 NodeMCU
- Description: A Wi-Fi capable microcontroller module based on the ESP8266 chip.
- Pins: D0, D1, D2, D3, D4, 3V3, GND, D5, D6, D7, D8, RX, TX, A0, RSV, SD3, SD2, SD1, CMD, SD0, CLK, EN, RST, VIN
TP4056
- Description: A lithium battery charger module with a micro USB input for charging and protection circuitry.
- Pins: OUT-, B-, B+, OUT+, IN-, IN+
LED Dot Display
- Description: A matrix LED display module for visual output.
- Pins: VCC, GND, DIN, CS, CLK
Battery Pack
- Description: A power source for the circuit, consisting of one or more batteries.
- Pins: +, -
Wiring Details
ESP8266 NodeMCU
- D5 connected to LED Dot Display CLK
- D7 connected to LED Dot Display DIN
- D8 connected to LED Dot Display CS
- GND connected to LED Dot Display GND and TP4056 OUT-
- VIN connected to TP4056 OUT+
TP4056
- OUT- connected to ESP8266 NodeMCU GND
- B- connected to Battery Pack -
- B+ connected to Battery Pack +
- OUT+ connected to ESP8266 NodeMCU VIN and LED Dot Display VCC
LED Dot Display
- CLK connected to ESP8266 NodeMCU D5
- DIN connected to ESP8266 NodeMCU D7
- CS connected to ESP8266 NodeMCU D8
- GND connected to ESP8266 NodeMCU GND
- VCC connected to TP4056 OUT+
Battery Pack
-
- connected to TP4056 B+
-
- connected to TP4056 B-
Documented Code
Microcontroller Code (ESP8266 NodeMCU)
File: sketch.ino
void setup() {
  // put your setup code here, to run once:

}

void loop() {
  // put your main code here, to run repeatedly:

}
Note: The provided code is a template and does not include specific functionality. It is expected that the user will add code to control the LED Dot Display and manage Wi-Fi connectivity using the ESP8266 NodeMCU's capabilities.