
Arduino-Based Stepper Motor Controller with pH Meter and LCD Display
View and Edit Project In Cirkit Designer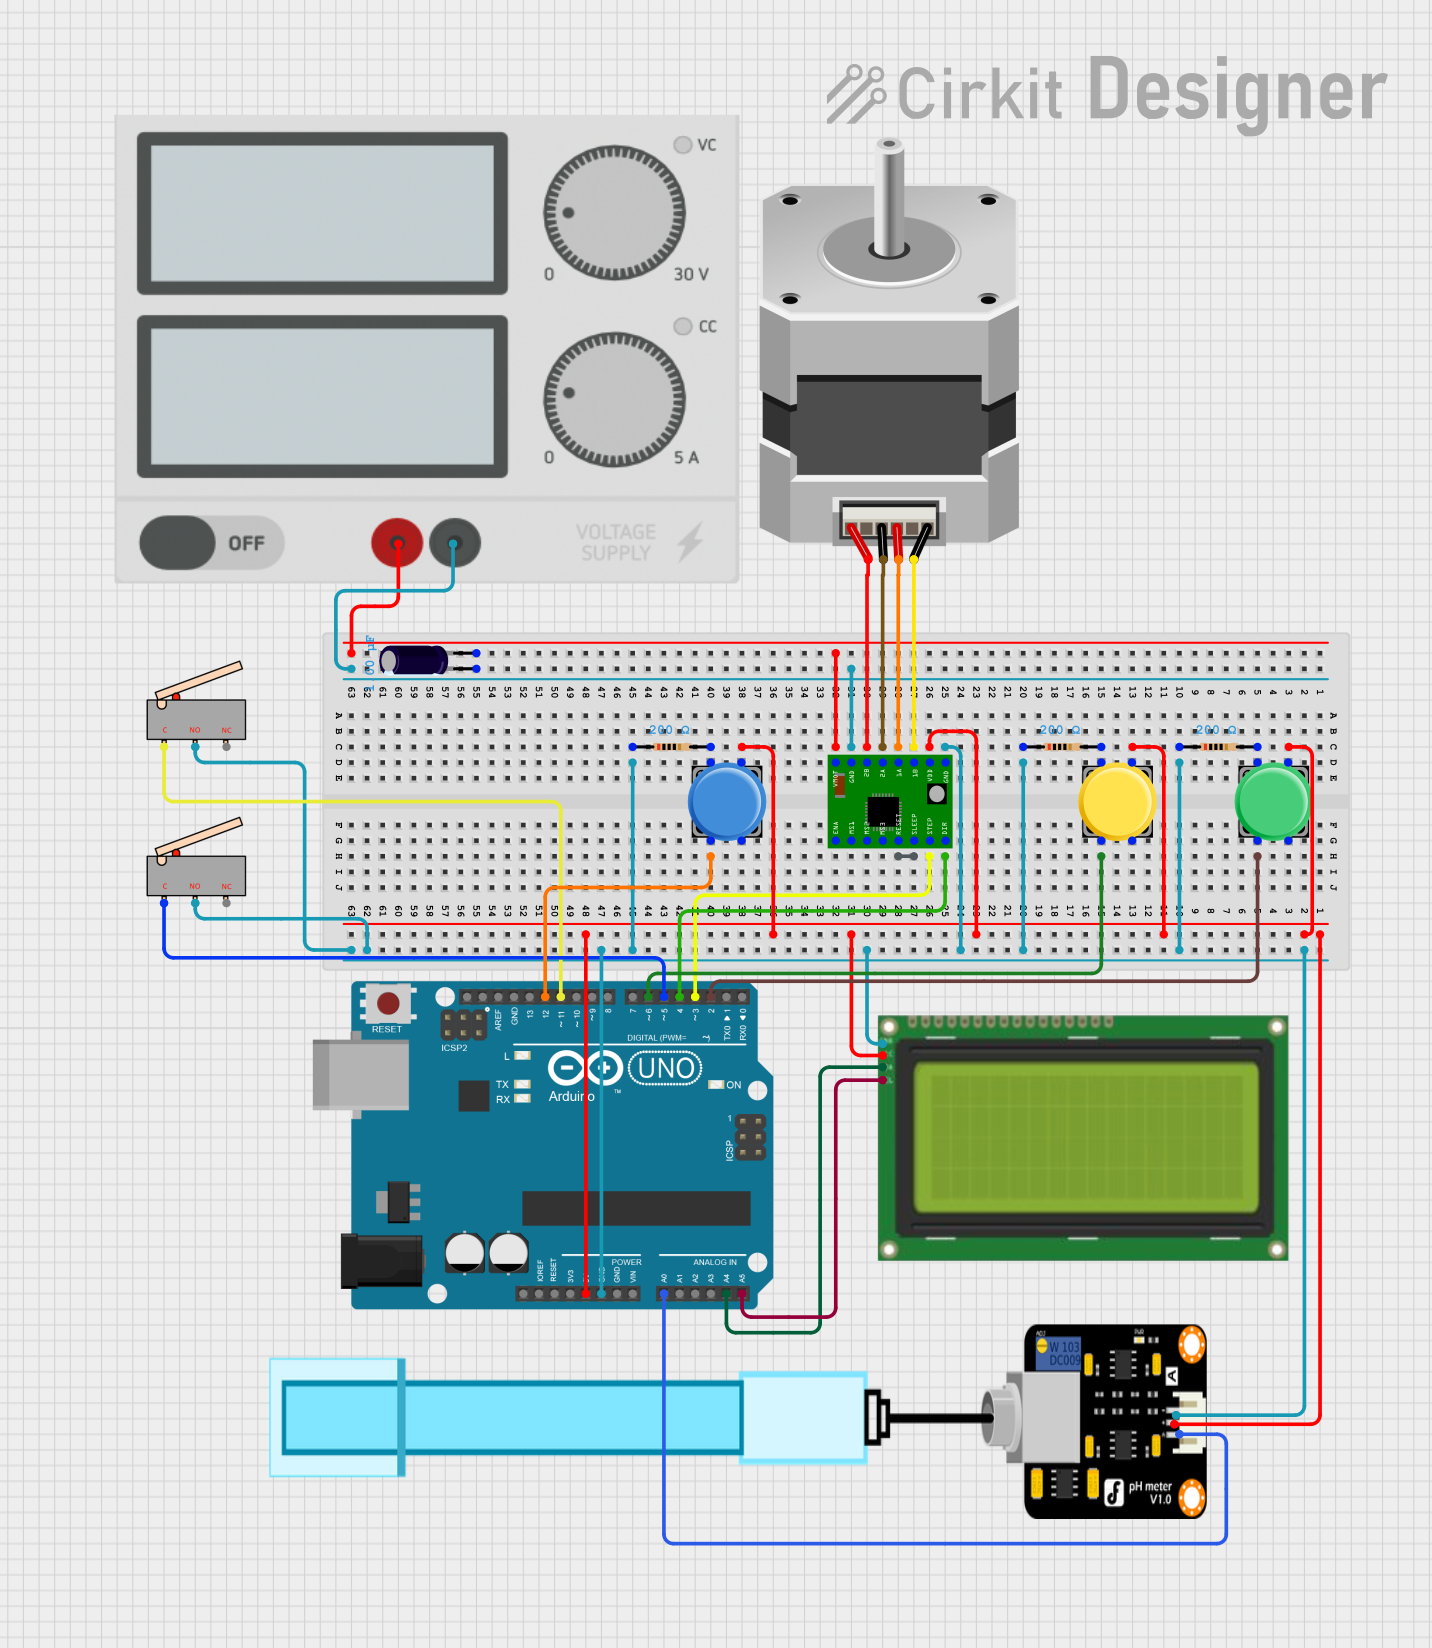
Circuit Documentation
Summary
This circuit is designed to control a stepper motor using an A4988 stepper motor driver, an Arduino UNO, and various other components including pushbuttons, limit switches, a pH meter, and an LCD display. The circuit is powered by a power supply and includes resistors and a capacitor for proper operation.
Component List
A4988 Stepper Motor Driver Carrier
- Pins: ENABLE, MS1, MS2, MS3, RESET, SLEEP, STEP, DIR, GND, VCC, 1B, 1A, 2A, 2B, VMOT
- Description: Stepper motor driver for controlling bipolar stepper motors.
Pushbutton
- Pins: Pin 2, Pin 1, Pin 3, Pin 4
- Description: Simple pushbutton for user input.
Electrolytic Capacitor
- Pins: -, +
- Description: Capacitor for filtering and stabilizing voltage.
- Properties: Capacitance: 0.000001 Farads
Resistor
- Pins: pin1, pin2
- Description: Resistor for current limiting.
- Properties: Resistance: 200 Ohms
Stepper Motor (Bipolar)
- Pins: D, B, C, A
- Description: Bipolar stepper motor for precise control of rotation.
Power Supply
- Pins: +, -
- Description: Power supply for providing necessary voltage and current.
Arduino UNO
- Pins: UNUSED, IOREF, Reset, 3.3V, 5V, GND, Vin, A0, A1, A2, A3, A4, A5, SCL, SDA, AREF, D13, D12, D11, D10, D9, D8, D7, D6, D5, D4, D3, D2, D1, D0
- Description: Microcontroller board for controlling the circuit.
PH Meter
- Pins: Signal, VCC, GND
- Description: pH meter for measuring the pH level of a solution.
Lcd 20x4 i2c
- Pins: GND, 5v, SCA, SCL
- Description: LCD display for showing information.
Limit switch
- Pins: C, NO, NC
- Description: Limit switch for detecting end-of-travel positions.
Wiring Details
A4988 Stepper Motor Driver Carrier
- VCC: Connected to 5V of Arduino UNO, VCC of PH Meter, 5v of LCD 20x4 i2c, and Pin 3 of all Pushbuttons.
- GND: Connected to GND of Arduino UNO, GND of PH Meter, GND of LCD 20x4 i2c, pin1 of all Resistors, and NO of both Limit switches.
- DIR: Connected to D4 of Arduino UNO.
- STEP: Connected to D3 of Arduino UNO.
- 1B: Connected to D of Stepper Motor.
- 1A: Connected to B of Stepper Motor.
- 2A: Connected to C of Stepper Motor.
- 2B: Connected to A of Stepper Motor.
- SLEEP: Connected to RESET of A4988 Stepper Motor Driver Carrier.
- VMOT: Connected to + of Electrolytic Capacitor and + of Power Supply.
- GND: Connected to - of Electrolytic Capacitor and - of Power Supply.
Pushbutton
- Pin 2:
- First Pushbutton: Connected to D2 of Arduino UNO.
- Second Pushbutton: Connected to D6 of Arduino UNO.
- Third Pushbutton: Connected to D12 of Arduino UNO.
- Pin 1:
- First Pushbutton: Connected to pin2 of first Resistor.
- Second Pushbutton: Connected to pin2 of second Resistor.
- Third Pushbutton: Connected to pin2 of third Resistor.
- Pin 3: Connected to VCC of A4988 Stepper Motor Driver Carrier, VCC of PH Meter, 5v of LCD 20x4 i2c, and 5V of Arduino UNO.
Electrolytic Capacitor
- -: Connected to GND of A4988 Stepper Motor Driver Carrier and - of Power Supply.
- +: Connected to VMOT of A4988 Stepper Motor Driver Carrier and + of Power Supply.
Resistor
- pin1: Connected to GND of A4988 Stepper Motor Driver Carrier, GND of PH Meter, GND of LCD 20x4 i2c, GND of Arduino UNO, and NO of both Limit switches.
- pin2:
- First Resistor: Connected to Pin 1 of first Pushbutton.
- Second Resistor: Connected to Pin 1 of second Pushbutton.
- Third Resistor: Connected to Pin 1 of third Pushbutton.
Stepper Motor (Bipolar)
- D: Connected to 1B of A4988 Stepper Motor Driver Carrier.
- B: Connected to 1A of A4988 Stepper Motor Driver Carrier.
- C: Connected to 2A of A4988 Stepper Motor Driver Carrier.
- A: Connected to 2B of A4988 Stepper Motor Driver Carrier.
Power Supply
- +: Connected to + of Electrolytic Capacitor and VMOT of A4988 Stepper Motor Driver Carrier.
- -: Connected to - of Electrolytic Capacitor and GND of A4988 Stepper Motor Driver Carrier.
Arduino UNO
- 5V: Connected to VCC of A4988 Stepper Motor Driver Carrier, VCC of PH Meter, 5v of LCD 20x4 i2c, and Pin 3 of all Pushbuttons.
- GND: Connected to GND of A4988 Stepper Motor Driver Carrier, GND of PH Meter, GND of LCD 20x4 i2c, pin1 of all Resistors, and NO of both Limit switches.
- D2: Connected to Pin 2 of first Pushbutton.
- D3: Connected to STEP of A4988 Stepper Motor Driver Carrier.
- D4: Connected to DIR of A4988 Stepper Motor Driver Carrier.
- D6: Connected to Pin 2 of second Pushbutton.
- D12: Connected to Pin 2 of third Pushbutton.
- A0: Connected to Signal of PH Meter.
- A4: Connected to SCA of LCD 20x4 i2c.
- A5: Connected to SCL of LCD 20x4 i2c.
- D11: Connected to C of first Limit switch.
- D5: Connected to C of second Limit switch.
PH Meter
- VCC: Connected to 5V of Arduino UNO, VCC of A4988 Stepper Motor Driver Carrier, 5v of LCD 20x4 i2c, and Pin 3 of all Pushbuttons.
- GND: Connected to GND of Arduino UNO, GND of A4988 Stepper Motor Driver Carrier, GND of LCD 20x4 i2c, pin1 of all Resistors, and NO of both Limit switches.
- Signal: Connected to A0 of Arduino UNO.
Lcd 20x4 i2c
- 5v: Connected to 5V of Arduino UNO, VCC of A4988 Stepper Motor Driver Carrier, VCC of PH Meter, and Pin 3 of all Pushbuttons.
- GND: Connected to GND of Arduino UNO, GND of A4988 Stepper Motor Driver Carrier, GND of PH Meter, pin1 of all Resistors, and NO of both Limit switches.
- SCA: Connected to A4 of Arduino UNO.
- SCL: Connected to A5 of Arduino UNO.
Limit switch
- NO: Connected to GND of Arduino UNO, GND of A4988 Stepper Motor Driver Carrier, GND of PH Meter, GND of LCD 20x4 i2c, and pin1 of all Resistors.
- C:
- First Limit switch: Connected to D11 of Arduino UNO.
- Second Limit switch: Connected to D5 of Arduino UNO.
Documented Code
Arduino UNO Code
void setup() {
  // put your setup code here, to run once:

}

void loop() {
  // put your main code here, to run repeatedly:

}
This code is a basic template for the Arduino UNO. The setup() function is used to initialize any settings or configurations, and the loop() function contains the main code that runs repeatedly. You can add your specific logic to control the stepper motor, read the pH meter, and interact with the LCD display and pushbuttons within these functions.