
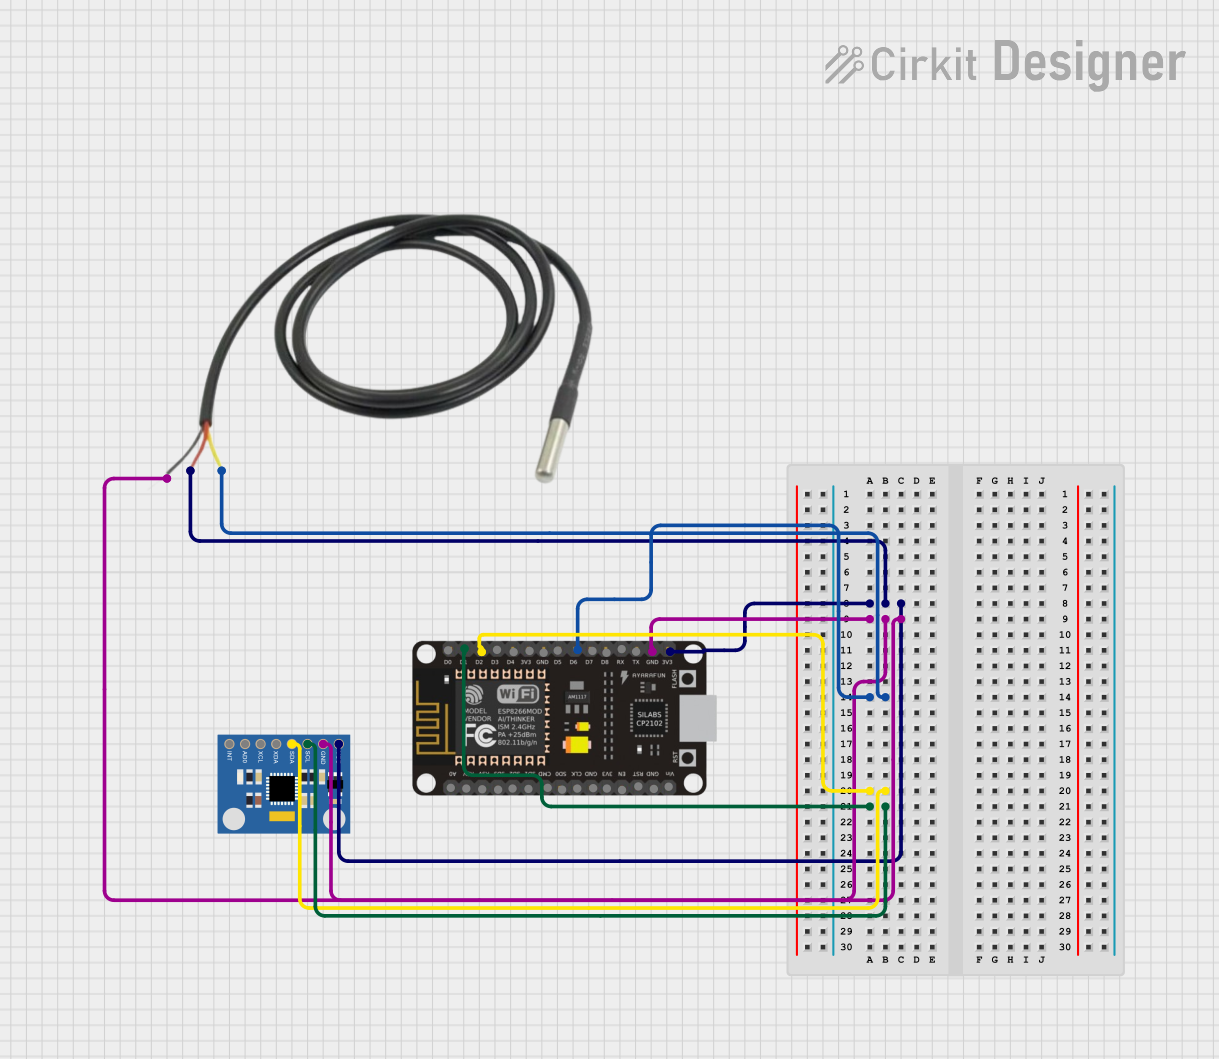
Circuit Documentation
Summary
This circuit involves an ESP8266 NodeMCU microcontroller interfaced with a temperature sensor and an MPU6050 accelerometer + gyroscope. The ESP8266 reads data from both sensors and prints the values to the serial monitor.
Component List
ESP8266 NodeMCU
- Description: A low-cost Wi-Fi microcontroller with GPIO, ADC, and other features.
- Pins: D0, D1, D2, D3, D4, 3V3, GND, D5, D6, D7, D8, RX, TX, A0, RSV, SD3, SD2, SD1, CMD, SD0, CLK, EN, RST, VIN
Temperature Sensor
- Description: A digital temperature sensor.
- Pins: Temp GND Black, Temp VDD Red, Temp DQ Data Yellow
MPU6050 Accelerometer + Gyroscope
- Description: A 6-axis motion tracking device that combines a 3-axis gyroscope and a 3-axis accelerometer.
- Pins: INT, AD0, XCL, XDA, SDA, SCL, GND, VCC
Wiring Details
ESP8266 NodeMCU
- 3V3: Connected to VCC of MPU6050 and Temp VDD Red of Temperature Sensor
- GND: Connected to GND of MPU6050 and Temp GND Black of Temperature Sensor
- D6: Connected to Temp DQ Data Yellow of Temperature Sensor
- D2: Connected to SDA of MPU6050
- D1: Connected to SCL of MPU6050
Temperature Sensor
- Temp VDD Red: Connected to 3V3 of ESP8266 NodeMCU
- Temp GND Black: Connected to GND of ESP8266 NodeMCU
- Temp DQ Data Yellow: Connected to D6 of ESP8266 NodeMCU
MPU6050 Accelerometer + Gyroscope
- VCC: Connected to 3V3 of ESP8266 NodeMCU
- GND: Connected to GND of ESP8266 NodeMCU
- SDA: Connected to D2 of ESP8266 NodeMCU
- SCL: Connected to D1 of ESP8266 NodeMCU
Code Documentation
/*
 * ESP32 MPU TEMP
 * This Arduino sketch reads data from a temperature sensor and an MPU6050
 * accelerometer + gyroscope, and prints the values to the serial monitor.
 */

#include <Wire.h>
#include <Adafruit_MPU6050.h>
#include <Adafruit_Sensor.h>
#include <OneWire.h>
#include <DallasTemperature.h>

// Pin definitions
#define TEMP_PIN D6
#define MPU_SDA D2
#define MPU_SCL D1

// Temperature sensor setup
OneWire oneWire(TEMP_PIN);
DallasTemperature tempSensor(&oneWire);

// MPU6050 setup
Adafruit_MPU6050 mpu;

void setup() {
  // Initialize serial communication
  Serial.begin(115200);
  while (!Serial) delay(10); // Wait for serial port to connect

  // Initialize temperature sensor
  tempSensor.begin();

  // Initialize MPU6050
  if (!mpu.begin()) {
    Serial.println("Failed to find MPU6050 chip");
    while (1) {
      delay(10);
    }
  }
  mpu.setAccelerometerRange(MPU6050_RANGE_2_G);
  mpu.setGyroRange(MPU6050_RANGE_250_DEG);
  mpu.setFilterBandwidth(MPU6050_BAND_21_HZ);
}

void loop() {
  // Request temperature readings
  tempSensor.requestTemperatures();
  float temperatureC = tempSensor.getTempCByIndex(0);

  // Get MPU6050 readings
  sensors_event_t a, g, temp;
  mpu.getEvent(&a, &g, &temp);

  // Print temperature sensor data
  Serial.print("Temperature: ");
  Serial.print(temperatureC);
  Serial.println(" *C");

  // Print MPU6050 data
  Serial.print("Accel X: ");
  Serial.print(a.acceleration.x);
  Serial.print(" m/s^2");
  Serial.print(" | Accel Y: ");
  Serial.print(a.acceleration.y);
  Serial.print(" m/s^2");
  Serial.print(" | Accel Z: ");
  Serial.print(a.acceleration.z);
  Serial.println(" m/s^2");

  Serial.print("Gyro X: ");
  Serial.print(g.gyro.x);
  Serial.print(" rad/s");
  Serial.print(" | Gyro Y: ");
  Serial.print(g.gyro.y);
  Serial.print(" rad/s");
  Serial.print(" | Gyro Z: ");
  Serial.print(g.gyro.z);
  Serial.println(" rad/s");

  delay(1000); // Delay for a second before next reading
}
This code initializes the temperature sensor and MPU6050, reads data from both sensors, and prints the values to the serial monitor every second.