Bluetooth-Enabled Wearable Motion Sensor with Rechargeable Battery
Circuit Documentation
Summary
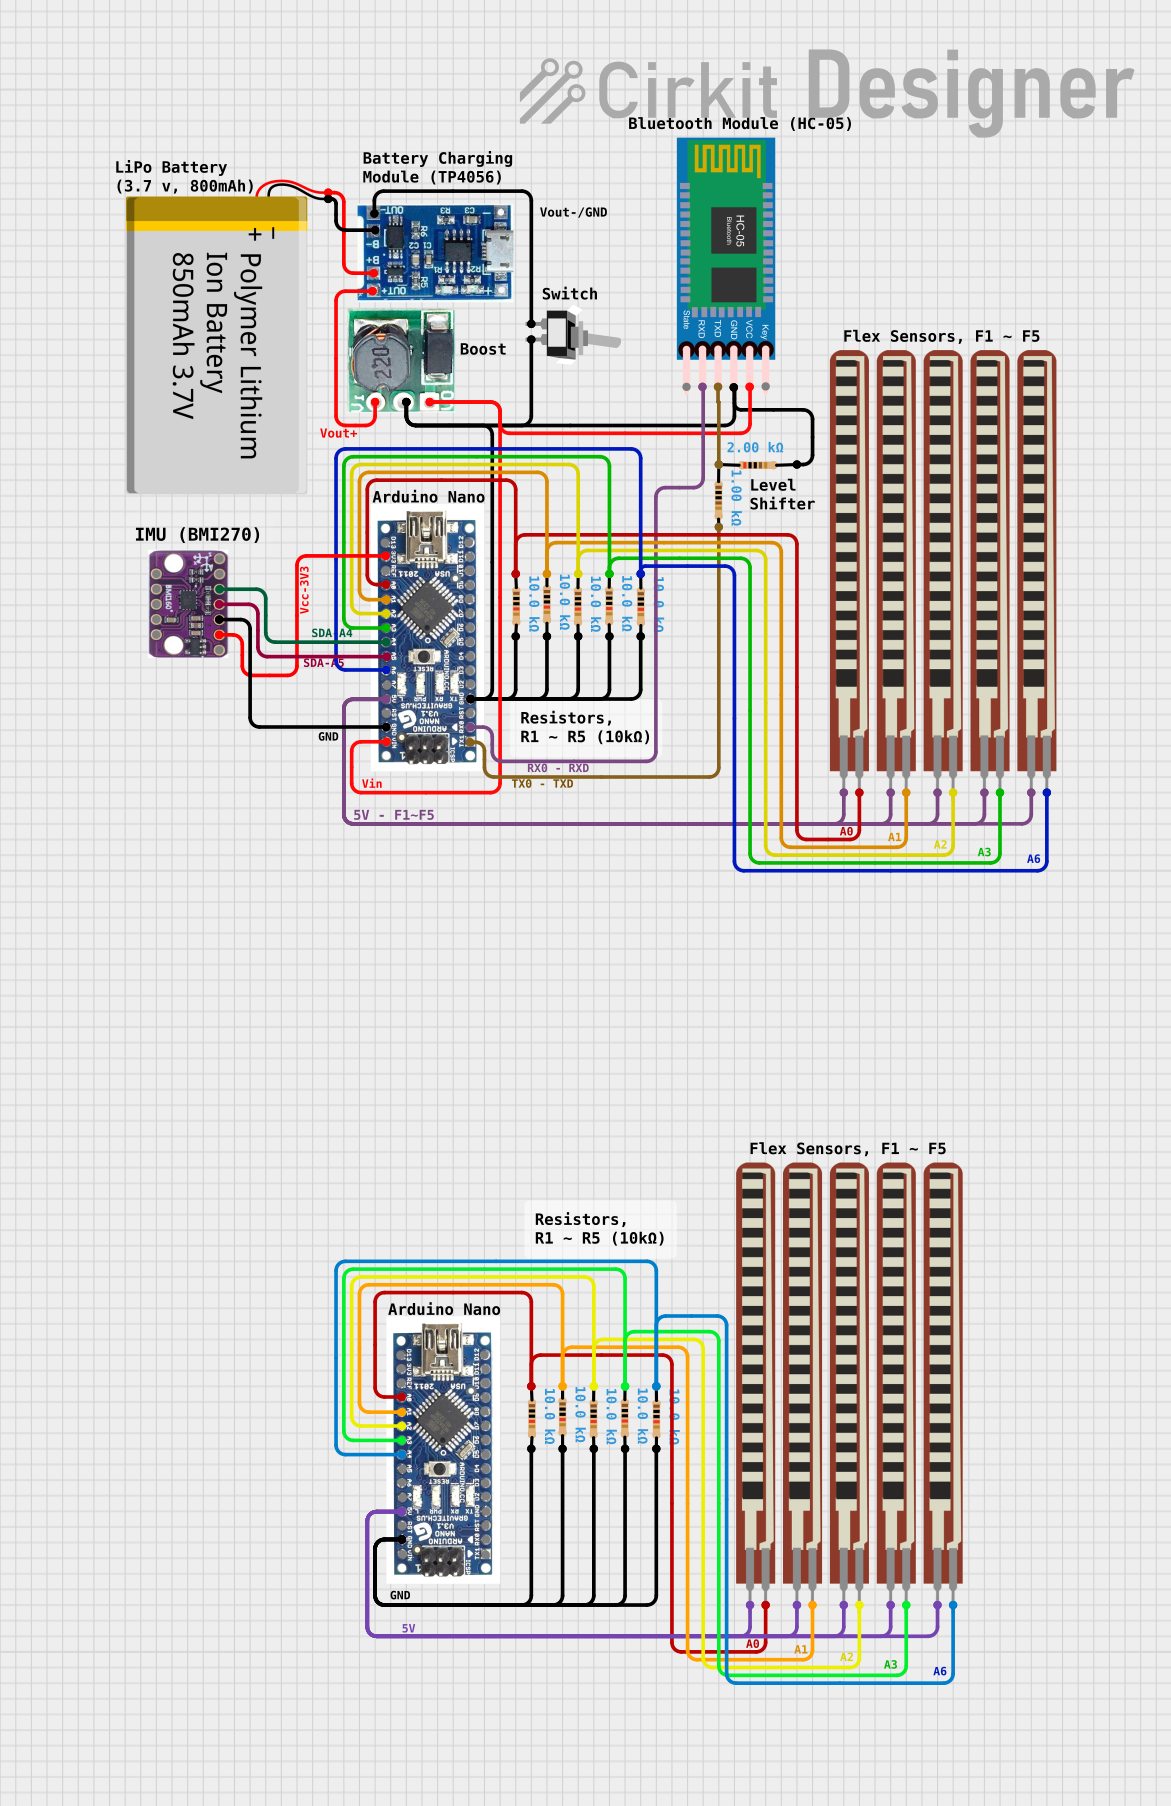
This document provides a detailed overview of a circuit designed to interface an Arduino Nano with various sensors and modules, including a Bluetooth module (HC-05), a 6DOF sensor (BMI160 Accelerometer Gyro), and multiple flex resistors. The circuit is powered by a polymer lithium-ion battery, which is managed by a lipo battery charger module and a step-up boost converter to regulate the voltage. A toggle switch is included to control the power flow. The Arduino Nano serves as the central processing unit, reading sensor data and communicating via Bluetooth.
Component List
- Arduino Nano: A compact microcontroller board based on the ATmega328P, featuring digital and analog I/O pins.
- HC-05 Bluetooth Module: A wireless communication module that allows for Bluetooth connectivity.
- BMI160 Accelerometer Gyro - 6DOF sensor: A sensor that provides 6 degrees of freedom, measuring acceleration and gyroscopic data.
- 2.2 inch Basic Flex Resistor: Flexible resistors used to detect bending or flexing.
- Polymer Lithium Ion Battery - 850mAh: A rechargeable battery that provides power to the circuit.
- Lipo Battery Charger Module: A module used to charge the polymer lithium-ion battery.
- Toggle Switch SPST: A single-pole single-throw switch used to control the power supply to the circuit.
- Step Up Boost 3v- 5v: A voltage step-up module that boosts the voltage from 3V to 5V.
- Resistor: A passive two-terminal electrical component that implements electrical resistance as a circuit element.
Wiring Details
Arduino Nano
- GND: Connected to the ground of the Bluetooth module, ground pins of resistors, and the ground of the 6DOF sensor.
- RX0: Receives data from the TXD pin of the HC-05 Bluetooth Module.
- TX1: Transmits data to the RXD pin of the HC-05 Bluetooth Module through a resistor.
- 3V3: Powers the 3V3 pin of the BMI160 Accelerometer Gyro.
- A0-A6: Analog input pins connected to various flex resistors and resistors.
- 5V: Provides power to the flex resistors.
- VIN: Connected to the VCC of the HC-05 Bluetooth Module and the output voltage of the Step Up Boost module.
HC-05 Bluetooth Module
- GND: Connected to the ground network.
- VCC: Powered by the VIN pin of the Arduino Nano.
- TXD: Transmits data to a resistor connected to the Arduino Nano.
- RXD: Receives data from the TX1 pin of the Arduino Nano.
BMI160 Accelerometer Gyro - 6DOF sensor
- 3V3: Powered by the 3V3 pin of the Arduino Nano.
- SDA: Connected to the A4 pin of the Arduino Nano for I2C data.
- SCL: Connected to the A5 pin of the Arduino Nano for I2C clock.
- GND: Connected to the ground network.
2.2 inch Basic Flex Resistor
- Pin 1: Connected to various analog pins (A0-A6) on the Arduino Nano.
- Pin 2: Connected to the 5V supply from the Arduino Nano.
Polymer Lithium Ion Battery - 850mAh
- GND: Connected to the B- pin of the lipo battery charger module.
- VCC: Connected to the B+ pin of the lipo battery charger module.
Lipo Battery Charger Module
- B-: Connected to the ground of the battery.
- B+: Connected to the VCC of the battery.
- OUT-: Connected to the COM pin of the toggle switch.
- OUT+: Connected to the Vi pin of the Step Up Boost module.
Toggle Switch SPST
- L1: Connected to the OUT- of the lipo battery charger module.
- COM: Connected to the ground network.
Step Up Boost 3v- 5v
- Vi: Connected to the OUT+ of the lipo battery charger module.
- GND: Connected to the ground network.
- Vo: Provides a stepped-up voltage to the VIN pin of the Arduino Nano.
Resistor
- Pin 1: Connected to various digital pins (TX1, A0-A6) on the Arduino Nano.
- Pin 2: Connected to the ground network.
Documented Code
Arduino Nano (Primary Microcontroller)
File: sketch.ino
void setup() {
  // put your setup code here, to run once:

}

void loop() {
  // put your main code here, to run repeatedly:

}
Arduino Nano (Secondary Microcontroller)
File: sketch.ino
void setup() {
  // put your setup code here, to run once:

}

void loop() {
  // put your main code here, to run repeatedly:

}
Note: The code provided for both Arduino Nano microcontrollers is a template with empty setup and loop functions. This code should be expanded with specific instructions for initializing the connected components and handling data acquisition and communication tasks.