Arduino UNO Flame Detection System with Relay Control and LED Indicator
Circuit Documentation
Summary
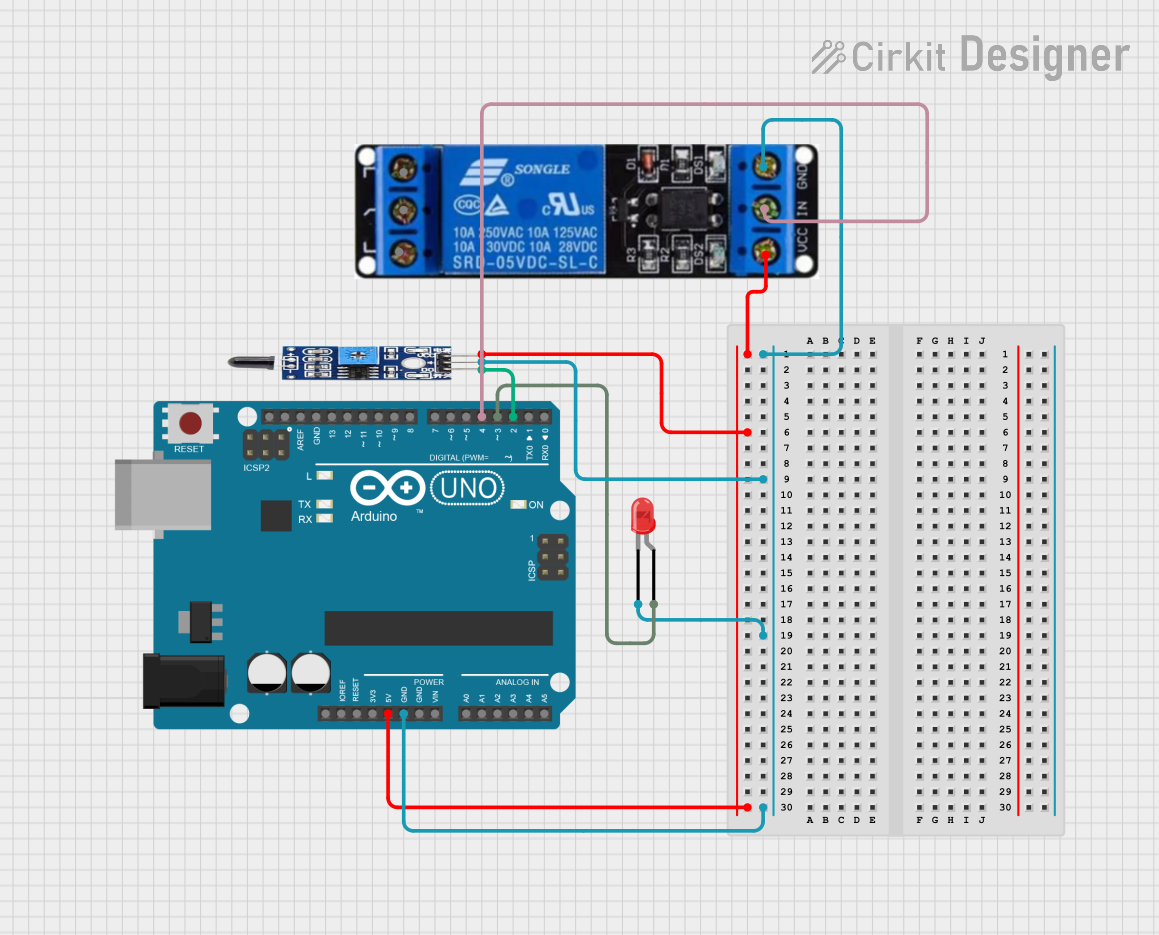
This circuit is designed to detect the presence of a flame using a flame sensor and control a relay and an LED based on the sensor's output. The Arduino UNO microcontroller is used to process the sensor data and control the relay and LED accordingly.
Component List
Arduino UNO
- Description: A microcontroller board based on the ATmega328P.
- Pins: UNUSED, IOREF, Reset, 3.3V, 5V, GND, Vin, A0, A1, A2, A3, A4, A5, SCL, SDA, AREF, D13, D12, D11, D10, D9, D8, D7, D6, D5, D4, D3, D2, D1, D0
Flame Sensor
- Description: A sensor used to detect the presence of a flame.
- Pins: VCC, GND, OUTPUT
Relay 12V
- Description: A relay module that can be used to control high voltage devices.
- Pins: ground, in, VCC, NO, COM, NC
LED: Two Pin (red)
- Description: A red LED with two pins.
- Pins: cathode, anode
Wiring Details
Arduino UNO
5V is connected to:
- Relay 12V (VCC)
- Flame Sensor (VCC)
GND is connected to:
- Relay 12V (ground)
- Flame Sensor (GND)
- LED: Two Pin (red) (cathode)
D4 is connected to:
- Relay 12V (in)
D3 is connected to:
- LED: Two Pin (red) (anode)
D2 is connected to:
- Flame Sensor (OUTPUT)
Flame Sensor
VCC is connected to:
- Arduino UNO (5V)
GND is connected to:
- Arduino UNO (GND)
OUTPUT is connected to:
- Arduino UNO (D2)
Relay 12V
VCC is connected to:
- Arduino UNO (5V)
ground is connected to:
- Arduino UNO (GND)
in is connected to:
- Arduino UNO (D4)
LED: Two Pin (red)
cathode is connected to:
- Arduino UNO (GND)
anode is connected to:
- Arduino UNO (D3)
Code Documentation
Arduino UNO Code
void setup() {
  // put your setup code here, to run once:

}

void loop() {
  // put your main code here, to run repeatedly:

}
This code is a basic template for the Arduino UNO. The setup function is used to initialize any settings or configurations, and the loop function contains the main logic that runs repeatedly. In this template, no specific functionality has been implemented yet.