
Arduino-Controlled WS2812 RGB LED Strip with Red Pushbutton and Battery Power
View and Edit Project In Cirkit Designer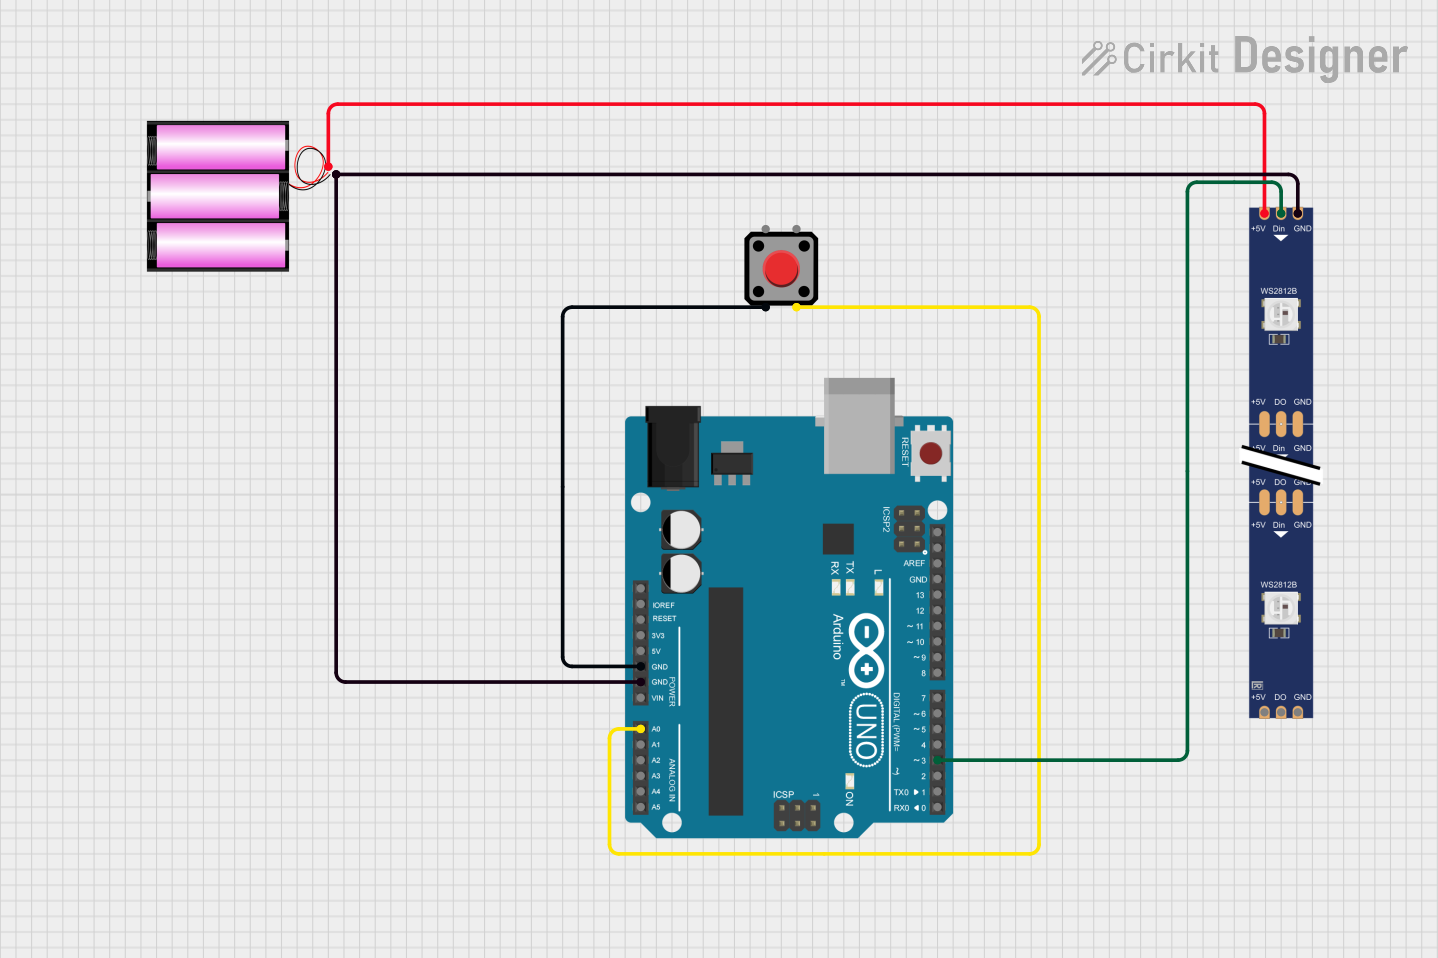
Circuit Documentation
Summary
This circuit consists of an Arduino UNO microcontroller, a red pushbutton, a WS2812 RGB LED strip, and a 12V battery. The Arduino UNO controls the LED strip and reads the state of the pushbutton. The LED strip displays a sequence of colors, and specific LEDs blink red. The pushbutton can be used to interact with the circuit.
Component List
Red Pushbutton
- Description: A simple pushbutton switch.
- Pins: Pin 1, Pin 2, Pin 3, Pin 4
Arduino UNO
- Description: A microcontroller board based on the ATmega328P.
- Pins: UNUSED, IOREF, Reset, 3.3V, 5V, GND, Vin, A0, A1, A2, A3, A4, A5, SCL, SDA, AREF, D13, D12, D11, D10, D9, D8, D7, D6, D5, D4, D3, D2, D1, D0
WS2812 RGB LED strip
- Description: An addressable RGB LED strip.
- Pins: DIN, 5V, GND, DO
Battery 12V
- Description: A 12V battery for powering the circuit.
- Pins: +, -
Wiring Details
Red Pushbutton
- Pin 2: Connected to GND of Arduino UNO
- Pin 3: Connected to A0 of Arduino UNO
Arduino UNO
- GND: Connected to Pin 2 of Red Pushbutton, GND of WS2812 RGB LED strip, and - of Battery 12V
- A0: Connected to Pin 3 of Red Pushbutton
- D3: Connected to DIN of WS2812 RGB LED strip
WS2812 RGB LED strip
- GND: Connected to GND of Arduino UNO and - of Battery 12V
- DIN: Connected to D3 of Arduino UNO
- 5V: Connected to + of Battery 12V
Battery 12V
- -: Connected to GND of Arduino UNO and GND of WS2812 RGB LED strip
- +: Connected to 5V of WS2812 RGB LED strip
Code Documentation
Arduino Sketch
/*
 * This Arduino sketch controls a WS2812 RGB LED strip and a red pushbutton.
 * LEDs 67, 68, and 69 blink red with 500ms on and 100ms off.
 * LEDs 0 to 66 dim up and down in rainbow colors with 2000ms up and 1000ms down.
 * The sequence stops for 300ms before repeating.
 */

#include <Adafruit_NeoPixel.h>

#define LED_PIN 3
#define BUTTON_PIN A0
#define NUM_LEDS 70

Adafruit_NeoPixel strip = Adafruit_NeoPixel(NUM_LEDS, LED_PIN, NEO_GRB + NEO_KHZ800);

void setup() {
  strip.begin();
  strip.show(); // Initialize all pixels to 'off'
  pinMode(BUTTON_PIN, INPUT);
}

void loop() {
  blinkRedLeds();
  rainbowCycle(2000, 1000);
  delay(300);
}

void blinkRedLeds() {
  for (int i = 0; i < 3; i++) {
    strip.setPixelColor(67 + i, strip.Color(255, 0, 0));
  }
  strip.show();
  delay(500);
  for (int i = 0; i < 3; i++) {
    strip.setPixelColor(67 + i, strip.Color(0, 0, 0));
  }
  strip.show();
  delay(100);
}

void rainbowCycle(uint16_t upTime, uint16_t downTime) {
  for (uint16_t j = 0; j < 256; j++) { // 1 cycle of all colors on wheel
    for (uint16_t i = 0; i < strip.numPixels() - 3; i++) {
      strip.setPixelColor(i, Wheel((i * 256 / (strip.numPixels() - 3) + j) & 255));
    }
    strip.show();
    delay(upTime / 256);
  }
  for (uint16_t j = 256; j > 0; j--) { // 1 cycle of all colors on wheel
    for (uint16_t i = 0; i < strip.numPixels() - 3; i++) {
      strip.setPixelColor(i, Wheel((i * 256 / (strip.numPixels() - 3) + j) & 255));
    }
    strip.show();
    delay(downTime / 256);
  }
}

uint32_t Wheel(byte WheelPos) {
  WheelPos = 255 - WheelPos;
  if (WheelPos < 85) {
    return strip.Color(255 - WheelPos * 3, 0, WheelPos * 3);
  }
  if (WheelPos < 170) {
    WheelPos -= 85;
    return strip.Color(0, WheelPos * 3, 255 - WheelPos * 3);
  }
  WheelPos -= 170;
  return strip.Color(WheelPos * 3, 255 - WheelPos * 3, 0);
}
This code initializes the WS2812 RGB LED strip and the pushbutton. The loop function continuously runs two functions: blinkRedLeds and rainbowCycle. The blinkRedLeds function makes LEDs 67, 68, and 69 blink red, while the rainbowCycle function creates a rainbow effect on the other LEDs. The Wheel function is a helper function to generate color values.