
Arduino Nano and ESP8266 Wi-Fi Controlled DC Motor System with MPU-6050
View and Edit Project In Cirkit Designer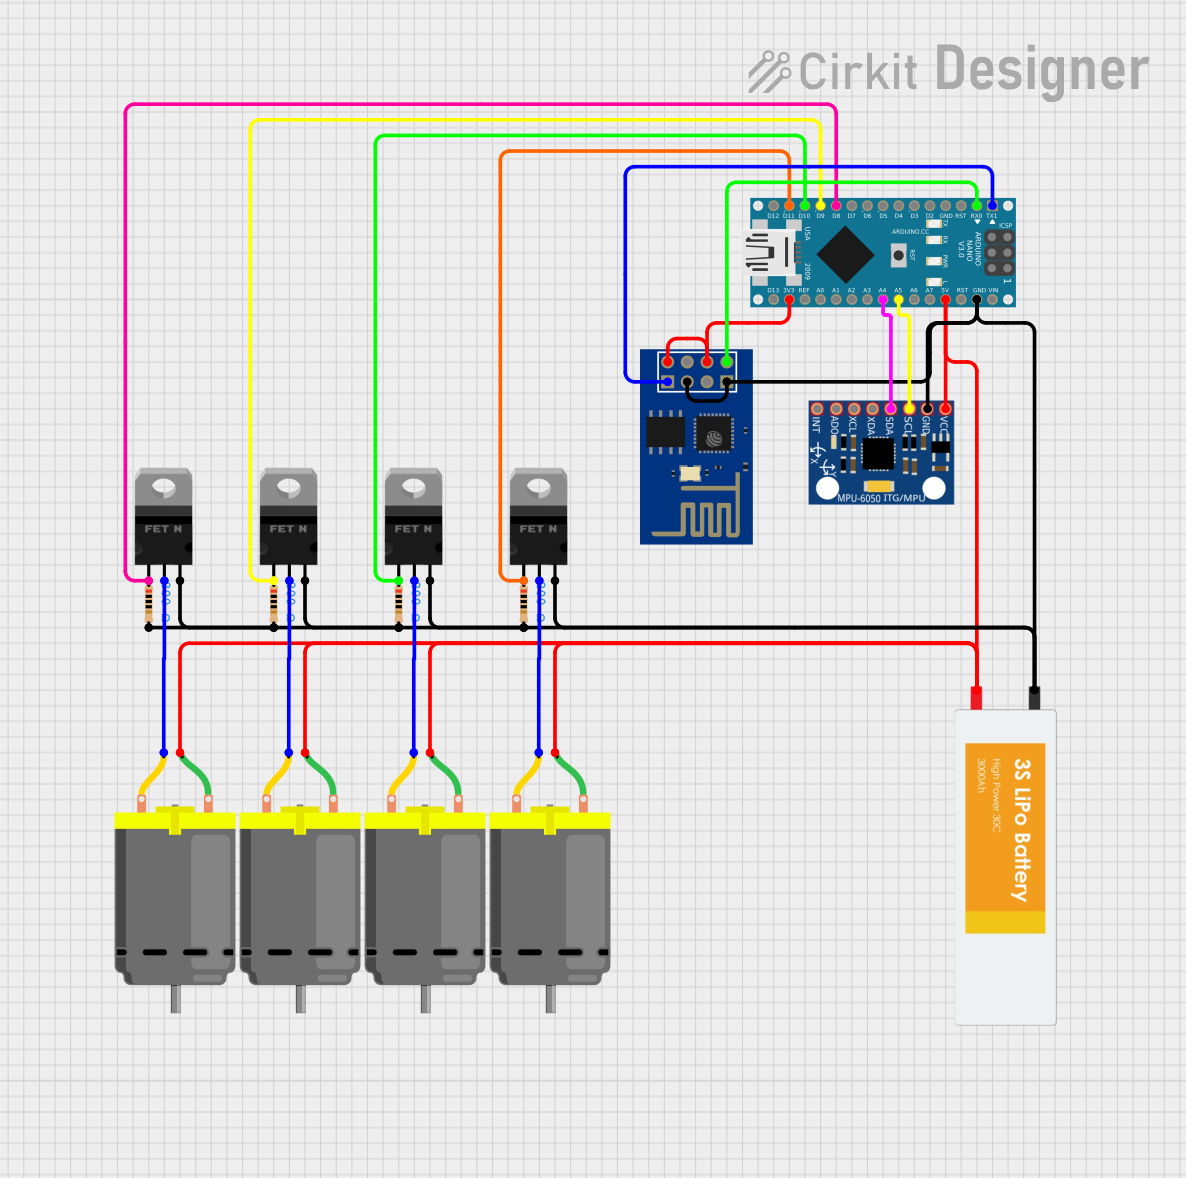
Circuit Documentation
Summary
This circuit involves an Arduino Nano microcontroller interfacing with an ESP8266 ESP-01 WiFi module, multiple DC motors, an MPU-6050 sensor, and several nMOS transistors and resistors. The circuit is powered by a LiPo battery. The Arduino Nano is programmed to control the various components.
Component List
Arduino Nano
- Description: A small, complete, and breadboard-friendly board based on the ATmega328.
- Pins: D1/TX, D0/RX, RESET, GND, D2, D3, D4, D5, D6, D7, D8, D9, D10, D11/MOSI, D12/MISO, VIN, 5V, A7, A6, A5, A4, A3, A2, A1, A0, AREF, 3V3, D13/SCK
ESP8266 ESP-01 WiFi Module
- Description: A self-contained SOC with integrated TCP/IP protocol stack that can give any microcontroller access to your WiFi network.
- Pins: TXD, CH_PD, RST, VCC, GND, GPIO_2, GPIO_0, RXD
DC Motor
- Description: A motor that runs on direct current (DC) electricity.
- Pins: pin 1, pin 2
LiPo Battery
- Description: A rechargeable lithium polymer battery.
- Pins: VCC, GND
nMOS Transistor (MOSFET)
- Description: A type of transistor used for switching and amplifying electronic signals.
- Pins: gate, drain, source
Resistor
- Description: A passive electrical component that implements electrical resistance as a circuit element.
- Pins: pin1, pin2
- Properties: Resistance: 200 Ohms
MPU-6050
- Description: A 6-axis motion tracking device that combines a 3-axis gyroscope and a 3-axis accelerometer.
- Pins: VCC, GND, SCL, SDA, XDA, XCL, AD0, INT
Wiring Details
Arduino Nano
- D1/TX connected to ESP8266 ESP-01 WiFi Module RXD
- D0/RX connected to ESP8266 ESP-01 WiFi Module TXD
- D8 connected to Resistor pin1
- D9 connected to Resistor pin1 and nMOS Transistor (MOSFET) gate
- D10 connected to Resistor pin1
- D11/MOSI connected to nMOS Transistor (MOSFET) gate
- GND connected to ESP8266 ESP-01 WiFi Module GND, ESP8266 ESP-01 WiFi Module GPIO_0, nMOS Transistor (MOSFET) source, MPU-6050 GND, Resistor pin2, and LiPo Battery GND
- 5V connected to DC Motor pin 1
- A5 connected to MPU-6050 SCL
- A4 connected to MPU-6050 SDA
- 3V3 connected to ESP8266 ESP-01 WiFi Module CH_PD and ESP8266 ESP-01 WiFi Module VCC
ESP8266 ESP-01 WiFi Module
- RXD connected to Arduino Nano D1/TX
- TXD connected to Arduino Nano D0/RX
- GND connected to Arduino Nano GND, ESP8266 ESP-01 WiFi Module GPIO_0, nMOS Transistor (MOSFET) source, MPU-6050 GND, Resistor pin2, and LiPo Battery GND
- CH_PD connected to Arduino Nano 3V3
- VCC connected to Arduino Nano 3V3
DC Motor
- pin 1 connected to Arduino Nano 5V
- pin 2 connected to nMOS Transistor (MOSFET) drain
LiPo Battery
- VCC connected to DC Motor pin 1 and MPU-6050 VCC
- GND connected to Arduino Nano GND, ESP8266 ESP-01 WiFi Module GND, ESP8266 ESP-01 WiFi Module GPIO_0, nMOS Transistor (MOSFET) source, MPU-6050 GND, and Resistor pin2
nMOS Transistor (MOSFET)
- gate connected to Arduino Nano D9 and Resistor pin1
- drain connected to DC Motor pin 2
- source connected to Arduino Nano GND, ESP8266 ESP-01 WiFi Module GND, ESP8266 ESP-01 WiFi Module GPIO_0, MPU-6050 GND, Resistor pin2, and LiPo Battery GND
Resistor
- pin1 connected to Arduino Nano D8, Arduino Nano D9, and Arduino Nano D10
- pin2 connected to Arduino Nano GND, ESP8266 ESP-01 WiFi Module GND, ESP8266 ESP-01 WiFi Module GPIO_0, nMOS Transistor (MOSFET) source, MPU-6050 GND, and LiPo Battery GND
MPU-6050
- VCC connected to LiPo Battery VCC
- GND connected to Arduino Nano GND, ESP8266 ESP-01 WiFi Module GND, ESP8266 ESP-01 WiFi Module GPIO_0, nMOS Transistor (MOSFET) source, Resistor pin2, and LiPo Battery GND
- SCL connected to Arduino Nano A5
- SDA connected to Arduino Nano A4
Documented Code
Arduino Nano Code (sketch.ino)
void setup() {
  // put your setup code here, to run once:

}

void loop() {
  // put your main code here, to run repeatedly:

}
Additional Documentation (documentation.txt)