
Arduino-Controlled PIR Motion Sensor with MP3 Playback and LED Lightning Effect
View and Edit Project In Cirkit Designer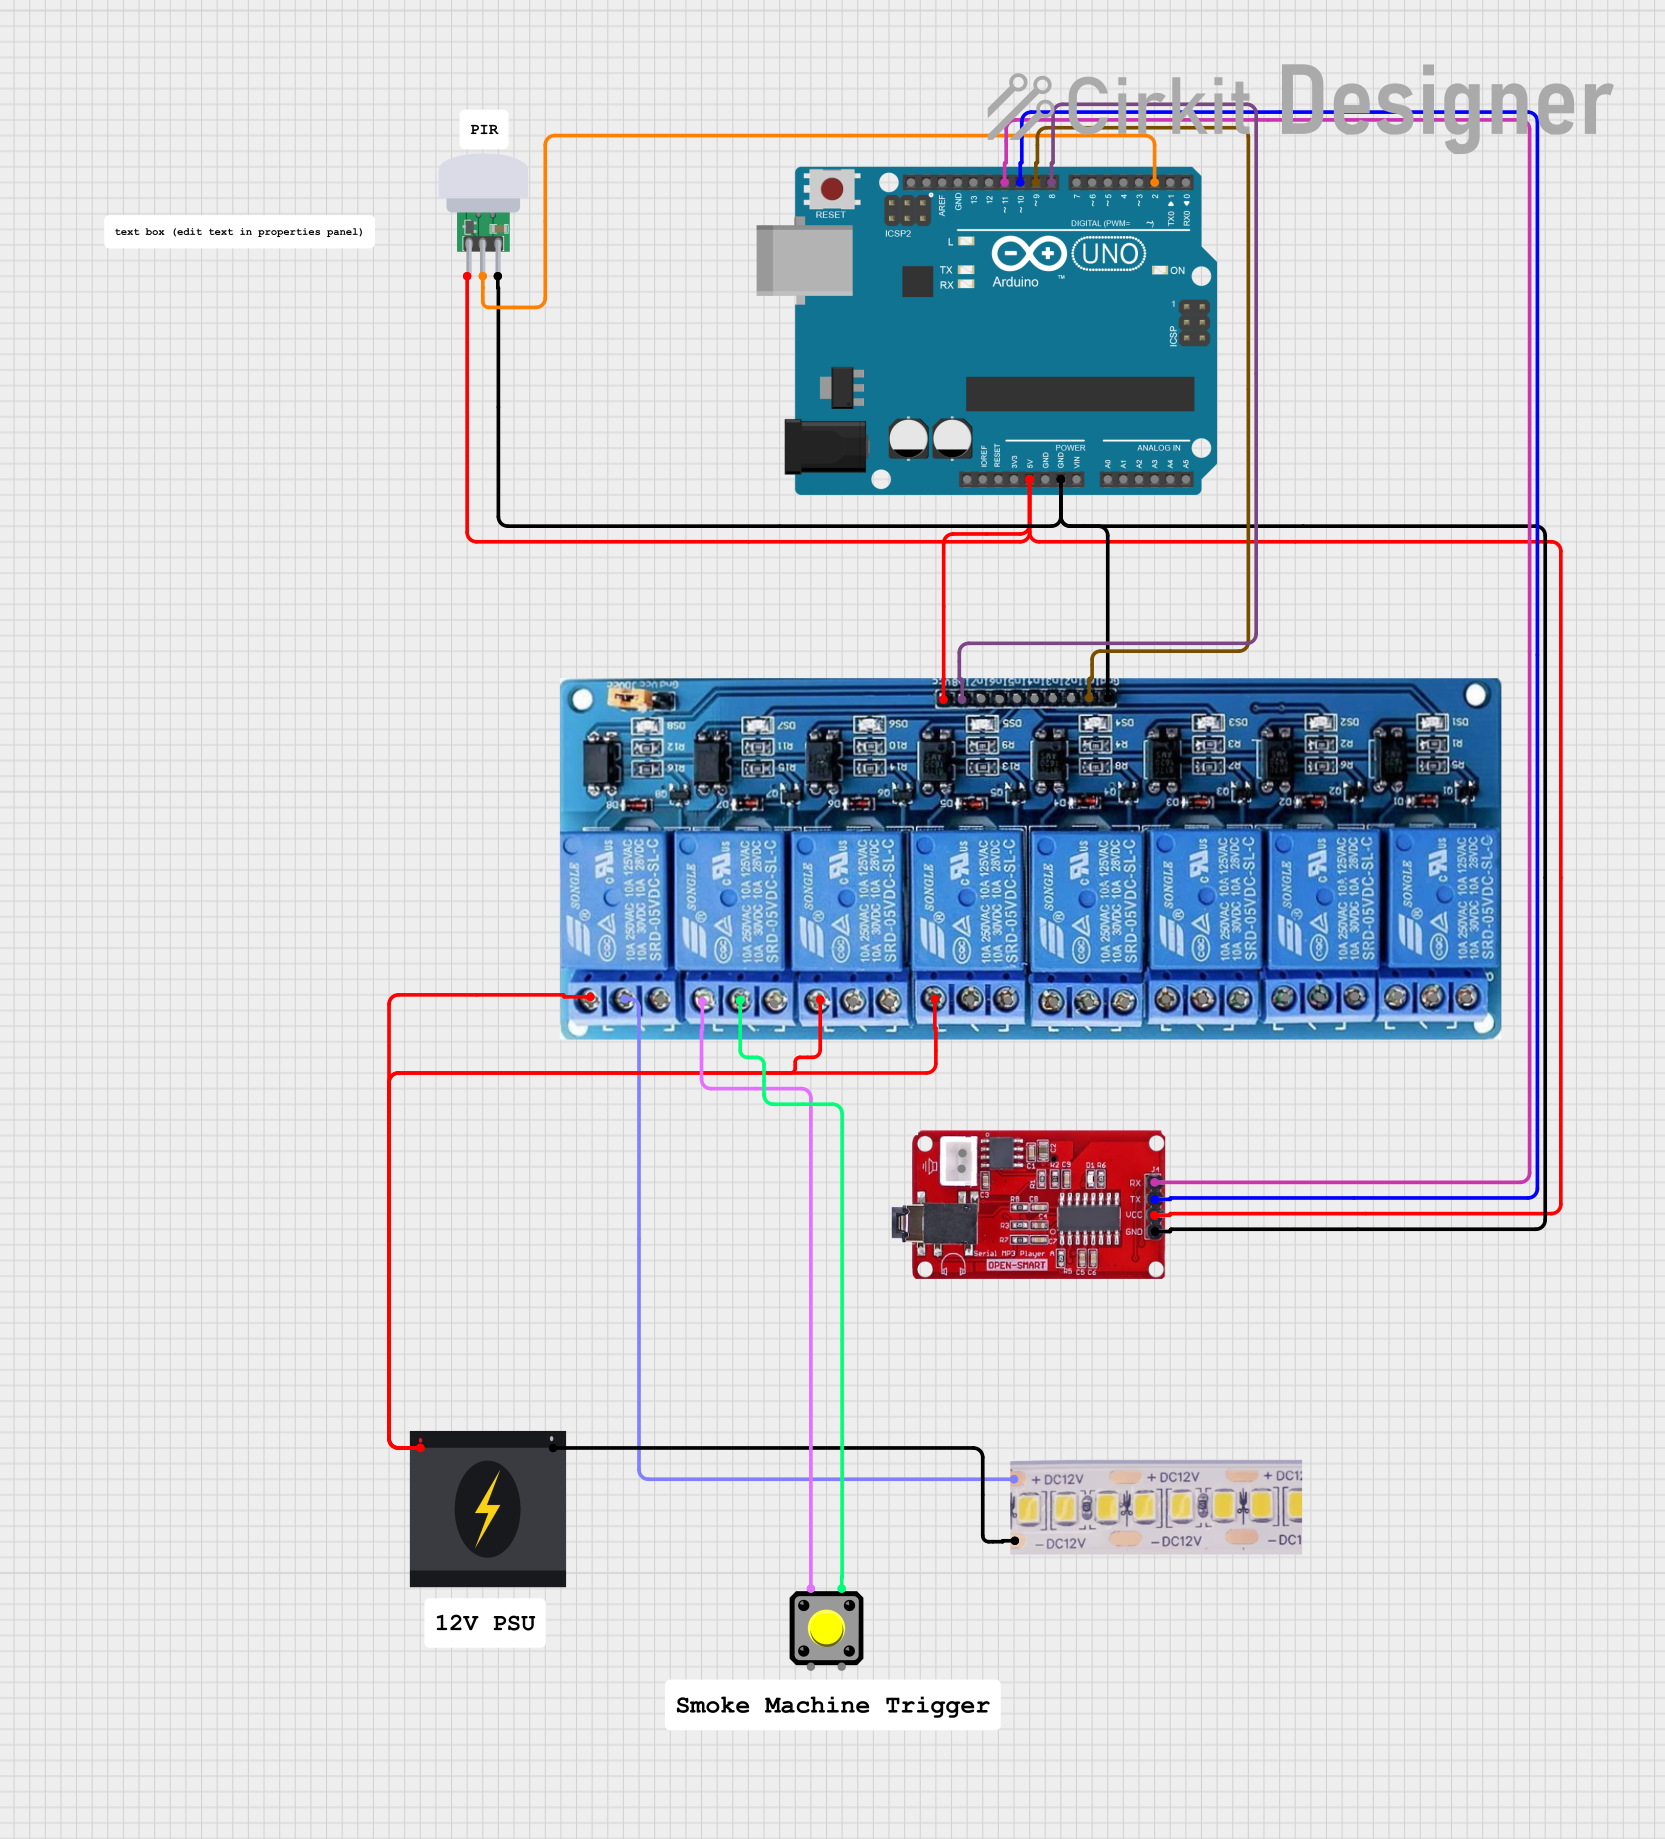
Circuit Documentation
Summary
The circuit is designed to detect motion using a PIR sensor and, upon detection, trigger a sequence that simulates lightning using an LED strip while playing a sound through an MP3 player module. The Arduino UNO serves as the central controller, interfacing with the PIR sensor, MP3 player, and relay module that controls the LED strip. The relay module is used to switch the high-power LED strip, and the MP3 player communicates with the Arduino via serial communication. A pushbutton is included to manually trigger the relay.
Component List
PIR Sensor SB312A
- Description: A passive infrared sensor that detects motion by measuring changes in the infrared levels emitted by surrounding objects.
- Pins: VCC, OUT, GND
Arduino UNO
- Description: A microcontroller board based on the ATmega328P, used for controlling the various components in the circuit.
- Pins: UNUSED, IOREF, Reset, 3.3V, 5V, GND, Vin, A0-A5, SCL, SDA, AREF, D0-D13
5V 8-Channel Relay
- Description: An 8-channel relay module that allows the Arduino to control higher power circuits.
- Pins: GND, IN1-IN8, VCC, NC, C, NO
Serial MP3 Player
- Description: A compact MP3 module that can play a variety of MP3 files stored on a micro SD card.
- Pins: RX, TX, VCC, GND
12V White LED Strip
- Description: A strip of white LEDs that requires 12V power supply, used to simulate lightning effects.
- Pins: +12V, GND
Pushbutton
- Description: A simple pushbutton switch used to manually trigger the relay.
- Pins: Pin 1, Pin 2, Pin 3, Pin 4
240v Power Source
- Description: Provides the main power for the circuit, particularly for the LED strip through the relay.
- Pins: Live, Neutral
Wiring Details
PIR Sensor SB312A
- VCC: Connected to the 5V power supply from the Arduino UNO.
- OUT: Connected to pin D2 of the Arduino UNO.
- GND: Connected to the ground (GND) of the Arduino UNO.
Arduino UNO
- 5V: Provides power to the PIR sensor, relay module, and MP3 player.
- GND: Common ground for PIR sensor, relay module, and MP3 player.
- D2: Receives the PIR sensor output signal.
- D9: Controls IN1 on the relay module.
- D8: Controls IN8 on the relay module (unused in this context).
- D10: Connected to TX of the MP3 player.
- D11: Connected to RX of the MP3 player.
5V 8-Channel Relay
- VCC: Connected to the 5V power supply from the Arduino UNO.
- GND: Connected to the ground (GND) of the Arduino UNO.
- IN1: Controlled by pin D9 of the Arduino UNO.
- IN8: Controlled by pin D8 of the Arduino UNO (unused in this context).
- NO: Normally open contacts of the relay connected to the Live pin of the 240v Power Source.
- C: Common contact of the relay connected to the +12V pin of the LED strip.
Serial MP3 Player
- VCC: Connected to the 5V power supply from the Arduino UNO.
- GND: Connected to the ground (GND) of the Arduino UNO.
- RX: Connected to pin D11 of the Arduino UNO.
- TX: Connected to pin D10 of the Arduino UNO.
12V White LED Strip
- +12V: Connected to the common (C) contact of the relay module.
- GND: Connected to the Neutral pin of the 240v Power Source.
Pushbutton
- Pin 1: Connected to the normally open (NO) contact of the relay module.
- Pin 4: Connected to the common (C) contact of the relay module.
240v Power Source
- Live: Connected to the normally open (NO) contacts of the relay module.
- Neutral: Connected to the GND pin of the LED strip.
Documented Code
#include <SoftwareSerial.h>
#include <DFPlayerMini_Fast.h>

// Pin definitions
#define PIR_PIN 2          // PIR sensor connected to pin D2
#define LED_STRIP_PIN 9     // LED strip pin (used to simulate lightning effect)
#define MP3_RX_PIN 10       // RX pin for DFPlayer Mini
#define MP3_TX_PIN 11       // TX pin for DFPlayer Mini

// MP3 player setup
SoftwareSerial mySerial(MP3_RX_PIN, MP3_TX_PIN); // RX (Pin 10), TX (Pin 11)
DFPlayerMini_Fast myMP3;

// Variable to store PIR sensor state
bool motionDetected = false;

// Flag to prevent retriggering during sequence
bool sequenceInProgress = false;

// Set a delay to avoid retriggering the PIR sensor immediately after motion is detected
unsigned long pirCooldown = 77000;  // 1 minute 17 seconds (77 seconds) delay after PIR is triggered
unsigned long lastMotionTime = 0;   // Timestamp of when the PIR was last triggered

void setup() {
  // Initialize serial communication for MP3 and debugging
  mySerial.begin(9600);
  Serial.begin(9600);

  // Initialize PIR sensor pin as input
  pinMode(PIR_PIN, INPUT);

  // Set up the LED strip pin as output and ensure it's off initially
  pinMode(LED_STRIP_PIN, OUTPUT);
  analogWrite(LED_STRIP_PIN, 0);    // Ensure the LED strip is off initially

  // Initialize DFPlayer Mini
  if (!myMP3.begin(mySerial)) {
    Serial.println("DFPlayer Mini not detected.");
    while (true); // Halt if MP3 player isn't detected
  } else {
    Serial.println("DFPlayer Mini detected and initialized.");
  }

  myMP3.volume(25);  // Set volume level (0 to 30)
  Serial.println("System ready. Waiting for PIR motion detection...");
}

void loop() {
  unsigned long currentTime = millis(); // Get the current time

  // If a sequence is in progress, check if cooldown time has passed
  if (sequenceInProgress) {
    // If 77 seconds have passed since the PIR was triggered, reset for next sequence
    if (currentTime - lastMotionTime >= pirCooldown) {
      sequenceInProgress = false;  // Reset sequence flag, allowing the PIR to trigger again
      Serial.println("Cooldown complete. System ready for next trigger.");
    }
    return;  // Do nothing else while the sequence is in progress
  }

  // Read PIR sensor input
  motionDetected = digitalRead(PIR_PIN);

  // Check if PIR detected motion and cooldown has passed
  if (motionDetected && (currentTime - lastMotionTime >= pirCooldown)) {
    lastMotionTime = currentTime;  // Record the time when the PIR was triggered
    sequenceInProgress = true;     // Set the sequence in progress flag
    Serial.println("Motion detected! Starting lightning and MP3 sequence...");

    // Play the MP3 file at the same time as the lightning
    playMP3WithLightning();

    Serial.println("Sequence complete. Waiting for cooldown.");
  }

  // Small delay to avoid excessive polling
  delay(100);
}

// Function to simulate a lightning effect using the LED strip while playing MP3
void playMP3WithLightning() {
  // Start playing the MP3 file (0001.mp3)
  myMP3.play(1);
  Serial.println("Playing MP3 track 0001.mp3");

  int numFlashes = random(3, 8); // Random number of flashes (3 to 7 flashes)

  for (int i = 0; i < numFlashes; i++) {
    // Bright flash with random intensity
    int flashBrightness = random(180, 255); // Random brightness between 180 and 255
    analogWrite(LED_STRIP_PIN, flashBrightness); // Set brightness
    int flashDuration = random(50, 150); // Random short flash duration (50ms to 150ms)
    delay(flashDuration); // Keep the brightness for the duration

    // Dim to simulate fading flash
    analogWrite(LED_STRIP_PIN, random(50, 120)); // Dim flash to random brightness (50 to 120)
    delay(random(100, 300)); // Dim flash duration (100ms to 300ms)

    // Small pause between flashes to add randomness
    delay(random(100, 500)); // Random delay between flashes (100ms to 500ms)

    // Check if MP3 is still playing, if not, break out of loop
    if (!myMP3.isPlaying()) {
      break;
    }
  }

  // Gradually fade out after the lightning effect
  for (int