
Arduino UNO-Based Ultrasonic Distance Meter with LCD Display and Laser Emitter
View and Edit Project In Cirkit Designer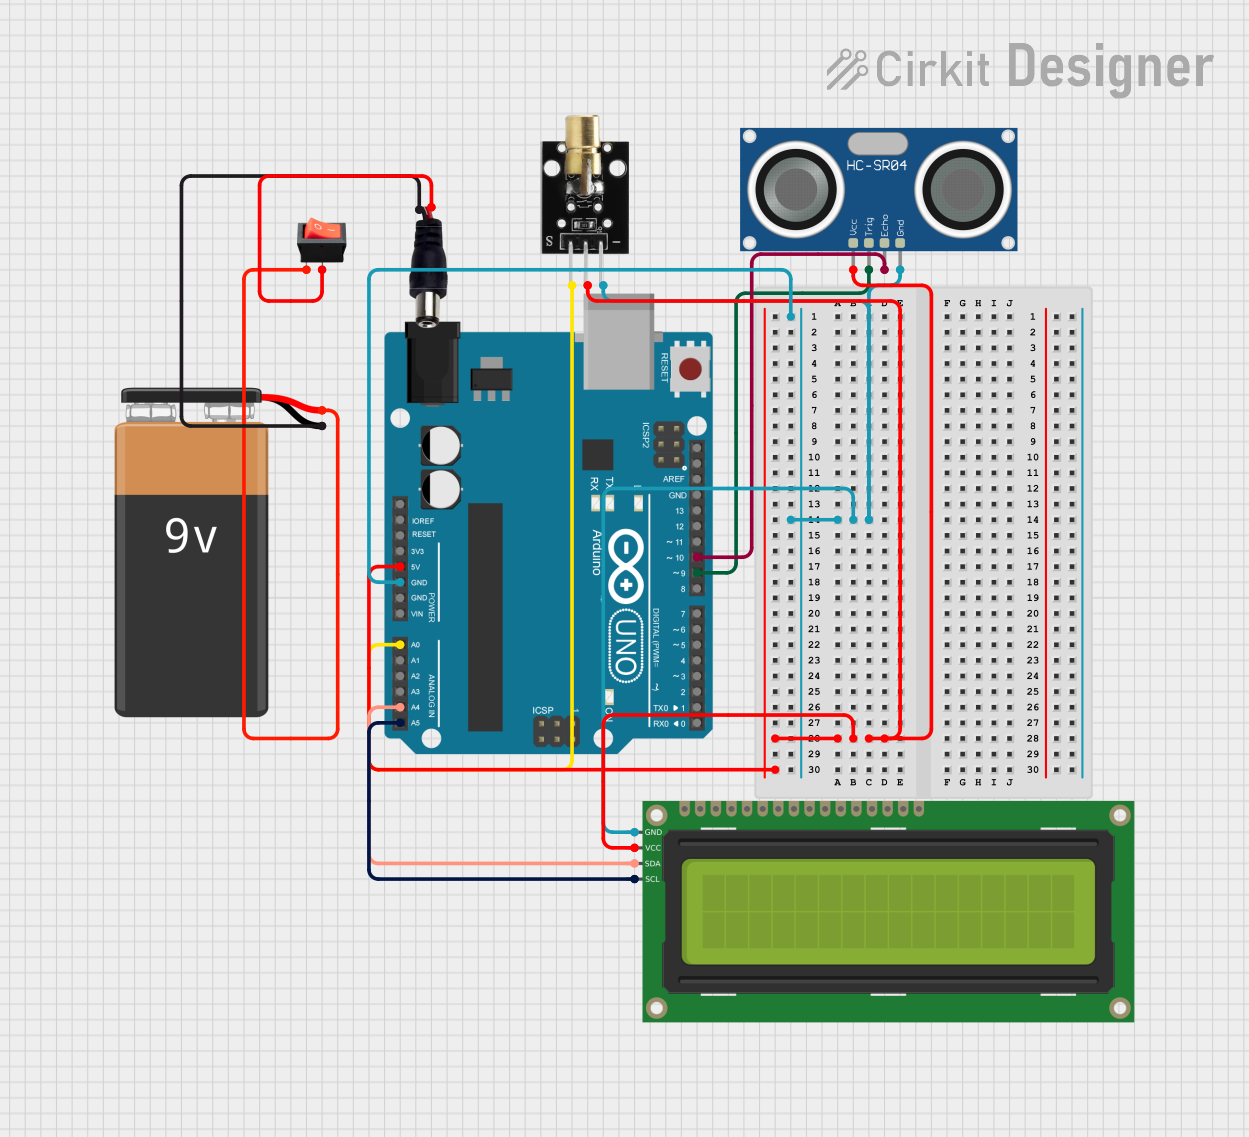
Circuit Documentation
Summary
This circuit is designed to measure distance using an HC-SR04 Ultrasonic Sensor and display the measured distance on a 16x2 I2C LCD. Additionally, a KY-008 Laser Emitter is used for visual indication. The entire system is powered by a 9V battery connected through a power jack and controlled by an Arduino UNO. A rocker switch is used to turn the circuit on and off.
Component List
9V Battery
- Description: Provides power to the circuit.
- Pins: -, +
Arduino UNO
- Description: Microcontroller used to control the circuit.
- Pins: UNUSED, IOREF, Reset, 3.3V, 5V, GND, Vin, A0, A1, A2, A3, A4, A5, SCL, SDA, AREF, D13, D12, D11, D10, D9, D8, D7, D6, D5, D4, D3, D2, D1, D0
HC-SR04 Ultrasonic Sensor
- Description: Measures distance by emitting ultrasonic waves and receiving the echo.
- Pins: VCC, TRIG, ECHO, GND
16x2 I2C LCD
- Description: Displays the measured distance.
- Pins: GND, VCC, SDA, SCL
Rocker Switch
- Description: Turns the circuit on and off.
- Pins: output, input
KY-008 Laser Emitter
- Description: Emits a laser beam for visual indication.
- Pins: SIG, 5v, GND
Power Jack
- Description: Connects the 9V battery to the circuit.
- Pins: POSITIF, NEGATIF
Wiring Details
9V Battery
- - pin is connected to the NEGATIF pin of the power jack.
- + pin is connected to the input pin of the rocker switch.
Arduino UNO
- 5V pin is connected to the 5v pin of the KY-008 Laser Emitter, VCC pin of the HC-SR04 Ultrasonic Sensor, and VCC pin of the 16x2 I2C LCD.
- GND pin is connected to the GND pin of the KY-008 Laser Emitter, GND pin of the HC-SR04 Ultrasonic Sensor, and GND pin of the 16x2 I2C LCD.
- A0 pin is connected to the SIG pin of the KY-008 Laser Emitter.
- A4 pin is connected to the SDA pin of the 16x2 I2C LCD.
- A5 pin is connected to the SCL pin of the 16x2 I2C LCD.
- D10 pin is connected to the ECHO pin of the HC-SR04 Ultrasonic Sensor.
- D9 pin is connected to the TRIG pin of the HC-SR04 Ultrasonic Sensor.
HC-SR04 Ultrasonic Sensor
- VCC pin is connected to the 5V pin of the Arduino UNO.
- TRIG pin is connected to the D9 pin of the Arduino UNO.
- ECHO pin is connected to the D10 pin of the Arduino UNO.
- GND pin is connected to the GND pin of the Arduino UNO.
16x2 I2C LCD
- GND pin is connected to the GND pin of the Arduino UNO.
- VCC pin is connected to the 5V pin of the Arduino UNO.
- SDA pin is connected to the A4 pin of the Arduino UNO.
- SCL pin is connected to the A5 pin of the Arduino UNO.
Rocker Switch
- input pin is connected to the + pin of the 9V Battery.
- output pin is connected to the POSITIF pin of the power jack.
KY-008 Laser Emitter
- SIG pin is connected to the A0 pin of the Arduino UNO.
- 5v pin is connected to the 5V pin of the Arduino UNO.
- GND pin is connected to the GND pin of the Arduino UNO.
Power Jack
- POSITIF pin is connected to the output pin of the rocker switch.
- NEGATIF pin is connected to the - pin of the 9V Battery.
Code Documentation
#include <Wire.h>
#include <LiquidCrystal_I2C.h>

// Pin definitions
#define TRIG_PIN 10
#define ECHO_PIN 9
#define LASER_PIN A0  // Laser module trigger pin connected to A0

// Create LCD object for I2C
LiquidCrystal_I2C lcd(0x27, 16, 2);  // Adjust address if needed

void setup() {
  // Initialize the LCD
  lcd.begin(16, 2);
  lcd.backlight();
  lcd.setCursor(0, 0);
  lcd.print("FEET: ");

   // Set up ultrasonic sensor pins
    pinMode(TRIG_PIN, OUTPUT);
    pinMode(ECHO_PIN, INPUT);
    // Set up the laser module

    // Start serial communication
    Serial.begin(9600);
}

void loop() {
    long duration;
    float distance_cm;
    float distance_ft;

    // Trigger the ultrasonic sensor
    digitalWrite(TRIG_PIN, LOW);
    delayMicroseconds(2);
    digitalWrite(TRIG_PIN, HIGH);
    delayMicroseconds(10);
    digitalWrite(TRIG_PIN, LOW);

    // Read the echo pin
    duration = pulseIn(ECHO_PIN, HIGH);

    // Calculate distance (in cm and feet)
    distance_cm = (duration * 0.0343) / 2;
    distance_ft = distance_cm * 0.0328084;

    // Output the distance to Serial Monitor
    Serial.print("DISTANCE: ");
    Serial.print(distance_ft, 2);
    Serial.print(" ft || ");
    Serial.print(distance_cm, 2);
    Serial.println(" cm");

  // Clear the display and update the distance readings
  lcd.clear();

  // Display the distance on the LCD
  lcd.setCursor(0, 0);
  lcd.print("FEET: ");
  lcd.print(distance_ft, 2); // Display feet with 2 decimal places
  lcd.print(" ft."); // Feet unit symbol

  lcd.setCursor(0, 1);
  lcd.print("CM: ");
  lcd.print(distance_cm, 2); // Display centimeters with 2 decimal places
  lcd.print(" cm."); // Centimeter unit symbol

  // Optional: Send data over Serial for Bluetooth or debugging
  Serial.print("DISTANCE: ");
  Serial.print(distance_ft, 2);
  Serial.print(" ft. || ");
  Serial.print(distance_cm, 2);
  Serial.println(" cm.");

  // Turn off the laser after measurement
  digitalWrite(LASER_PIN, LOW);

  // Add a small delay before repeating
  delay(2000);
}
This code initializes the LCD, sets up the pins for the ultrasonic sensor and laser module, and continuously measures the distance, displaying it on the LCD and sending it to the Serial Monitor. The laser is turned off after each measurement cycle.