
Arduino UNO EMG Sensor and MPU-6050 Controlled Servo with LCD Display
View and Edit Project In Cirkit Designer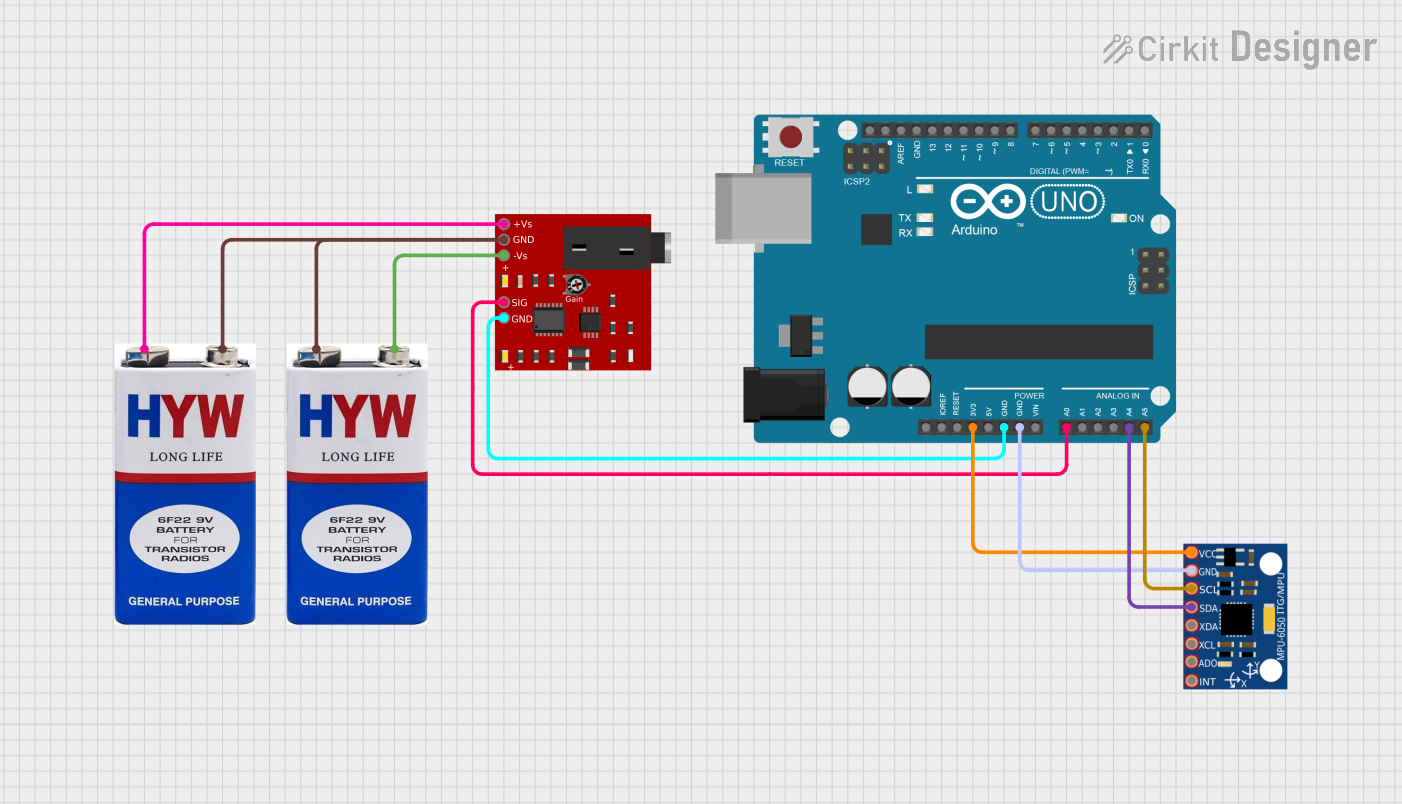
Circuit Documentation
Summary
This circuit is designed to interface an EMG sensor and an MPU-6050 accelerometer/gyroscope with an Arduino UNO. The EMG sensor detects muscle activity and sends the signal to the Arduino, which then controls a servo motor based on the signal. The MPU-6050 provides additional motion data to the Arduino. The circuit is powered by two 9V batteries.
Component List
EMG Sensor
- Description: Measures muscle activity.
- Pins: +Vs, GND, -Vs, SIG
Arduino UNO
- Description: Microcontroller board based on the ATmega328P.
- Pins: UNUSED, IOREF, Reset, 3.3V, 5V, GND, Vin, A0, A1, A2, A3, A4, A5, SCL, SDA, AREF, D13, D12, D11, D10, D9, D8, D7, D6, D5, D4, D3, D2, D1, D0
9V Battery (x2)
- Description: Provides power to the circuit.
- Pins: +, -
MPU-6050
- Description: Accelerometer and gyroscope sensor.
- Pins: VCC, GND, SCL, SDA, XDA, XCL, AD0, INT
Wiring Details
EMG Sensor
- +Vs: Connected to the + terminal of a 9V battery.
- GND: Connected to the GND pin of the Arduino UNO and the - terminal of the same 9V battery.
- -Vs: Connected to the - terminal of another 9V battery.
- SIG: Connected to the A0 pin of the Arduino UNO.
Arduino UNO
- 3.3V: Connected to the VCC pin of the MPU-6050.
- GND: Connected to the GND pin of the MPU-6050 and the GND pin of the EMG sensor.
- A0: Connected to the SIG pin of the EMG sensor.
- A4: Connected to the SDA pin of the MPU-6050.
- A5: Connected to the SCL pin of the MPU-6050.
9V Battery (1)
- +: Connected to the +Vs pin of the EMG sensor.
- -: Connected to the GND pin of the EMG sensor.
9V Battery (2)
- +: Connected to the - terminal of the first 9V battery.
- -: Connected to the -Vs pin of the EMG sensor.
MPU-6050
- VCC: Connected to the 3.3V pin of the Arduino UNO.
- GND: Connected to the GND pin of the Arduino UNO.
- SDA: Connected to the A4 pin of the Arduino UNO.
- SCL: Connected to the A5 pin of the Arduino UNO.
Code Documentation
#include <Servo.h>
#include <Wire.h>  // Include the Wire library for I2C communication
#include <LiquidCrystal_I2C.h>  // Include the LiquidCrystal I2C library

#define THRESHOLD_MAX 1023  // Maximum threshold value
#define THRESHOLD_MIN 0     // Minimum threshold value

#define EMG_PIN 0           // Analog pin for muscle sensor
#define SERVO_PIN 3         // Digital PWM pin for servo

#define BUTTON_INC A1       // Analog pin for increasing threshold button
#define BUTTON_DEC A2       // Analog pin for decreasing threshold button

Servo SERVO_1;

// Set the LCD address to 0x27 for a 16x2 display
// You may need to change this address if your module has a different address
LiquidCrystal_I2C lcd(0x27, 16, 2);

int threshold = 250;  // Initial threshold value

void setup() {
  Serial.begin(115200);
  SERVO_1.attach(SERVO_PIN);

  // Initialize the LCD
  lcd.init();
  lcd.backlight();  // Turn on the backlight
  lcd.setCursor(0, 0);
  lcd.print("Threshold:");
  lcd.setCursor(0, 1);
  lcd.print(threshold);
}

void loop() {
  int value = analogRead(EMG_PIN);

  if (value > threshold) {
    SERVO_1.write(170);
  } else {
    SERVO_1.write(10);
  }

  Serial.println(value);

  // Check if the increase threshold button is pressed
  if (analogRead(BUTTON_INC) < 100) {
    threshold += 10;  // Increase threshold value by 10
    if (threshold > THRESHOLD_MAX) {
      threshold = THRESHOLD_MAX;
    }
    updateLCD();  // Update LCD display with new threshold value
    delay(200);  // Debounce delay
  }

  // Check if the decrease threshold button is pressed
  if (analogRead(BUTTON_DEC) < 100) {
    threshold -= 10;  // Decrease threshold value by 10
    if (threshold < THRESHOLD_MIN) {
      threshold = THRESHOLD_MIN;
    }
    updateLCD();  // Update LCD display with new threshold value
    delay(200);  // Debounce delay
  }
}

void updateLCD() {
  lcd.setCursor(10, 1);
  lcd.print("   ");  // Clear previous threshold value
  lcd.setCursor(10, 1);
  lcd.print(threshold);
}
This code reads the EMG sensor value and controls a servo motor based on a threshold. It also includes functionality to adjust the threshold using buttons and displays the threshold on an LCD.