
Arduino UNO-Based Interactive LED Game with 8x8 Matrix and TM1637 Display
View and Edit Project In Cirkit Designer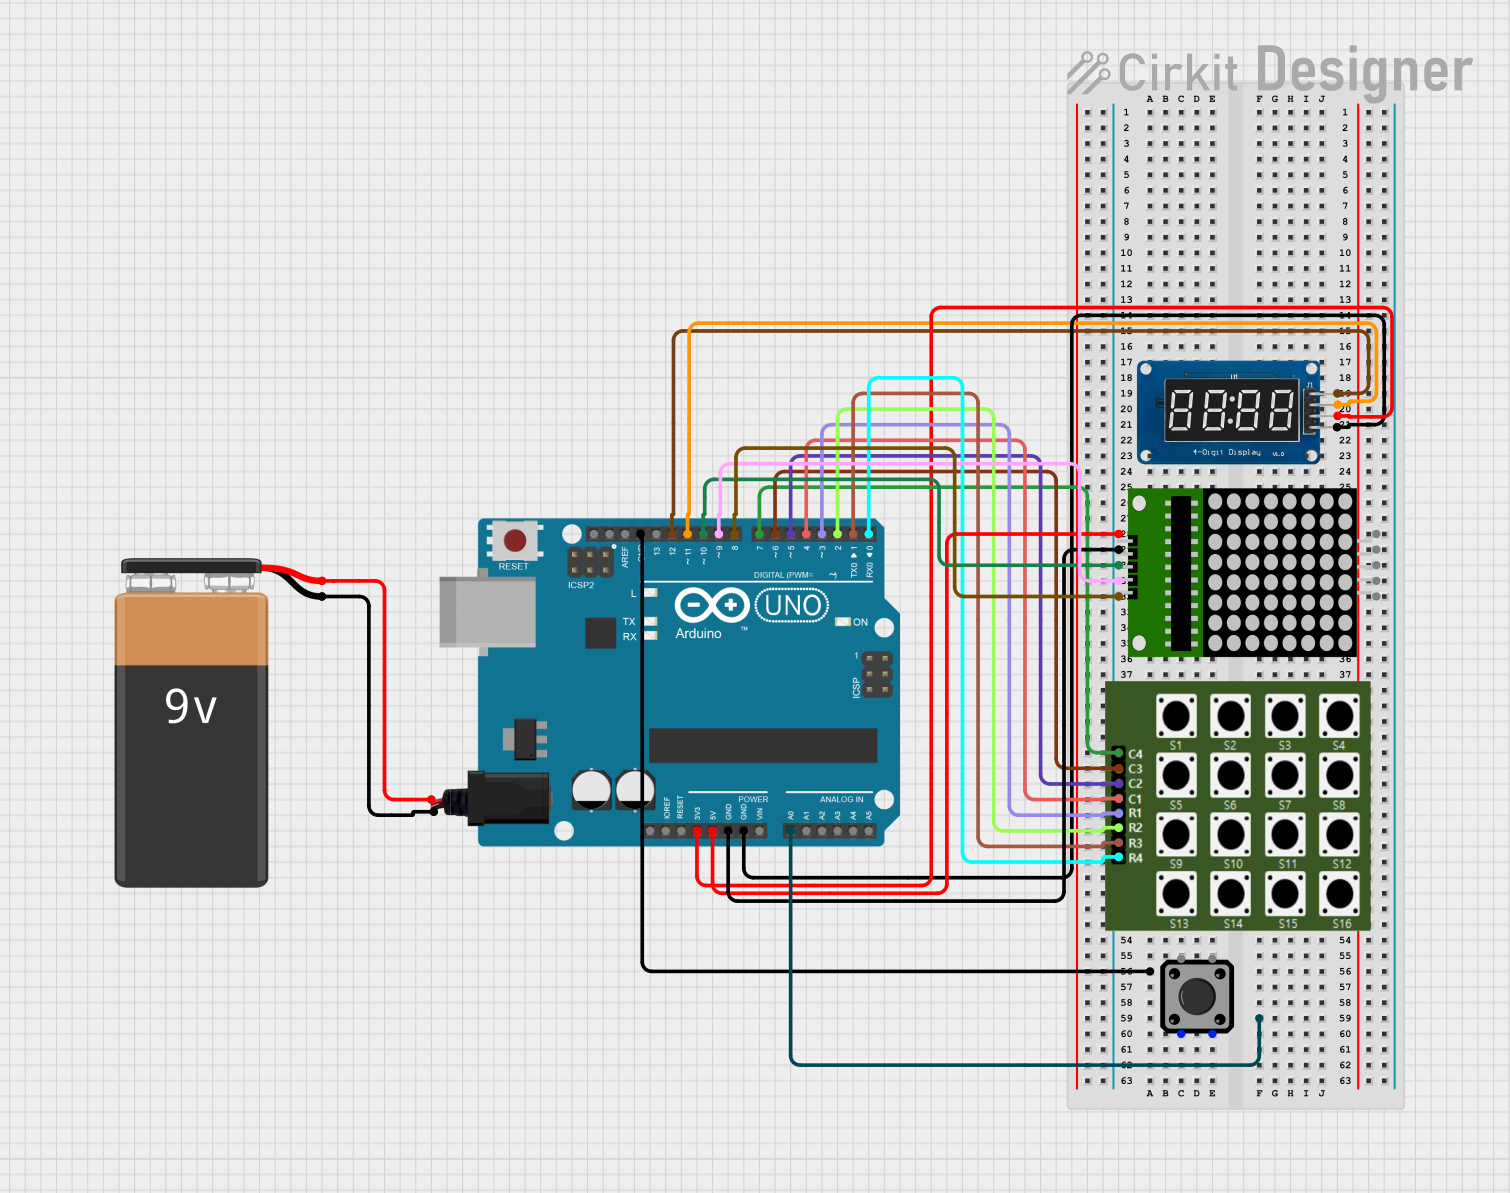
Circuit Documentation
Summary
This circuit is designed to interface an Arduino UNO with an 8x8 LED matrix, a 4x4 keypad, a TM1637 4-digit display, a tactile switch button, and a power supply. The Arduino UNO serves as the central microcontroller, controlling the LED matrix and the TM1637 display, and reading inputs from the keypad and the tactile switch button. The circuit is powered by a 9V battery connected through a power jack.
Component List
8x8 LED Matrix
- Description: An 8x8 LED matrix used for displaying patterns or characters.
- Pins: VCC, DIN, CLK, CS, GND
4x4 Keypad
- Description: A 4x4 matrix keypad used for user input.
- Pins: C1, C2, C3, C4, R1, R2, R3, R4
Power Jack
- Description: A power jack for connecting an external power supply.
- Pins: POSITIF, NEGATIF
TM1637
- Description: A 4-digit 7-segment display module.
- Pins: VCC, CLK, DIO, GND
Tactile Switch Button
- Description: A 12mm square tactile switch button.
- Pins: 1, 2, 3, 4
9V Battery
- Description: A 9V battery used as the power source.
- Pins: +, -
Arduino UNO
- Description: A microcontroller board based on the ATmega328P.
- Pins: UNUSED, IOREF, Reset, 3.3V, 5V, GND, Vin, A0, A1, A2, A3, A4, A5, SCL, SDA, AREF, D13, D12, D11, D10, D9, D8, D7, D6, D5, D4, D3, D2, D1, D0
Wiring Details
8x8 LED Matrix
- VCC: Connected to Arduino UNO 5V
- DIN: Connected to Arduino UNO D10
- CLK: Connected to Arduino UNO D9
- CS: Connected to Arduino UNO D8
- GND: Connected to Arduino UNO GND
4x4 Keypad
- C1: Connected to Arduino UNO D4
- C2: Connected to Arduino UNO D5
- C3: Connected to Arduino UNO D6
- C4: Connected to Arduino UNO D7
- R1: Connected to Arduino UNO D3
- R2: Connected to Arduino UNO D2
- R3: Connected to Arduino UNO D1
- R4: Connected to Arduino UNO D0
Power Jack
- POSITIF: Connected to 9V Battery +
- NEGATIF: Connected to 9V Battery -
TM1637
- VCC: Connected to Arduino UNO 3.3V
- CLK: Connected to Arduino UNO D12
- DIO: Connected to Arduino UNO D11
- GND: Connected to Arduino UNO GND
Tactile Switch Button
- Pin 3: Connected to Pin 4 of the same button
Arduino UNO
- GND: Connected to GND of 8x8 LED Matrix, TM1637, and other components as needed
- A0: Used for reading the start button input
- 5V: Connected to VCC of 8x8 LED Matrix
- 3.3V: Connected to VCC of TM1637
- D10: Connected to DIN of 8x8 LED Matrix
- D9: Connected to CLK of 8x8 LED Matrix
- D8: Connected to CS of 8x8 LED Matrix
- D6: Connected to C3 of 4x4 Keypad
- D5: Connected to C2 of 4x4 Keypad
- D7: Connected to C4 of 4x4 Keypad
- D4: Connected to C1 of 4x4 Keypad
- D3: Connected to R1 of 4x4 Keypad
- D2: Connected to R2 of 4x4 Keypad
- D1: Connected to R3 of 4x4 Keypad
- D0: Connected to R4 of 4x4 Keypad
- D12: Connected to CLK of TM1637
- D11: Connected to DIO of TM1637
Code Documentation
#include <LedControl.h>
#include <TM1637Display.h>

// Piny MAX7219 (panel LED 8x8)
#define DATA_IN   10  // DIN
#define CLK       8   // CLK
#define LOAD      9   // CS

// Piny TM1637 (4-cyfrowy wyświetlacz)
#define TM1637_CLK 12
#define TM1637_DIO 11

// Piny dla panelu przycisków (4x4)
const int rowPins[4] = {3, 2, 1, 0};    // Rzędy: r1, r2, r3, r4
const int colPins[4] = {4, 5, 6, 7};    // Kolumny: c1, c2, c3, c4

// Pin dla przycisku startowego
#define START_BUTTON_PIN A0

// Obiekty sterujące wyświetlaczem i panelem LED
LedControl lc = LedControl(DATA_IN, CLK, LOAD, 1);
TM1637Display display(TM1637_CLK, TM1637_DIO);

// Flagi i zmienne gry
bool gameActive = false;  // Czy gra jest aktywna
int score = 0;            // Wynik gracza
int currentSquare = -1;   // Aktualny kwadrat, który świeci
unsigned long lightDuration = 2000; // Czas świecenia LED (ms)
unsigned long interval = 3000;      // Odstęp między kolejnymi światłami (ms)
unsigned long minLightDuration = 700;  // Minimalny czas świecenia LED (ms)
unsigned long minInterval = 600;       // Minimalny odstęp między światłami (ms)

void setup() {
  // Inicjalizacja panelu LED
  lc.shutdown(0, false);
  lc.setIntensity(0, 8);
  lc.clearDisplay(0);

  // Inicjalizacja wyświetlacza TM1637
  display.setBrightness(7);
  display.clear();

  // Konfiguracja pinów dla przycisków
  for (int i = 0; i < 4; i++) {
    pinMode(rowPins[i], OUTPUT);
    digitalWrite(rowPins[i], HIGH);  // Rzędy w stanie wysokim
    pinMode(colPins[i], INPUT_PULLUP); // Kolumny z pull-up
  }

  // Konfiguracja przycisku startowego
  pinMode(START_BUTTON_PIN, INPUT_PULLUP);
}

void loop() {
  if (!gameActive) {
    waitForStart(); // Oczekiwanie na rozpoczęcie gry
  } else {
    playGame();     // Rozgrywka
  }
}

// Funkcja oczekująca na wciśnięcie przycisku startowego
void waitForStart() {
  display.clear(); // Wyłącz wyświetlacz
  lc.clearDisplay(0); // Wyłącz panel LED

  while (!gameActive) {
    if (digitalRead(START_BUTTON_PIN) == LOW) { // Gdy przycisk startowy jest wciśnięty
      display.showNumberDec(0); // Wyświetl 0 na początku gry
      score = 0;               // Reset wyniku
      gameActive = true;       // Rozpocznij grę
      lightDuration = 2000;    // Reset czasu świecenia LED
      interval = 3000;         // Reset odstępu między światłami
      delay(100);              // Stabilizacja wejścia
    }
  }
}

// Funkcja głównej rozgrywki
void playGame() {
  // Wybierz losowy kwadrat na panelu LED
  currentSquare = random(0, 16);
  lightSquare(currentSquare);

  unsigned long startTime = millis(); // Czas rozpoczęcia świecenia
  bool inputValid = false;            // Flaga dla poprawnej reakcji

  // Pętla świecenia LED
  while (millis() - startTime < lightDuration) {
    int button = readButtons();       // Sprawdź wciśnięcie przycisków
    if (button != -1) {               // Jeśli przycisk został wciś