
Battery-Powered Arduino UNO Smart Light with NeoPixel and ADXL345
View and Edit Project In Cirkit Designer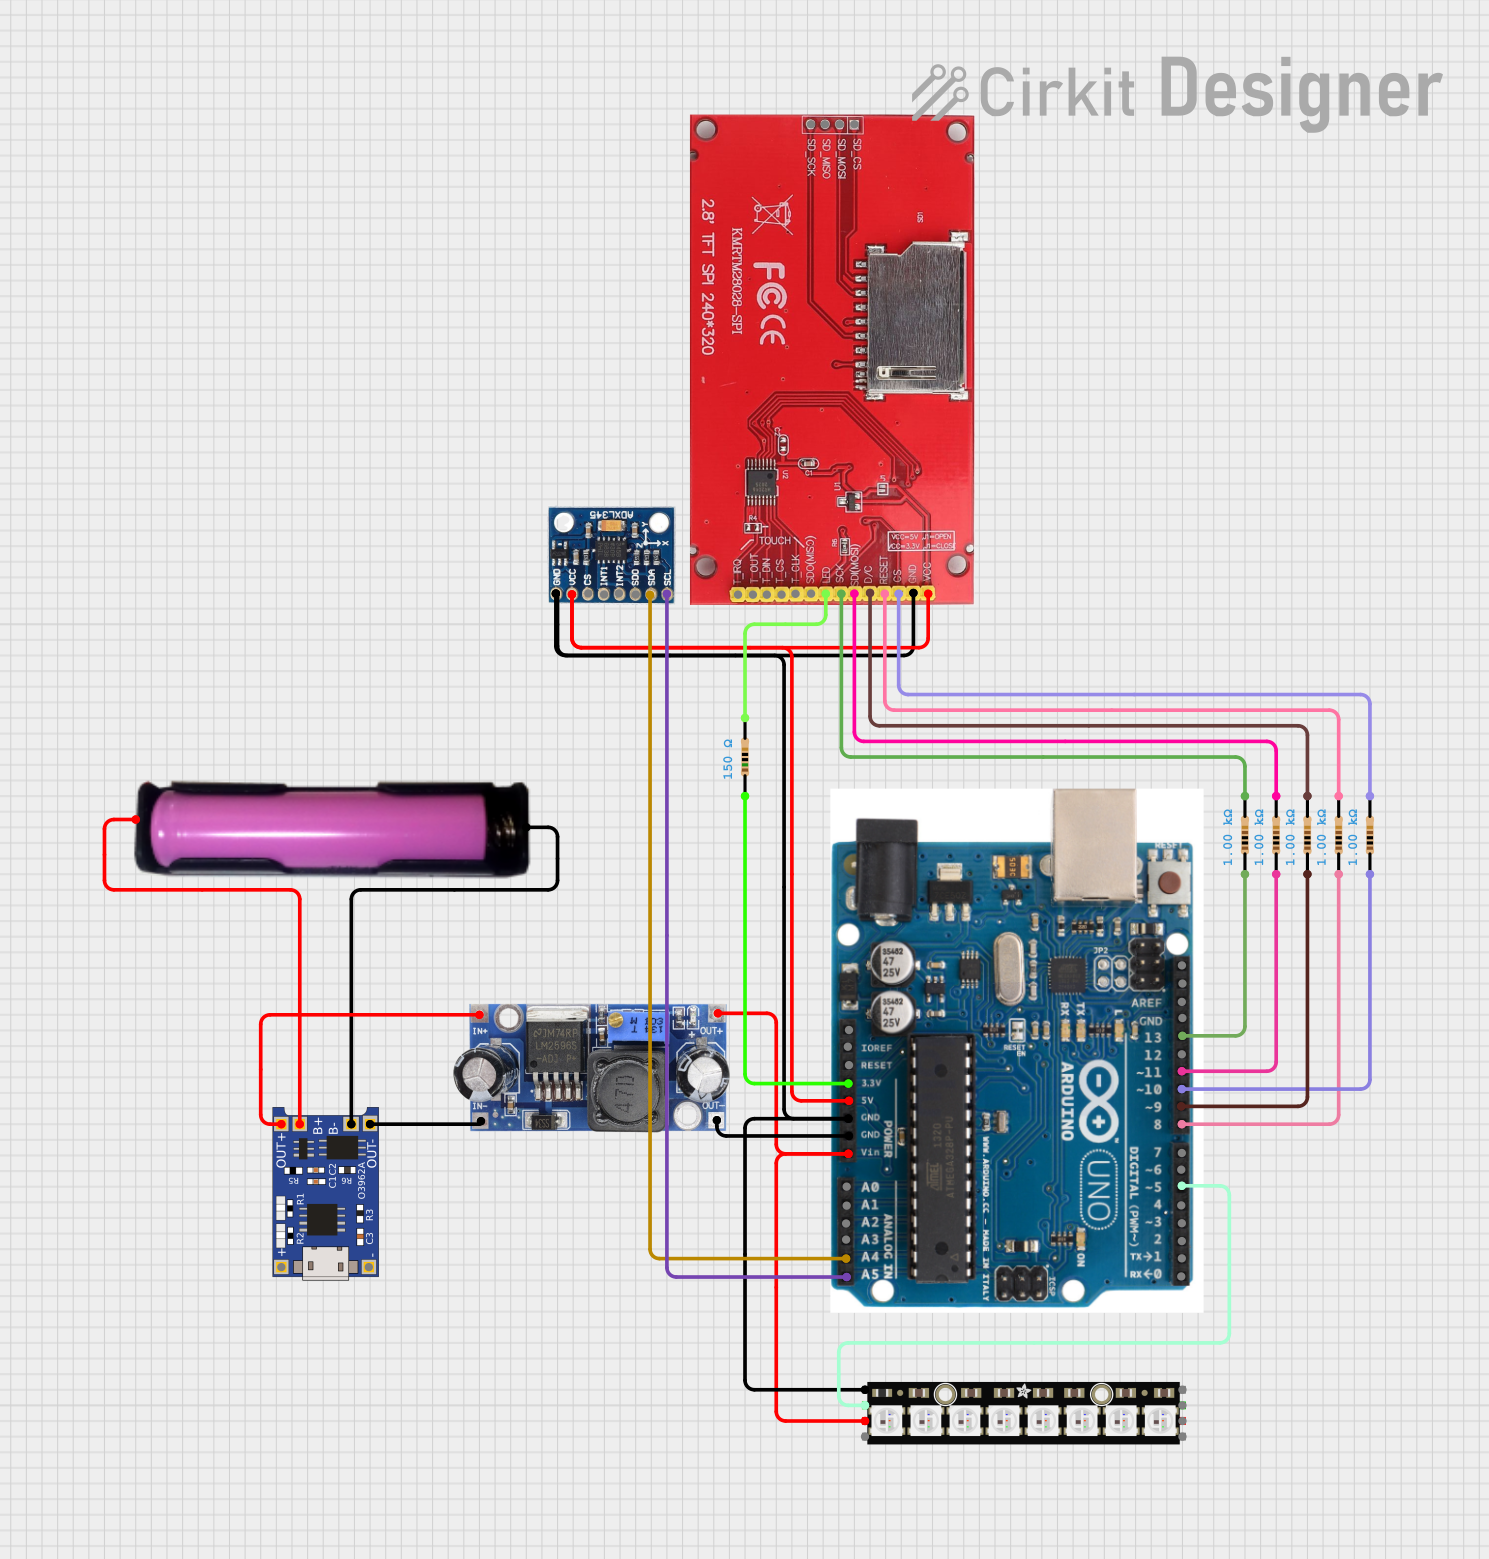
Circuit Documentation
Summary
This circuit involves an Arduino UNO microcontroller, a TP4056 battery charger, a 18650 battery in a holder, a DC-DC converter, an Adafruit NeoPixel Stick, an ADXL345 accelerometer, an ILI9341 TFT display, and several resistors. The circuit is designed to control an LED strip and display information on a TFT screen while being powered by a rechargeable battery.
Component List
Arduino UNO
- Description: A microcontroller board based on the ATmega328P.
- Pins: SDA, AREF, GND, 13, 12, 11, 10, 9, 8, 7, 6, 5, 4, 3, 2, 1, 0, A5, A4, A3, A2, A1, A0, Vin, 5V, 3.3V, RESET, IOREF, SCL
TP4056
- Description: A lithium-ion battery charger module.
- Pins: OUT-, B-, B+, OUT+, IN-, IN+
18650 in holder
- Description: A holder for a 18650 lithium-ion battery.
- Pins: GND, VCC
DC-DC Converter
- Description: A module to convert DC voltage levels.
- Pins: +VCC IN, GND IN, +VCC OUT, GND OUT
Adafruit NeoPixel Stick
- Description: An LED strip with individually addressable RGB LEDs.
- Pins: GND, DATAOUT, +5V, DATAIN
Resistor (150 Ohms)
- Description: A resistor with a resistance of 150 Ohms.
- Pins: pin1, pin2
Resistor (1000 Ohms)
- Description: A resistor with a resistance of 1000 Ohms.
- Pins: pin1, pin2
ADXL345
- Description: A 3-axis accelerometer.
- Pins: GND, VCC, CS, INT1, INT2, SDO, SDA, SCL
ILI9341 TFT Display
- Description: A TFT display module.
- Pins: SD_CS, SD_MOSI, SD_MISO, SD_SCK, VCC, GND, CS, RESET, D/C, SD(MOSI), SCK, LED, SDO(MISO), T_CLK, T_CS, T_DIN, T_OUT, T_IRQ
Wiring Details
Arduino UNO
- Pin 13: Connected to pin1 of a 1000 Ohms resistor.
- Pin 11: Connected to pin1 of a 1000 Ohms resistor.
- Pin 10: Connected to pin1 of a 1000 Ohms resistor.
- Pin 9: Connected to pin1 of a 1000 Ohms resistor.
- Pin 8: Connected to pin1 of a 1000 Ohms resistor.
- Pin 5: Connected to DATAIN of the Adafruit NeoPixel Stick.
- Pin A5: Connected to SCL of the ADXL345.
- Pin A4: Connected to SDA of the ADXL345.
- Pin Vin: Connected to +5V of the Adafruit NeoPixel Stick and +VCC OUT of the DC-DC converter.
- Pin GND: Connected to GND OUT of the DC-DC converter, GND of the ILI9341 TFT display, GND of the ADXL345, and GND of the Adafruit NeoPixel Stick.
- Pin 5V: Connected to VCC of the ILI9341 TFT display and VCC of the ADXL345.
- Pin 3.3V: Connected to pin1 of a 150 Ohms resistor.
TP4056
- OUT-: Connected to GND IN of the DC-DC converter.
- B-: Connected to GND of the 18650 in holder.
- B+: Connected to VCC of the 18650 in holder.
- OUT+: Connected to +VCC IN of the DC-DC converter.
18650 in holder
- GND: Connected to B- of the TP4056.
- VCC: Connected to B+ of the TP4056.
DC-DC Converter
- +VCC IN: Connected to OUT+ of the TP4056.
- GND IN: Connected to OUT- of the TP4056.
- +VCC OUT: Connected to Vin of the Arduino UNO and +5V of the Adafruit NeoPixel Stick.
- GND OUT: Connected to GND of the Arduino UNO.
Adafruit NeoPixel Stick
- DATAIN: Connected to pin 5 of the Arduino UNO.
- +5V: Connected to Vin of the Arduino UNO and +VCC OUT of the DC-DC converter.
- GND: Connected to GND of the Arduino UNO.
ADXL345
- SCL: Connected to pin A5 of the Arduino UNO.
- SDA: Connected to pin A4 of the Arduino UNO.
- GND: Connected to GND of the Arduino UNO.
- VCC: Connected to 5V of the Arduino UNO.
ILI9341 TFT Display
- GND: Connected to GND of the Arduino UNO.
- VCC: Connected to 5V of the Arduino UNO.
- LED: Connected to pin2 of a 150 Ohms resistor.
- CS: Connected to pin2 of a 1000 Ohms resistor.
- RESET: Connected to pin2 of a 1000 Ohms resistor.
- D/C: Connected to pin2 of a 1000 Ohms resistor.
- SD(MOSI): Connected to pin2 of a 1000 Ohms resistor.
- SCK: Connected to pin2 of a 1000 Ohms resistor.
Code Documentation
Arduino UNO Code
#include "Adafruit_NeoPixel.h"

#define LED_COUNT 5
#define LED_PIN 5

Adafruit_NeoPixel strip = Adafruit_NeoPixel(LED_COUNT, LED_PIN, NEO_GRB + NEO_KHZ800);

void setup() {
  strip.begin(); // Initialize the strip.
}

void loop() {
  for (int i = 0; i < LED_COUNT; i++) {
    strip.setPixelColor(i, strip.Color(255, 0, 0)); // Red color.
    strip.show();
    delay(300);
  }
  for (int i = 0; i < LED_COUNT; i++) {
    strip.setPixelColor(i, strip.Color(0, 0, 0)); // Turn off.
  }
  strip.show();
  delay(300);
}
Adafruit NeoPixel Stick Code
#include "Adafruit_NeoPixel.h"

#define LED_COUNT 5
#define LED_PIN 5

Adafruit_NeoPixel strip = Adafruit_NeoPixel(LED_COUNT, LED_PIN, NEO_GRB + NEO_KHZ800);

void setup() {
  strip.begin(); // Initialize the strip.
}

void loop() {
  for (int i = 0; i < LED_COUNT; i++) {
    strip.setPixelColor(i, strip.Color(255, 0, 0)); // Red color.
    strip.show();
    delay(300);
  }
  for (int i = 0; i < LED_COUNT; i++) {
    strip.setPixelColor(i, strip.Color(0, 0, 0)); // Turn off.
  }
  strip.show();
  delay(300);
}
This documentation provides a comprehensive overview of the circuit, including a summary, detailed component list, wiring details, and the code used for the microcontrollers.