
Arduino UNO-Based Line-Following and Obstacle-Avoiding Robot with IR and Ultrasonic Sensors
View and Edit Project In Cirkit Designer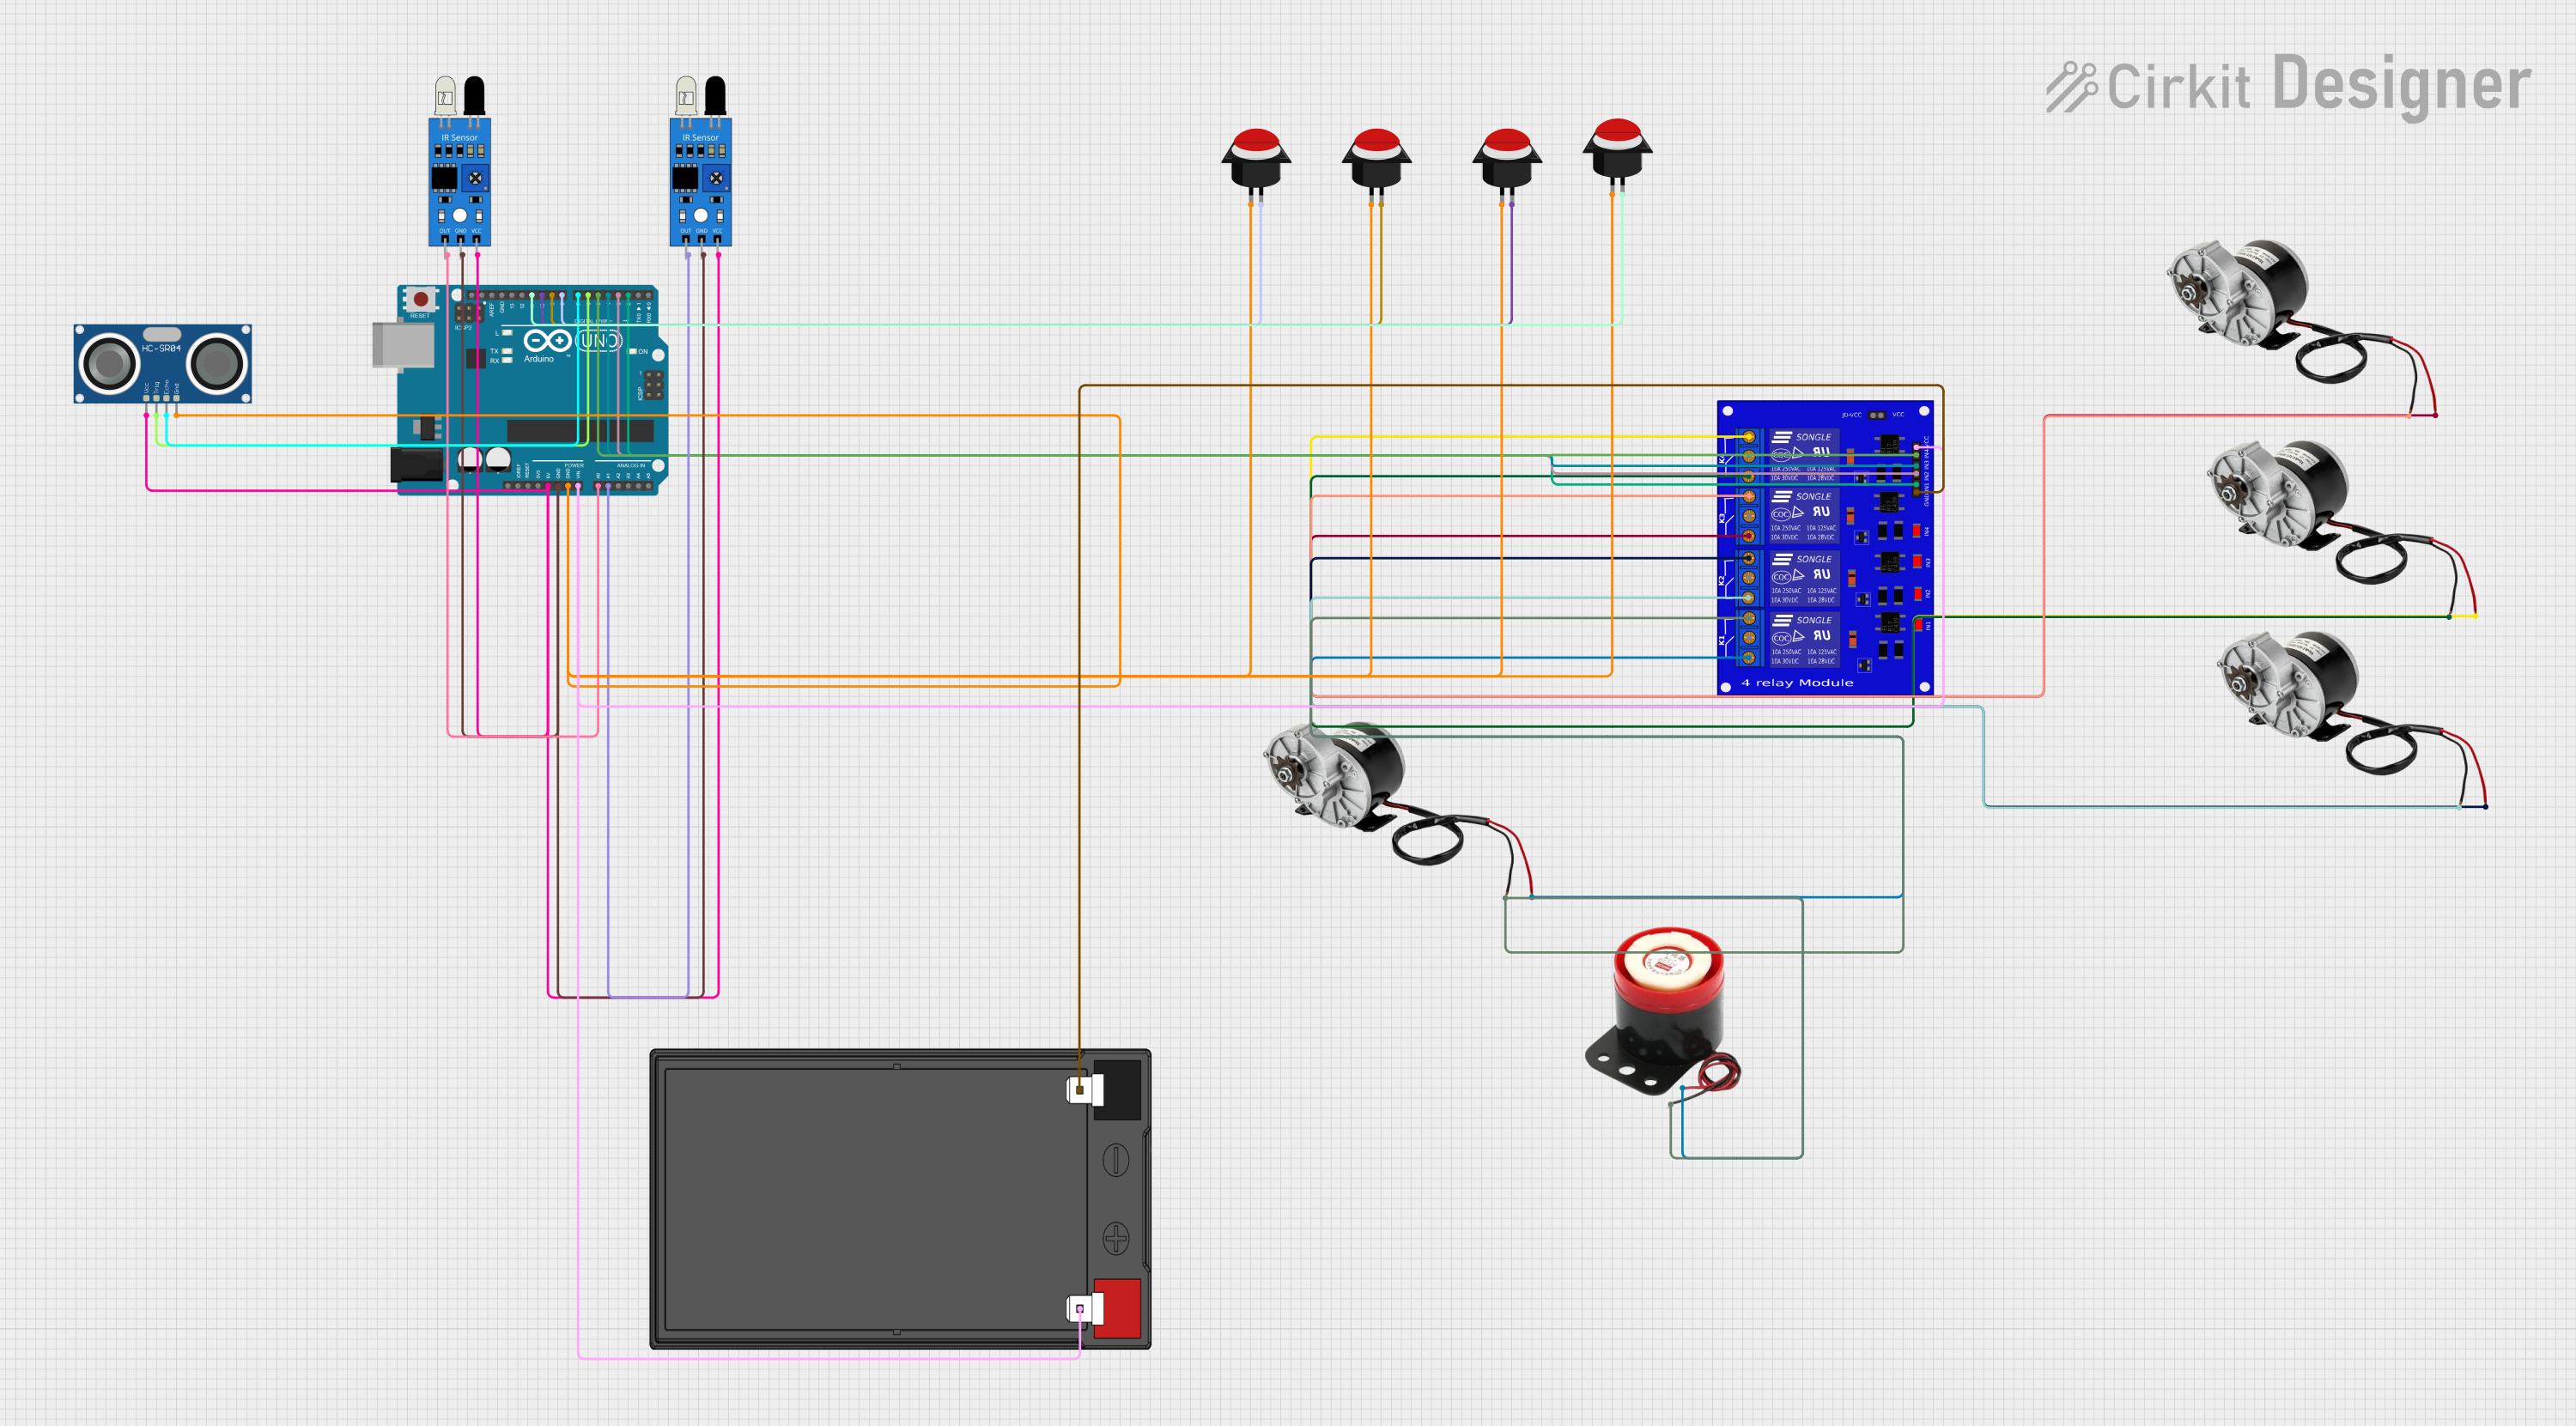
Circuit Documentation
Summary
This circuit is designed to control a robotic vehicle using an Arduino UNO microcontroller. The vehicle is equipped with multiple sensors, including IR sensors and an ultrasonic sensor, to enable line-following and obstacle detection capabilities. The vehicle's movement is controlled by DC motors, which are driven through a relay module. Additionally, push buttons are used for manual control of the vehicle's movement.
Component List
250W 12V Electric Motor Brush Motor DC
- Pins: POSITIF, NEGATIF
- Description: High-power DC motor for driving the vehicle.
IR Sensor
- Pins: out, gnd, vcc
- Description: Infrared sensor for line-following.
Push Button Round
- Pins: leg0, leg1
- Description: Push button for manual control.
Arduino UNO
- Pins: UNUSED, IOREF, Reset, 3.3V, 5V, GND, Vin, A0, A1, A2, A3, A4, A5, SCL, SDA, AREF, D13, D12, D11, D10, D9, D8, D7, D6, D5, D4, D3, D2, D1, D0
- Description: Microcontroller for controlling the vehicle.
Relevo 4 Canales
- Pins: JD-VCC, VCC2, K4-NO, K4-NF, K4-Com, K3-NO, K3-NF, K3-Com, K1-NO, K1-NF, K1-Com, K2-NO, K2-NF, K2-Com, IN4, VCC, IN2, IN3, GND, IN1
- Description: Relay module for controlling the DC motors.
HC-SR04 Ultrasonic Sensor
- Pins: VCC, TRIG, ECHO, GND
- Description: Ultrasonic sensor for obstacle detection.
12V 7Ah Battery
- Pins: 12v +, 12v -
- Description: Power source for the circuit.
12V Buzzer
- Pins: +, -
- Description: Buzzer for audio alerts.
Wiring Details
250W 12V Electric Motor Brush Motor DC
Motor 1
- POSITIF: Connected to K4-NO on Relevo 4 Canales
- NEGATIF: Connected to K4-Com on Relevo 4 Canales
Motor 2
- POSITIF: Connected to K3-Com on Relevo 4 Canales
- NEGATIF: Connected to K3-NO on Relevo 4 Canales
Motor 3
- POSITIF: Connected to K1-Com on Relevo 4 Canales
- NEGATIF: Connected to K1-NO on Relevo 4 Canales
Motor 4
- POSITIF: Connected to K2-NO on Relevo 4 Canales
- NEGATIF: Connected to K2-Com on Relevo 4 Canales
IR Sensor
Sensor 1
- vcc: Connected to 5V on Arduino UNO
- gnd: Connected to GND on Arduino UNO
- out: Connected to A0 on Arduino UNO
Sensor 2
- vcc: Connected to 5V on Arduino UNO
- gnd: Connected to GND on Arduino UNO
- out: Connected to A1 on Arduino UNO
Push Button Round
Button 1
- leg0: Connected to GND on Arduino UNO
- leg1: Connected to D10 on Arduino UNO
Button 2
- leg0: Connected to GND on Arduino UNO
- leg1: Connected to D9 on Arduino UNO
Button 3
- leg0: Connected to GND on Arduino UNO
- leg1: Connected to D8 on Arduino UNO
Button 4
- leg0: Connected to GND on Arduino UNO
- leg1: Connected to D11 on Arduino UNO
Arduino UNO
- 5V: Connected to vcc on IR Sensor 1, IR Sensor 2, and VCC on HC-SR04 Ultrasonic Sensor
- GND: Connected to gnd on IR Sensor 1, IR Sensor 2, and GND on HC-SR04 Ultrasonic Sensor
- Vin: Connected to VCC on Relevo 4 Canales and 12v + on 12V 7Ah Battery
- A0: Connected to out on IR Sensor 1
- A1: Connected to out on IR Sensor 2
- D2: Connected to IN1 on Relevo 4 Canales
- D3: Connected to IN2 on Relevo 4 Canales
- D4: Connected to IN3 on Relevo 4 Canales
- D5: Connected to IN4 on Relevo 4 Canales
- D6: Connected to TRIG on HC-SR04 Ultrasonic Sensor
- D7: Connected to ECHO on HC-SR04 Ultrasonic Sensor
- D8: Connected to leg1 on Push Button 3
- D9: Connected to leg1 on Push Button 2
- D10: Connected to leg1 on Push Button 1
- D11: Connected to leg1 on Push Button 4
Relevo 4 Canales
- VCC: Connected to Vin on Arduino UNO and 12v + on 12V 7Ah Battery
- GND: Connected to 12v - on 12V 7Ah Battery
- IN1: Connected to D2 on Arduino UNO
- IN2: Connected to D3 on Arduino UNO
- IN3: Connected to D4 on Arduino UNO
- IN4: Connected to D5 on Arduino UNO
- K4-NO: Connected to POSITIF on Motor 1
- K4-Com: Connected to NEGATIF on Motor 1
- K3-NO: Connected to NEGATIF on Motor 2
- K3-Com: Connected to POSITIF on Motor 2
- K1-NO: Connected to NEGATIF on Motor 3
- K1-Com: Connected to POSITIF on Motor 3
- K2-NO: Connected to POSITIF on Motor 4
- K2-Com: Connected to NEGATIF on Motor 4
HC-SR04 Ultrasonic Sensor
- VCC: Connected to 5V on Arduino UNO
- GND: Connected to GND on Arduino UNO
- TRIG: Connected to D6 on Arduino UNO
- ECHO: Connected to D7 on Arduino UNO
12V 7Ah Battery
- 12v +: Connected to Vin on Arduino UNO and VCC on Relevo 4 Canales
- 12v -: Connected to GND on Relevo 4 Canales
12V Buzzer
- +: Connected to POSITIF on Motor 3
- -: Connected to NEGATIF on Motor 3
Code Documentation
// Pin Definitions
const int leftMotorForward = 2;
const int leftMotorReverse = 3;
const int rightMotorForward = 4;
const int rightMotorReverse = 5;
const int irSensorLeft = A0;
const int irSensorRight = A1;
const int ultrasonicTrigger = 6;
const int ultrasonicEcho = 7;
const int forwardButton = 8;
const int leftTurnButton = 9;
const int rightTurnButton = 10;
const int stopButton = 11;

// Variables
bool manualControl = false;

// Function Prototypes
void lineFollowing();
bool detectObstacle();
void moveForward();
void turnLeft();
void turnRight();
void stopMotors();

// Arduino setup function
void setup() {
    pinMode(leftMotorForward, OUTPUT);
    pinMode(leftMotorReverse, OUTPUT);
    pinMode(rightMotorForward, OUTPUT);
    pinMode(rightMotorReverse, OUTPUT);
    pinMode(irSensorLeft, INPUT);
    pinMode(irSensorRight, INPUT);
    pinMode(ultrasonicTrigger, OUTPUT);
    pinMode(ultrasonicEcho, INPUT);
    pinMode(forwardButton, INPUT_PULLUP);
    pinMode(leftTurnButton, INPUT_PULLUP);
    pinMode(rightTurnButton, INPUT_PULLUP);
    pinMode(stopButton, INPUT_PULLUP);
    Serial.begin(9600);
}

// Arduino loop function
void loop() {
    if (digitalRead(stopButton) == LOW) {
        stopMotors();
    } else if (digitalRead(forwardButton) == LOW) {
        manualControl = true;
        moveForward();
    } else if (digitalRead(leftTurnButton) == LOW) {
        manualControl = true;
        turnLeft();
    } else if (digitalRead(rightTurnButton) == LOW) {
        manualControl = true;
        turnRight();
    } else {
        manualControl = false;
        lineFollowing();
    }

    if (detectObstacle()) {
        stopMotors();
    }
}

// Line-following logic