
Arduino Pro Mini-Based LED Control System with Pushbutton Interface
View and Edit Project In Cirkit Designer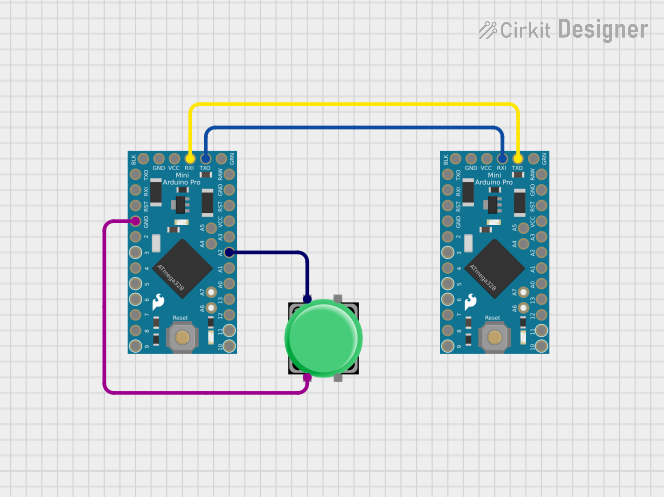
Circuit Documentation
Summary
This circuit consists of two Arduino Pro Mini microcontrollers and a pushbutton. The two Arduinos communicate with each other via serial communication. One Arduino is responsible for toggling an LED based on commands received from the other Arduino, which sends commands when a pushbutton is pressed.
Component List
Arduino Pro Mini
- Description: A compact microcontroller board based on the ATmega328P.
- Pins: DTR, TXO, RXI, VCC, GND, A4, A5, RAW, RESET, A3, A2, A1, A0, SCK, MISO, MOSI, D10, D9, D8, D7, D6, D5, D4, D3, D2
Pushbutton
- Description: A simple pushbutton switch.
- Pins: Pin 1, Pin 2, Pin 3, Pin 4
Wiring Details
Arduino Pro Mini (1)
- TXO: Connected to RXI of Arduino Pro Mini (2)
- RXI: Connected to TXO of Arduino Pro Mini (2)
Arduino Pro Mini (2)
- TXO: Connected to RXI of Arduino Pro Mini (1)
- RXI: Connected to TXO of Arduino Pro Mini (1)
- A2: Connected to Pin 1 of Pushbutton
- GND: Connected to Pin 2 of Pushbutton
Pushbutton
- Pin 1: Connected to A2 of Arduino Pro Mini (2)
- Pin 2: Connected to GND of Arduino Pro Mini (2)
Code Documentation
Arduino Pro Mini (1)
File Name: sketch.ino
const int indicationLedPin = 13; // Pin for the indication LED
bool ledState = false; // Variable to track the state of the LED

void setup() {
  pinMode(indicationLedPin, OUTPUT);
  Serial.begin(9600);  // Start serial communication at 9600 baud
}

void loop() {
  if (Serial.available() > 0) {
    String command = Serial.readStringUntil('\n'); // Read incoming command

    if (command == "TOGGLE") {
      ledState = !ledState; // Toggle the LED state
      digitalWrite(indicationLedPin, ledState ? HIGH : LOW); // Set the LED accordingly

      // Send feedback to Arduino 1 about the LED state
      if (ledState) {
        Serial.println("1");  // LED is ON
      } else {
        Serial.println("0");  // LED is OFF
      }
    }
  }
}
Arduino Pro Mini (2)
File Name: sketch.ino
const int buttonPin = A2;   // Pin for the button
const int feedbackLedPin = 13; // Pin for feedback LED
int buttonState = 0;          // Variable to store the button state
int lastButtonState = 0;      // Last button state to detect changes

void setup() {
  pinMode(buttonPin, INPUT_PULLUP);
  pinMode(feedbackLedPin, OUTPUT);
  Serial.begin(9600);  // Start serial communication at 9600 baud
}

void loop() {
  buttonState = digitalRead(buttonPin);

  // Check if the button state changes from LOW to HIGH (button press)
  if (buttonState == HIGH && lastButtonState == LOW) {
    // Send signal to Arduino 2 to toggle LED
    Serial.println("TOGGLE");

    // Wait for feedback from Arduino 2
    while (Serial.available() == 0); // Wait for data to be available
    char received = Serial.read(); // Read the feedback signal from Arduino 2

    if (received == '1') {
      digitalWrite(feedbackLedPin, HIGH); // Turn on feedback LED to match Arduino 2's state
    } else {
      digitalWrite(feedbackLedPin, LOW);  // Turn off feedback LED to match Arduino 2's state
    }

    delay(200);  // Debounce delay for button
  }

  lastButtonState = buttonState;
}