
Arduino UNO-Based Automated Water Quality Monitoring and Pump Control System
View and Edit Project In Cirkit Designer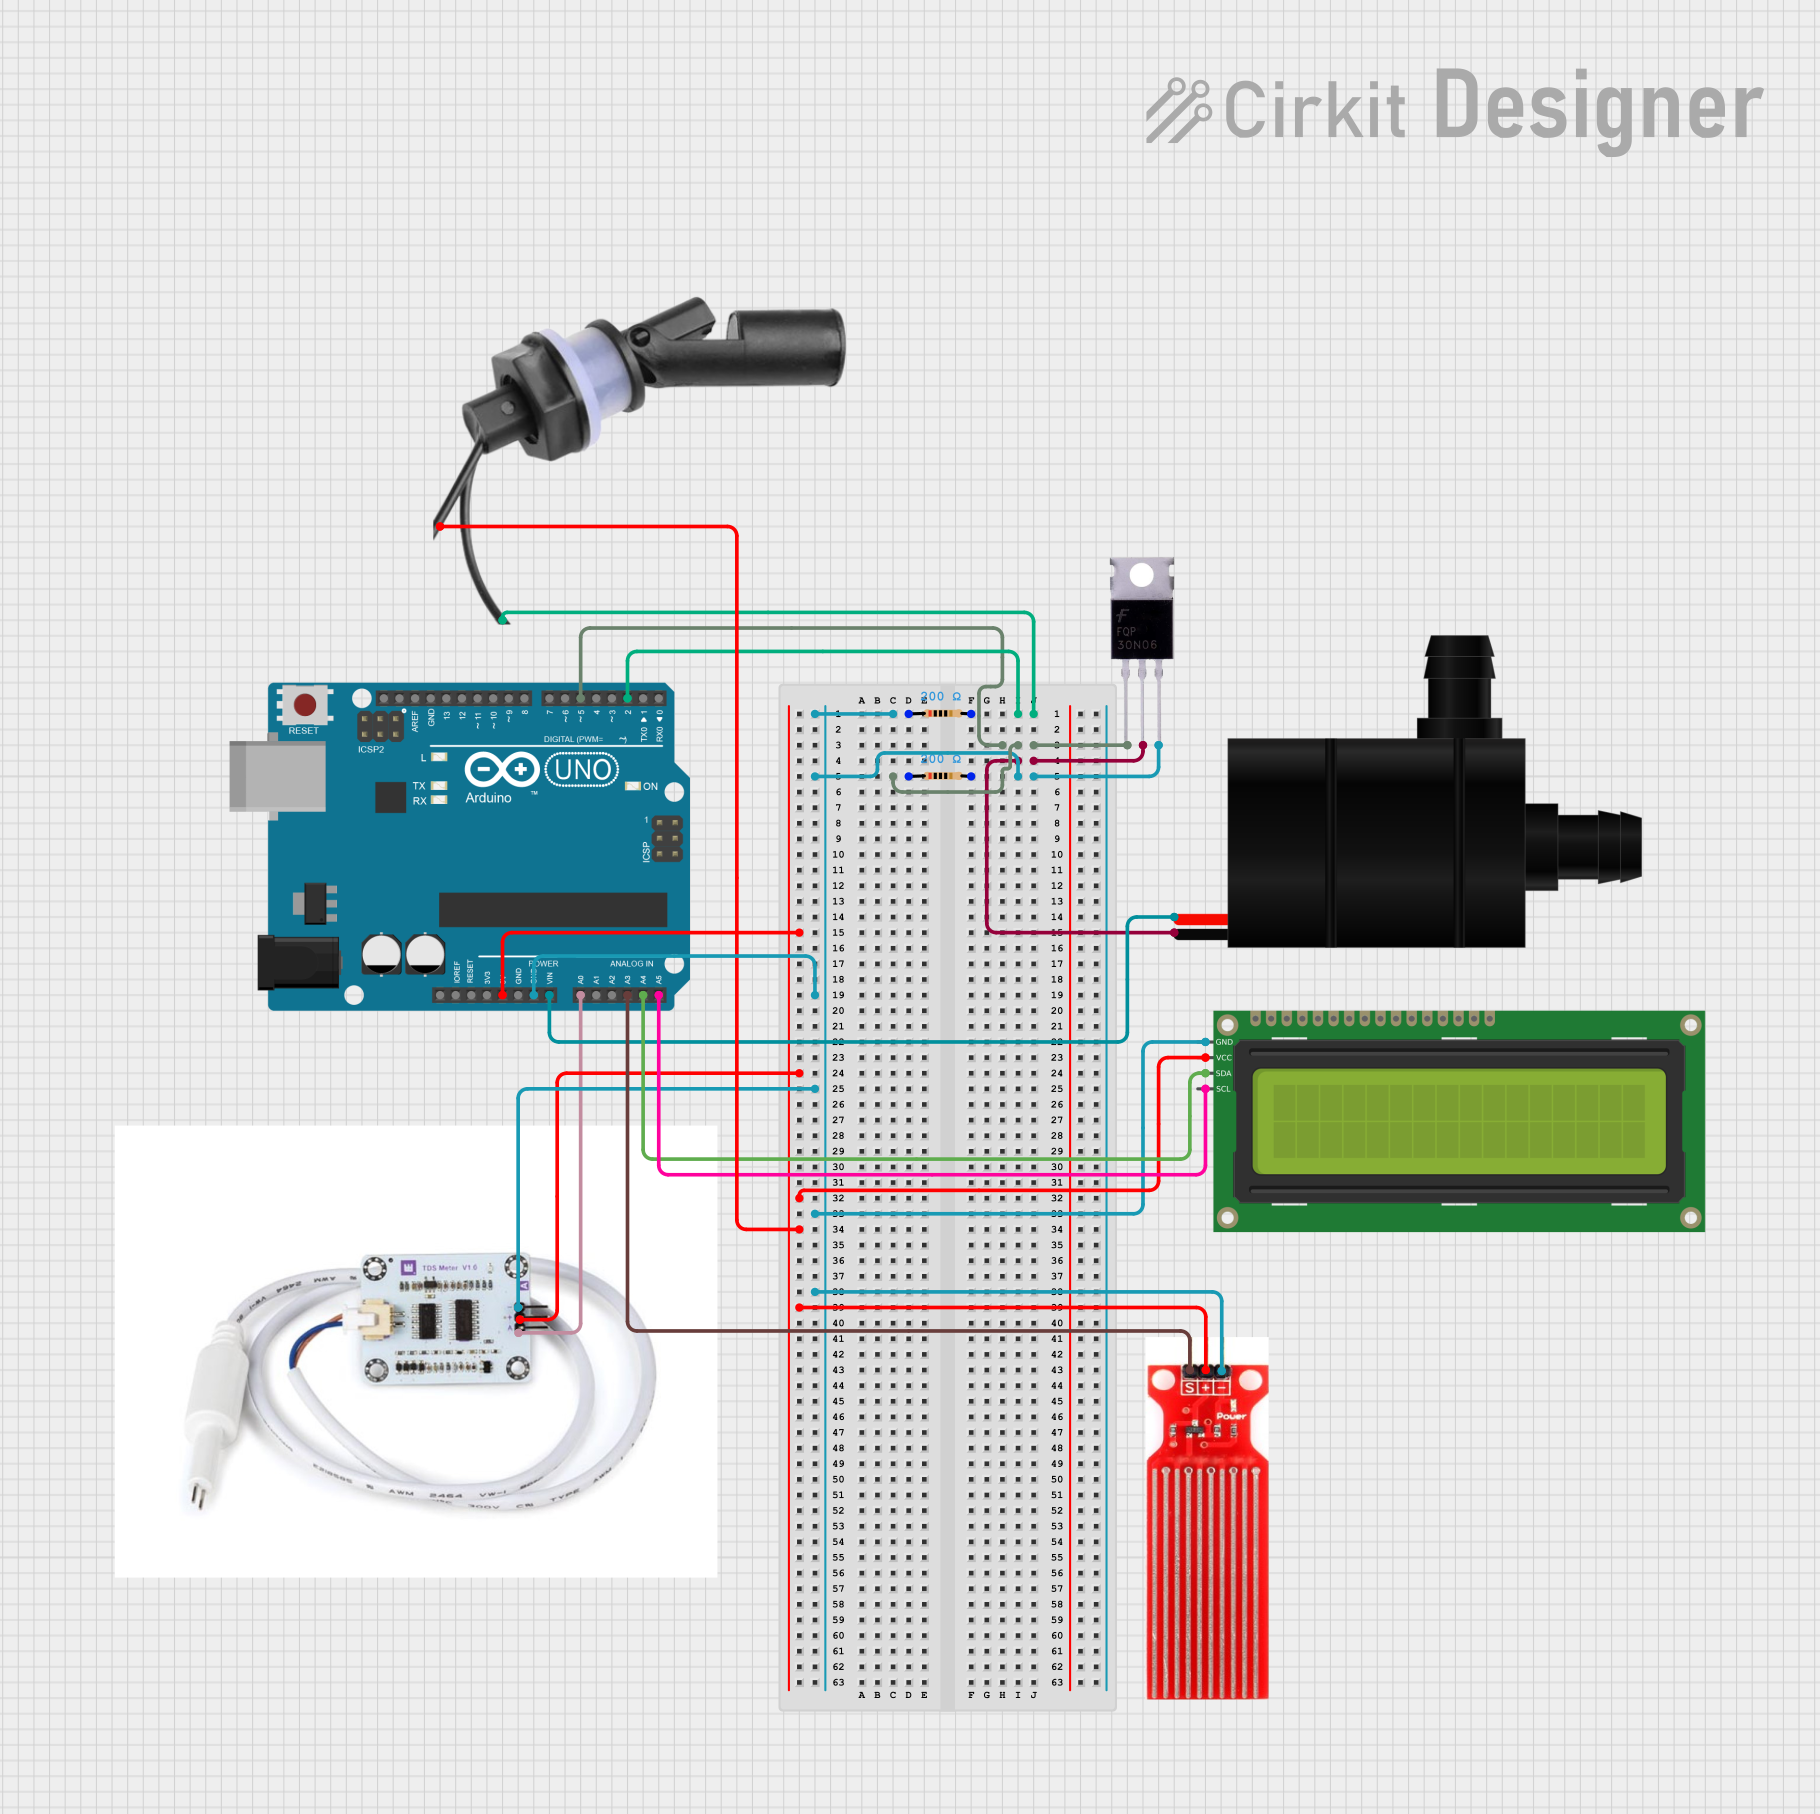
Circuit Documentation
Summary
This circuit is designed to monitor water quality and control a water pump based on sensor inputs. It utilizes an Arduino UNO microcontroller to interface with various sensors and a water pump. The sensors include a water sensor, a TDS (Total Dissolved Solids) sensor, and a water level float switch sensor. The circuit also includes a 16x2 I2C LCD for displaying information.
Component List
Arduino UNO
- Description: Microcontroller board based on the ATmega328P.
- Pins: UNUSED, IOREF, Reset, 3.3V, 5V, GND, Vin, A0, A1, A2, A3, A4, A5, SCL, SDA, AREF, D13, D12, D11, D10, D9, D8, D7, D6, D5, D4, D3, D2, D1, D0
Water Sensor
- Description: Sensor to detect the presence of water.
- Pins: Signal, VCC, GND
Water Pump
- Description: Pump to move water.
- Pins: +, -
TDS Sensor (for water quality)
- Description: Sensor to measure the total dissolved solids in water.
- Pins: gnd, v, analog pin
Mosfet
- Description: Transistor used to switch the water pump.
- Pins: Gate, Drain, Source
Water Level Float Switch Sensor
- Description: Sensor to detect the water level.
- Pins: Wire2, Wire1
Resistor (200 Ohms)
- Description: Resistor with a resistance of 200 Ohms.
- Pins: pin1, pin2
16x2 I2C LCD
- Description: LCD display with I2C interface.
- Pins: GND, VCC, SDA, SCL
Wiring Details
Arduino UNO
GND is connected to:
- Resistor pin1 (200 Ohms)
- Mosfet Source
- TDS Sensor gnd
- 16x2 I2C LCD GND
- Water Sensor GND
D2 is connected to:
- Resistor pin2 (200 Ohms)
- Water Level Float Switch Sensor Wire2
D5 is connected to:
- Resistor pin1 (200 Ohms)
- Mosfet Gate
5V is connected to:
- TDS Sensor v
- 16x2 I2C LCD VCC
- Water Level Float Switch Sensor Wire1
- Water Sensor VCC
Vin is connected to:
- Water Pump +
A0 is connected to:
- TDS Sensor analog pin
A3 is connected to:
- Water Sensor Signal
A4 is connected to:
- 16x2 I2C LCD SDA
A5 is connected to:
- 16x2 I2C LCD SCL
Water Sensor
Signal is connected to:
- Arduino UNO A3
VCC is connected to:
- Arduino UNO 5V
GND is connected to:
- Arduino UNO GND
Water Pump
+ is connected to:
- Arduino UNO Vin
- is connected to:
- Mosfet Drain
TDS Sensor (for water quality)
gnd is connected to:
- Arduino UNO GND
v is connected to:
- Arduino UNO 5V
analog pin is connected to:
- Arduino UNO A0
Mosfet
Gate is connected to:
- Resistor pin1 (200 Ohms)
- Arduino UNO D5
Drain is connected to:
- Water Pump -
Source is connected to:
- Arduino UNO GND
Water Level Float Switch Sensor
Wire2 is connected to:
- Resistor pin2 (200 Ohms)
- Arduino UNO D2
Wire1 is connected to:
- Arduino UNO 5V
Resistor (200 Ohms)
pin1 is connected to:
- Mosfet Gate
- Arduino UNO D5
pin2 is connected to:
- Resistor pin1 (200 Ohms)
- Mosfet Source
- Arduino UNO GND
- TDS Sensor gnd
- 16x2 I2C LCD GND
- Water Sensor GND
16x2 I2C LCD
GND is connected to:
- Arduino UNO GND
VCC is connected to:
- Arduino UNO 5V
SDA is connected to:
- Arduino UNO A4
SCL is connected to:
- Arduino UNO A5
Code Documentation
Arduino UNO Code
void setup() {
  // put your setup code here, to run once:

}

void loop() {
  // put your main code here, to run repeatedly:

}
This code is a basic template for the Arduino UNO. The setup function is where you initialize your components and settings, and the loop function is where the main logic of your program will run repeatedly.