
Automated Medicine Dispenser with Arduino UNO, RTC, and Bluetooth Connectivity
View and Edit Project In Cirkit Designer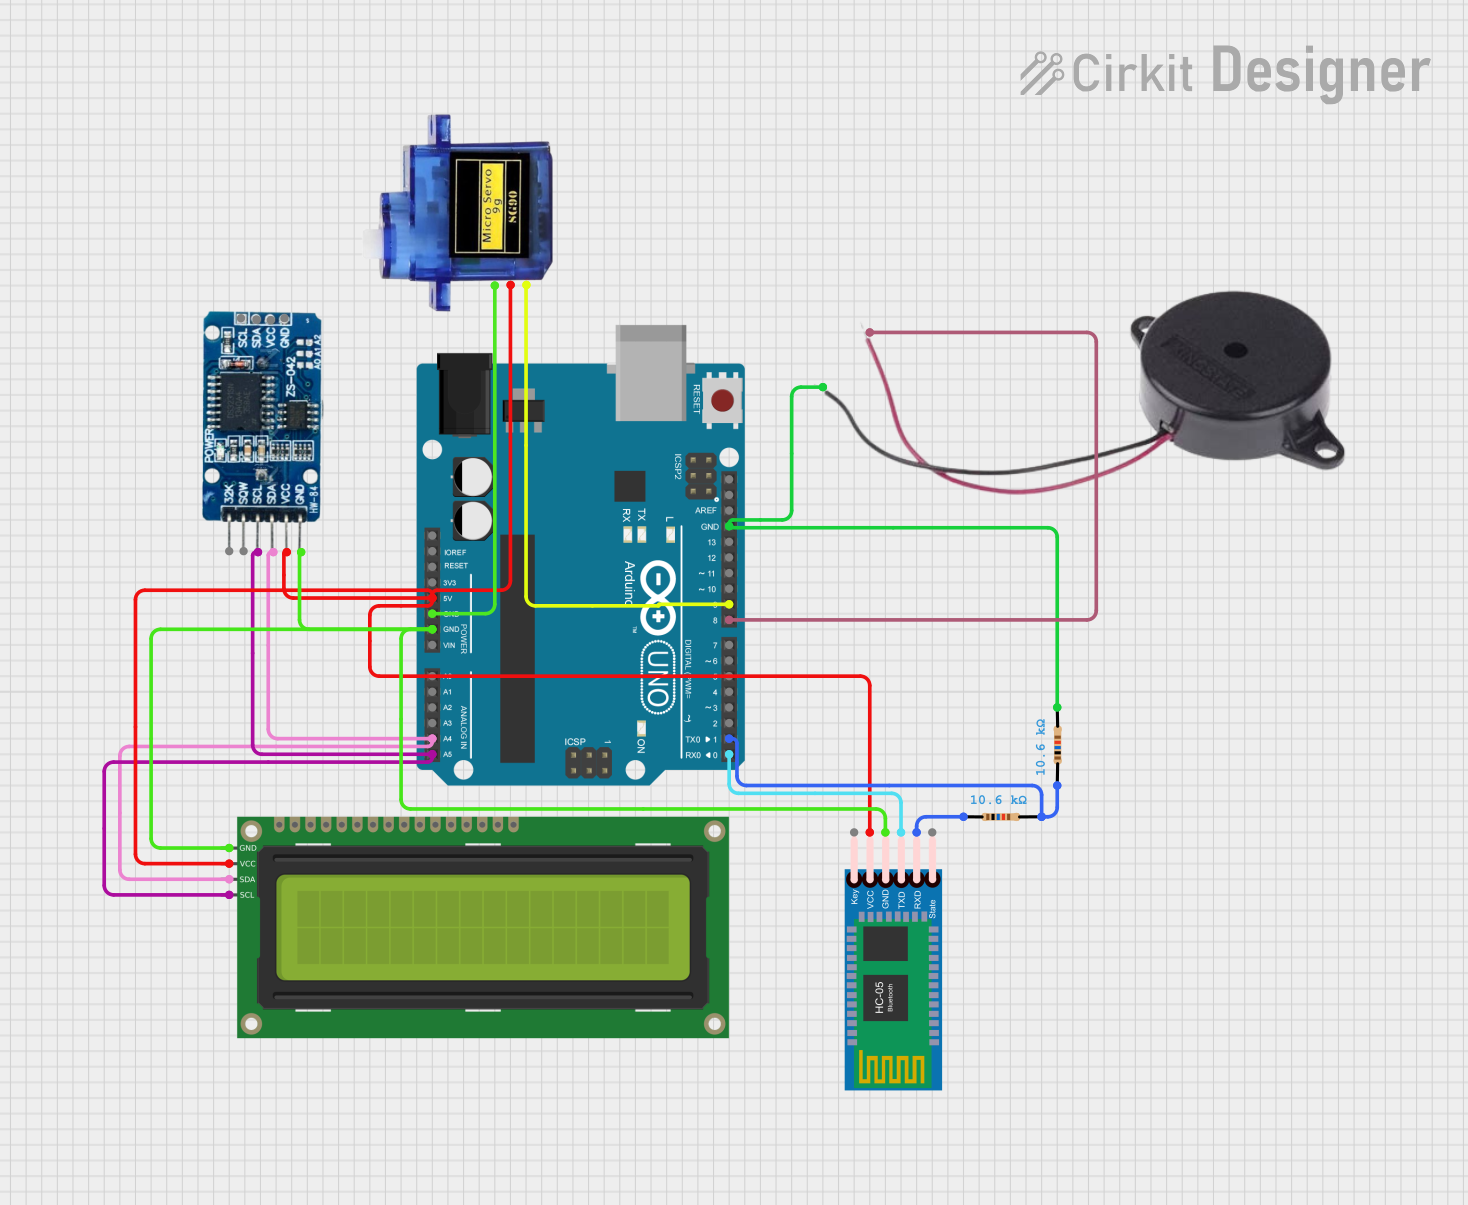
Automated Medicine Dispenser Circuit Documentation
Summary
This document provides a detailed overview of the Automated Medicine Dispenser circuit. The circuit is designed to dispense medicine at pre-set times using an Arduino UNO microcontroller, a micro servo motor, an RTC DS3231 module, a buzzer, a 16x2 I2C LCD, and an HC-05 Bluetooth module. The system allows users to set up to three timings via Bluetooth, and at each specified time, the buzzer will sound, the LCD will display a reminder, and the servo will rotate to dispense the medicine.
Component List
Arduino UNO
- Description: Microcontroller board based on the ATmega328P.
- Pins: UNUSED, IOREF, Reset, 3.3V, 5V, GND, Vin, A0, A1, A2, A3, A4, A5, SCL, SDA, AREF, D13, D12, D11, D10, D9, D8, D7, D6, D5, D4, D3, D2, D1, D0
Buzzer
- Description: An electronic device that produces a sound when a voltage is applied.
- Pins: POSITIVE, NEGATIVE
Micro Servo 9G
- Description: A small servo motor used for precise control of angular position.
- Pins: GND, +5V, PWM
RTC DS3231
- Description: Real-Time Clock module with a temperature-compensated crystal oscillator.
- Pins: 32K, SQW, SCL, SDA, VCC, GND
16x2 I2C LCD
- Description: A 16x2 character LCD display with I2C interface.
- Pins: GND, VCC, SDA, SCL
HC-05 Bluetooth Module
- Description: A Bluetooth module for wireless communication.
- Pins: Key, VCC, GND, TXD, RXD, State
Resistor (10.6k Ohms)
- Description: A resistor with a resistance of 10.6k Ohms.
- Pins: pin1, pin2
Wiring Details
Arduino UNO
- 5V: Connected to VCC of RTC DS3231, 16x2 I2C LCD, HC-05 Bluetooth Module, and +5V of Micro Servo 9G.
- GND: Connected to GND of RTC DS3231, 16x2 I2C LCD, HC-05 Bluetooth Module, and GND of Micro Servo 9G.
- A4: Connected to SDA of RTC DS3231 and 16x2 I2C LCD.
- A5: Connected to SCL of RTC DS3231 and 16x2 I2C LCD.
- D9: Connected to PWM of Micro Servo 9G.
- D8: Connected to POSITIVE of Buzzer.
- D1: Connected to pin1 of Resistor (10.6k Ohms).
- D0: Connected to TXD of HC-05 Bluetooth Module.
Buzzer
- POSITIVE: Connected to D8 of Arduino UNO.
- NEGATIVE: Connected to pin2 of Resistor (10.6k Ohms).
Micro Servo 9G
- GND: Connected to GND of Arduino UNO.
- +5V: Connected to 5V of Arduino UNO.
- PWM: Connected to D9 of Arduino UNO.
RTC DS3231
- VCC: Connected to 5V of Arduino UNO.
- GND: Connected to GND of Arduino UNO.
- SDA: Connected to A4 of Arduino UNO.
- SCL: Connected to A5 of Arduino UNO.
16x2 I2C LCD
- VCC: Connected to 5V of Arduino UNO.
- GND: Connected to GND of Arduino UNO.
- SDA: Connected to A4 of Arduino UNO.
- SCL: Connected to A5 of Arduino UNO.
HC-05 Bluetooth Module
- VCC: Connected to 5V of Arduino UNO.
- GND: Connected to GND of Arduino UNO.
- TXD: Connected to D0 of Arduino UNO.
- RXD: Connected to pin1 of Resistor (10.6k Ohms).
Resistor (10.6k Ohms)
- pin1: Connected to D1 of Arduino UNO and RXD of HC-05 Bluetooth Module.
- pin2: Connected to GND of Arduino UNO and NEGATIVE of Buzzer.
Code Documentation
/*
 * Automated Medicine Dispenser
 * Components: Arduino UNO, Micro Servo 9G, RTC DS3231, Buzzer, 16x2 I2C LCD, HC-05
 * Functionality:
 * - Displays 'waiting for BT' on LCD until Bluetooth connection is established.
 * - Displays 'BT connected' on LCD after connection.
 * - Prompts user to enter 3 timings via Bluetooth in HH:MM format.
 * - Compares entered timings with current time from RTC module.
 * - If a timing matches, buzzer beeps, LCD displays 'Take medicine', and servo rotates.
 * - Servo rotates to 45, 90, or 135 degrees based on the timing.
 * - After 20 seconds, servo returns to 0 degrees and LCD clears.
 * - Keeps checking the time every minute if no match.
 */

#include <Wire.h>
#include <LiquidCrystal_I2C.h>
#include <RTClib.h>
#include <Servo.h>

LiquidCrystal_I2C lcd(0x27, 16, 2);
RTC_DS3231 rtc;
Servo myservo;

const int buzzerPin = 8;
const int servoPin = 9;
const int btRxPin = 10;
const int btTxPin = 11;

String timings[3];
bool btConnected = false;

void setup() {
  lcd.begin();
  lcd.backlight();
  lcd.setCursor(0, 0);
  lcd.print("waiting for BT");

  Serial.begin(9600);
  pinMode(buzzerPin, OUTPUT);
  myservo.attach(servoPin);
  myservo.write(0);

  if (!rtc.begin()) {
    lcd.setCursor(0, 1);
    lcd.print("RTC failed");
    while (1);
  }

  if (rtc.lostPower()) {
    rtc.adjust(DateTime(F(__DATE__), F(__TIME__)));
  }
}

void loop() {
  if (Serial.available() > 0) {
    String input = Serial.readStringUntil('\n');
    if (!btConnected) {
      btConnected = true;
      lcd.clear();
      lcd.setCursor(0, 0);
      lcd.print("BT connected");
      delay(2000);
      lcd.clear();
      lcd.setCursor(0, 0);
      lcd.print("Enter Timings:");
    } else {
      static int timingIndex = 0;
      if (timingIndex < 3) {
        timings[timingIndex] = input;
        timingIndex++;
        lcd.setCursor(0, 1);
        lcd.print("Timing ");
        lcd.print(timingIndex);
        lcd.print(": ");
        lcd.print(input);
        delay(2000);
        lcd.clear();
        lcd.setCursor(0, 0);
        lcd.print("Enter Timings:");
      }
    }
  }

  DateTime now = rtc.now();
  String currentTime = String(now.hour()) + ":" + String(now.minute());

  for (int i = 0; i < 3; i++) {
    if (timings[i] == currentTime) {
      lcd.clear();
      lcd.setCursor(0, 0);
      lcd.print("Take medicine");
      digitalWrite(buzzerPin, HIGH);
      delay(2000);
      digitalWrite(buzzerPin, LOW);

      int angle = (i + 1) * 45;
      myservo.write(angle);
      delay(20000);
      myservo.write(0);

      lcd.clear();
      break;
    }
  }

  delay(60000); // Check every minute
}
This code initializes the components, waits for Bluetooth connection, allows the user to input three timings, and checks the current time against these timings. If a match is found, the buzzer sounds, the LCD displays a reminder, and the servo motor rotates to dispense the medicine.