
Arduino UNO-Based Distance Alert System with Ultrasonic Sensor and Audio-Visual Indicators
View and Edit Project In Cirkit Designer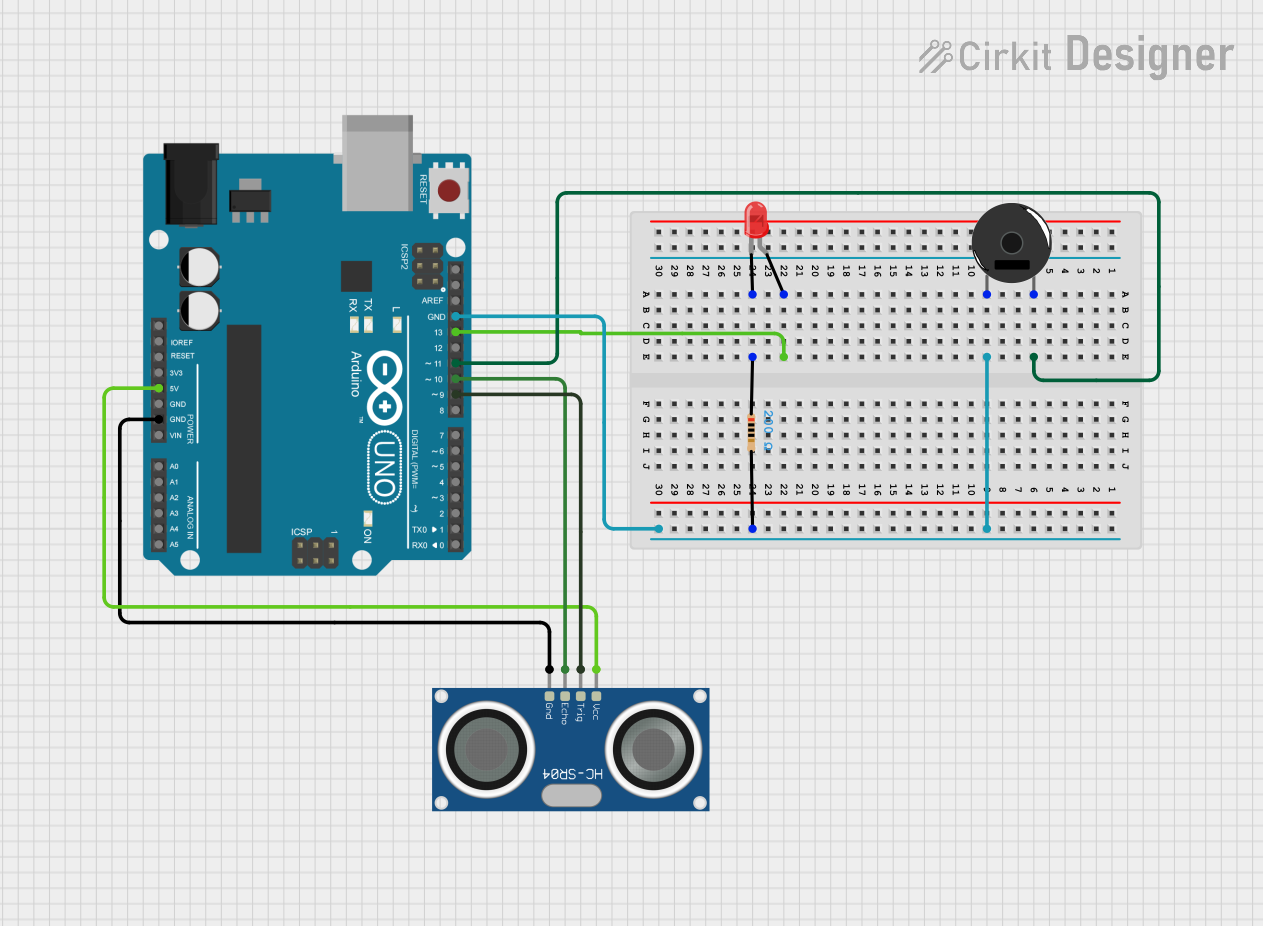
Circuit Documentation
Summary
This circuit integrates an Arduino UNO microcontroller with a set of peripheral components including an HC-SR04 Ultrasonic Sensor, a red two-pin LED, a resistor, and a Piezo Buzzer. The Arduino UNO serves as the central processing unit, controlling the LED and Piezo Buzzer, and interfacing with the ultrasonic sensor for distance measurement. The circuit is designed to perform tasks that may include distance sensing, audio signaling, and visual indication through the LED.
Component List
Arduino UNO
- Description: A microcontroller board based on the ATmega328P.
- Purpose: Acts as the central controller for the circuit, interfacing with all other components.
HC-SR04 Ultrasonic Sensor
- Description: An ultrasonic distance sensor capable of measuring distances by emitting ultrasonic waves and measuring the time taken for the echo to return.
- Purpose: Provides distance measurements to the Arduino UNO.
LED: Two Pin (red)
- Description: A basic red light-emitting diode with an anode and cathode.
- Purpose: Acts as a visual indicator controlled by the Arduino UNO.
Resistor
- Description: A passive two-terminal electrical component with a resistance of 200 Ohms.
- Purpose: Limits current to the LED to prevent damage.
Piezo Buzzer
- Description: An electronic device that produces sound when an electrical signal is applied.
- Purpose: Provides audio signaling controlled by the Arduino UNO.
Wiring Details
Arduino UNO
- Digital Pin 11 (D11) connected to Piezo Buzzer pin 2.
- Ground (GND) connected to one terminal of the Resistor and Piezo Buzzer pin 1.
- Digital Pin 13 (D13) connected to the anode of the LED.
- 5V pin connected to VCC of the HC-SR04 Ultrasonic Sensor.
- Digital Pin 9 (D9) connected to TRIG of the HC-SR04 Ultrasonic Sensor.
- Digital Pin 10 (D10) connected to ECHO of the HC-SR04 Ultrasonic Sensor.
- Ground (GND) connected to GND of the HC-SR04 Ultrasonic Sensor.
HC-SR04 Ultrasonic Sensor
- VCC connected to 5V on the Arduino UNO.
- TRIG connected to Digital Pin 9 (D9) on the Arduino UNO.
- ECHO connected to Digital Pin 10 (D10) on the Arduino UNO.
- GND connected to Ground (GND) on the Arduino UNO.
LED: Two Pin (red)
- Anode connected to Digital Pin 13 (D13) on the Arduino UNO.
- Cathode connected to one terminal of the Resistor.
Resistor
- One terminal connected to the cathode of the LED.
- The other terminal connected to Ground (GND) on the Arduino UNO and Piezo Buzzer pin 1.
Piezo Buzzer
- Pin 1 connected to Ground (GND) on the Arduino UNO and one terminal of the Resistor.
- Pin 2 connected to Digital Pin 11 (D11) on the Arduino UNO.
Documented Code
Arduino UNO Code (sketch.ino)
void setup() {
  // put your setup code here, to run once:

}

void loop() {
  // put your main code here, to run repeatedly:

}
Note: The provided code is a template and does not include specific functionality. It should be populated with the logic required to control the components in the circuit, such as driving the LED, buzzer, and reading data from the ultrasonic sensor.