Arduino UNO Bluetooth-Controlled Car with L298N Motor Driver
Circuit Documentation
Summary
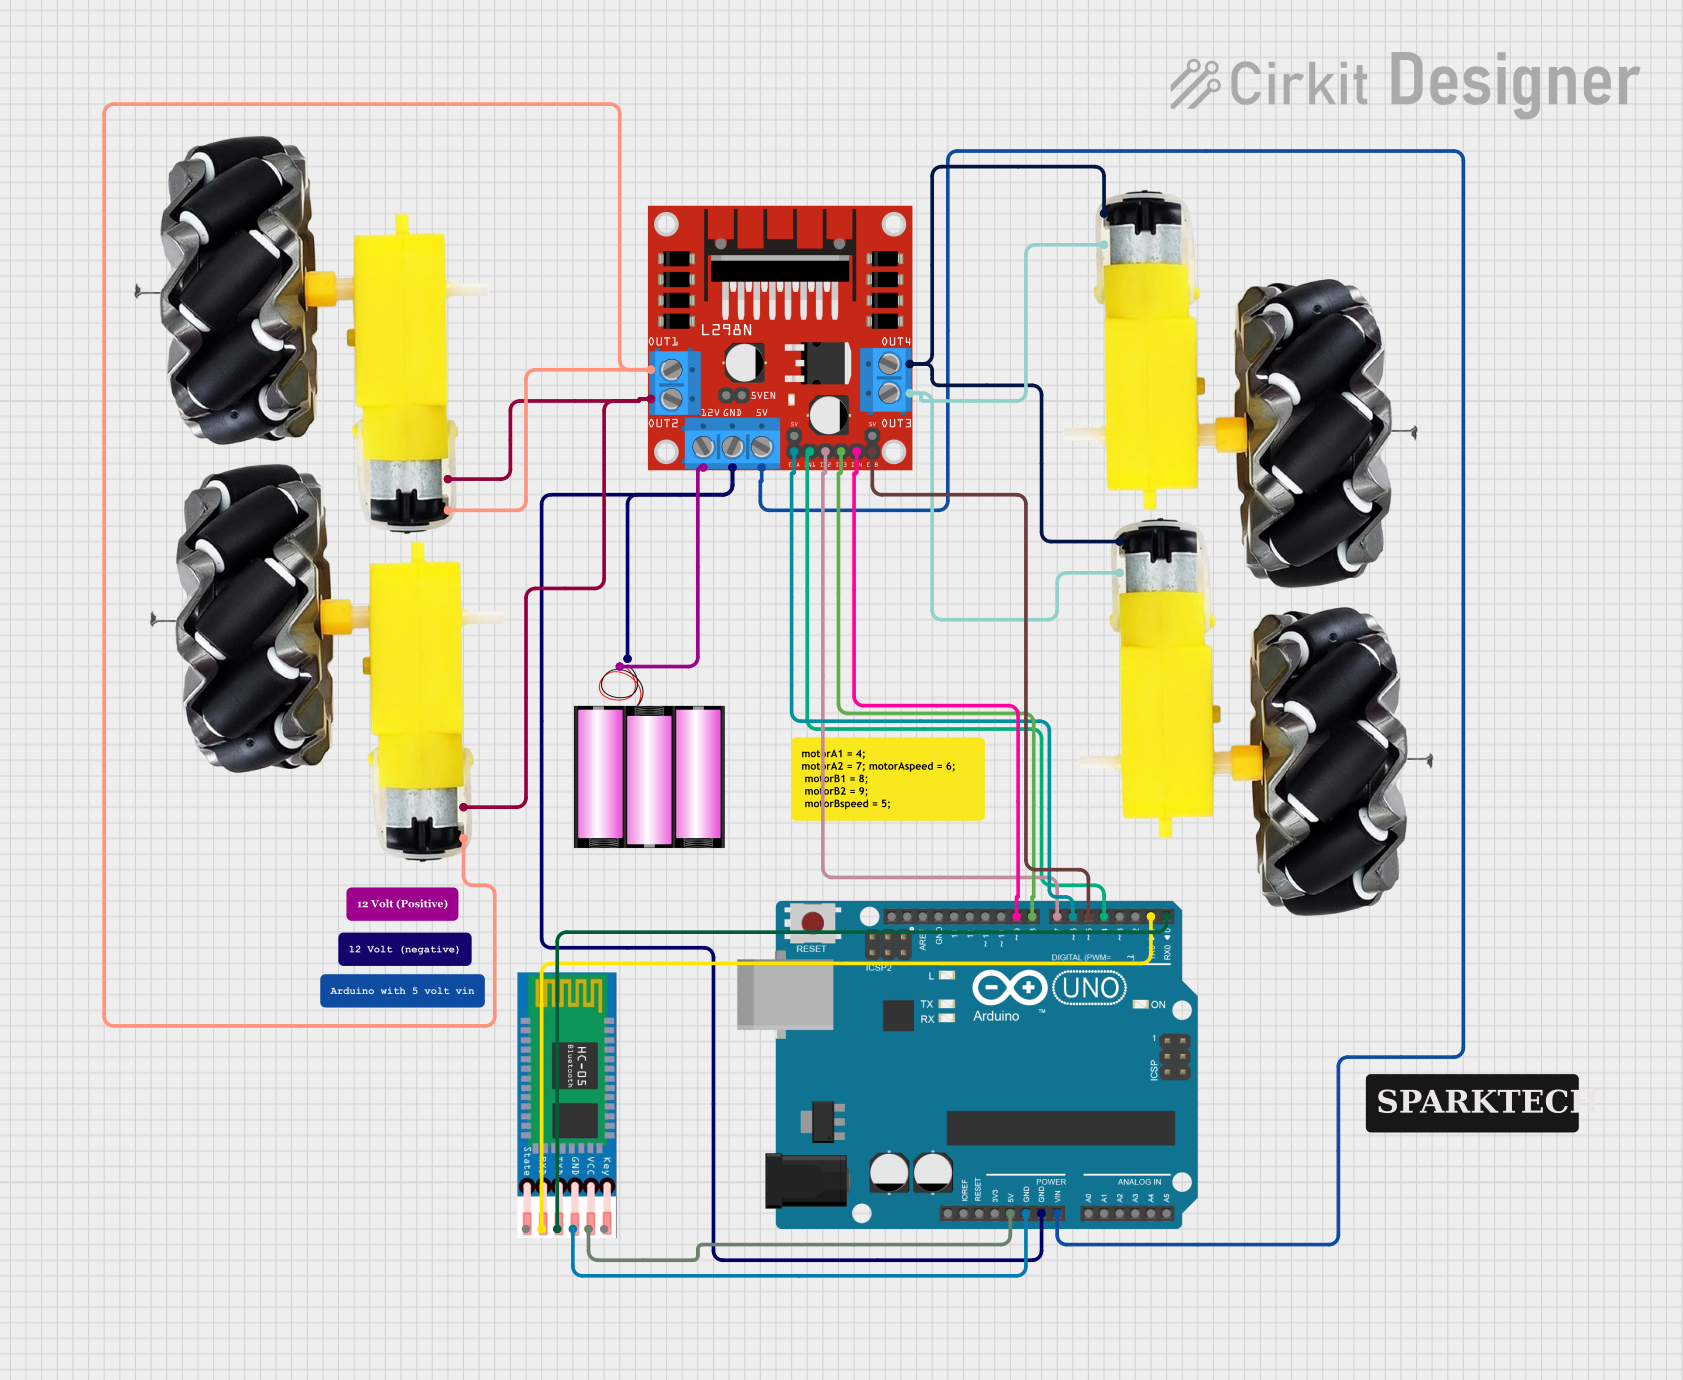
This circuit is designed to control a four-wheeled vehicle using an Arduino UNO microcontroller and a Bluetooth module (HC-05) for wireless communication. The vehicle's motion is driven by four DC motors, which are controlled by an L298N DC motor driver. The motors can be commanded to move the vehicle forward, backward, turn left, and turn right. The Arduino UNO receives commands via Bluetooth and operates the motors accordingly. A 12V battery provides power to the system.
Component List
L298N DC Motor Driver
- Description: A module used to control up to two DC motors with a maximum current load of 2A per channel.
- Pins: OUT1, OUT2, 12V, GND, 5V, OUT3, OUT4, 5V-ENA-JMP-I, 5V-ENA-JMP-O, +5V-J1, +5V-J2, ENA, IN1, IN2, IN3, IN4, ENB
Arduino UNO
- Description: A microcontroller board based on the ATmega328P, widely used for building digital devices and interactive objects.
- Pins: UNUSED, IOREF, Reset, 3.3V, 5V, GND, Vin, A0, A1, A2, A3, A4, A5, SCL, SDA, AREF, D13, D12, D11, D10, D9, D8, D7, D6, D5, D4, D3, D2, D1, D0
HC-05 Bluetooth Module
- Description: A Bluetooth module for wireless communication, typically used for serial port replacement.
- Pins: EN, VCC, GND, TXD, RXD, STATE
12V Battery
- Description: A power source for the circuit, providing the necessary voltage for the motor driver and motors.
- Pins: +, -
Motor and Wheels (x4)
- Description: The actuators for the vehicle's movement, each motor connects to a wheel.
- Pins: VCC, GND
Comments
- Description: Placeholder components for additional notes or documentation within the circuit design.
Wiring Details
L298N DC Motor Driver
- OUT1, OUT2 connected to two motors (motor and wheels)
- 12V connected to the 12V battery (+)
- GND connected to Arduino UNO (GND) and 12V battery (-)
- 5V connected to Arduino UNO (Vin)
- OUT3, OUT4 connected to two other motors (motor and wheels)
- ENA connected to Arduino UNO (D6)
- IN1 connected to Arduino UNO (D4)
- IN2 connected to Arduino UNO (D7)
- IN3 connected to Arduino UNO (D8)
- IN4 connected to Arduino UNO (D9)
- ENB connected to Arduino UNO (D5)
Arduino UNO
- GND connected to L298N DC Motor Driver (GND) and HC-05 (GND)
- Vin connected to L298N DC Motor Driver (5V)
- D6 connected to L298N DC Motor Driver (ENA)
- D4 connected to L298N DC Motor Driver (IN1)
- D7 connected to L298N DC Motor Driver (IN2)
- D8 connected to L298N DC Motor Driver (IN3)
- D9 connected to L298N DC Motor Driver (IN4)
- D5 connected to L298N DC Motor Driver (ENB)
- 5V connected to HC-05 (VCC)
- D1 connected to HC-05 (RXD)
- D0 connected to HC-05 (TXD)
HC-05 Bluetooth Module
- VCC connected to Arduino UNO (5V)
- GND connected to Arduino UNO (GND)
- RXD connected to Arduino UNO (D1)
- TXD connected to Arduino UNO (D0)
12V Battery
- connected to L298N DC Motor Driver (12V)
- connected to L298N DC Motor Driver (GND)
Motor and Wheels
- Four instances of motors, each with VCC and GND pins, connected to the L298N DC Motor Driver's OUT1, OUT2, OUT3, and OUT4 pins respectively.
Documented Code
//Arduino Bluetooth Controlled Car
//Before uploading the code you have to install the necessary library
//Note - Disconnect the Bluetooth Module before hitting the upload button otherwise you'll get compilation error message.
//AFMotor Library https://learn.adafruit.com/adafruit-motor-shield/library-install
//After downloading the library open Arduino IDE >> go to sketch >> Include Library >> ADD. ZIP Library >> Select the downloaded
//ZIP File >> Open it >> Done
//Now You Can Upload the Code without any problem but make sure the bt module isn't connected with Arduino while uploading code

#include <AFMotor.h>

//initial motors pin
AF_DCMotor motor1(1, MOTOR12_1KHZ);
AF_DCMotor motor2(2, MOTOR12_1KHZ);
AF_DCMotor motor3(3, MOTOR34_1KHZ);
AF_DCMotor motor4(4, MOTOR34_1KHZ);

char command;

void setup()
{
  Serial.begin(9600);  //Set the baud rate to your Bluetooth module.
}

void loop(){
  if(Serial.available() > 0){
    command = Serial.read();
    Stop(); //initialize with motors stopped
    //Change pin mode only if new command is different from previous.
    //Serial.println(command);
    switch(command){
    case 'F':
      forward();
      break;
    case 'B':
       back();
      break;
    case 'L':
      left();
      break;
    case 'R':
      right();
      break;
    }
  }
}

void forward()
{
  motor1.setSpeed(255); //Define maximum velocity
  motor1.run(FORWARD); //rotate the motor clockwise
  motor2.setSpeed(255); //Define maximum velocity
  motor2.run(FORWARD); //rotate the motor clockwise
  motor3.setSpeed(255);//Define maximum velocity
  motor3.run(FORWARD); //rotate the motor clockwise
  motor4.setSpeed(255);//Define maximum velocity
  motor4.run(FORWARD); //rotate the motor clockwise
}

void back()
{
  motor1.setSpeed(255); //Define maximum velocity
  motor1.run(BACKWARD); //rotate the motor anti-clockwise
  motor2.setSpeed(255); //Define maximum velocity
  motor2.run(BACKWARD); //rotate the motor anti-clockwise
  motor3.setSpeed(255); //Define maximum velocity
  motor3.run(BACKWARD); //rotate the motor anti-clockwise
  motor4.setSpeed(255); //Define maximum velocity
  motor4.run(BACKWARD); //rotate the motor anti-clockwise
}

void left()
{
  motor1.setSpeed(255); //Define maximum velocity
  motor1.run(BACKWARD); //rotate the motor anti-clockwise
  motor2.setSpeed(255); //Define maximum velocity
  motor2.run(BACKWARD); //rotate the motor anti-clockwise
  motor3.setSpeed(255); //Define maximum velocity
  motor3.run(FORWARD);  //rotate the motor clockwise
  motor4.setSpeed(255); //Define maximum velocity
  motor4.run(FORWARD);  //rotate the motor clockwise
}

void right()
{
  motor1.setSpeed(255); //Define maximum velocity
  motor1.run(FORWARD); //rotate the motor clockwise
  motor2.setSpeed(255); //Define maximum velocity
  motor2.run(FORWARD); //rotate the motor clockwise
  motor3.setSpeed(255); //Define maximum velocity
  motor3.run(BACKWARD); //rotate the motor anti-clockwise
  motor4.setSpeed(255); //Define maximum velocity
  motor4.run(BACKWARD); //rotate the motor anti-clockwise
}

void Stop()
{
  motor1.setSpeed(0); //Define minimum velocity
  motor1.run(RELEASE); //stop the motor when release the button
  motor2.setSpeed(0); //Define minimum velocity
  motor2.run(RELEASE); //stop the motor when release the button
  motor3.setSpeed(0); //Define minimum velocity
  motor3.run(RELEASE); //stop the motor when release the button
  motor4.setSpeed(0); //Define minimum velocity
  motor4.run(RELEASE); //stop the motor when release the button
}
This code is designed to be uploaded to an Arduino UNO microcontroller. It includes a setup function to initialize serial communication and a loop function that listens for Bluetooth commands to control the motors. The functions forward, back, left, right, and Stop are used to control the vehicle's movement. The Adafruit Motor Shield library is required for this code to function.