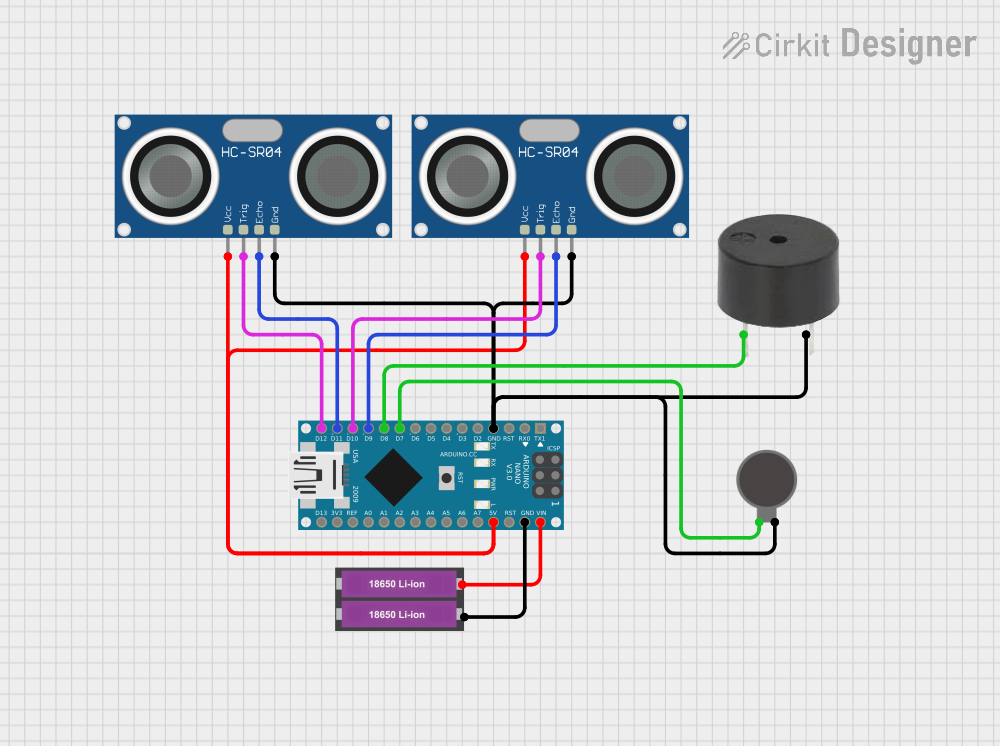
Arduino Nano-Based Distance Measurement and Alert System with Dual Ultrasonic Sensors and Haptic Feedback

Circuit Documentation
Summary of the Circuit
This circuit is designed around an Arduino Nano microcontroller and includes a variety of components that interact with the microcontroller. The circuit features two HC-SR04 Ultrasonic Sensors for distance measurement, a buzzer for audio feedback, a vibration motor for haptic feedback, and is powered by two 18650 Li-ion batteries. The Arduino Nano controls the sensors and actuators based on the programmed logic.
Component List
Arduino Nano
- Microcontroller board based on the ATmega328P
- It has a variety of digital and analog I/O pins.
HC-SR04 Ultrasonic Sensor (x2)
- Ultrasonic distance measuring module
- Features VCC, TRIG, ECHO, and GND pins.
Buzzer
- An electromechanical component used to generate sound
- Has a signal input pin and a ground pin.
Vibration Motor
- Provides haptic feedback
- Has a positive and a negative terminal.
18650 Li-ion Battery x 2
- Power source for the circuit
- Provides the required voltage and current.
Wiring Details
Arduino Nano
- GND connected to the ground pins of both HC-SR04 Ultrasonic Sensors, the buzzer, the vibration motor, and the negative terminal of the 18650 Li-ion Battery.
- D7 connected to the positive terminal of the Vibration Motor.
- D8 connected to the signal input pin of the Buzzer.
- D9 connected to the ECHO pin of the first HC-SR04 Ultrasonic Sensor.
- D10 connected to the TRIG pin of the first HC-SR04 Ultrasonic Sensor.
- D11/MOSI connected to the ECHO pin of the second HC-SR04 Ultrasonic Sensor.
- D12/MISO connected to the TRIG pin of the second HC-SR04 Ultrasonic Sensor.
- VIN connected to the positive terminal of the 18650 Li-ion Battery.
- 5V connected to the VCC pins of both HC-SR04 Ultrasonic Sensors.
HC-SR04 Ultrasonic Sensor
- VCC connected to the 5V output from the Arduino Nano.
- TRIG connected to a digital pin on the Arduino Nano for triggering the sensor.
- ECHO connected to a digital pin on the Arduino Nano to receive the echo signal.
- GND connected to the ground (common ground with Arduino Nano).
Buzzer
- PIN connected to a digital pin on the Arduino Nano for signal input.
- GND connected to the ground (common ground with Arduino Nano).
Vibration Motor
- + connected to a digital pin on the Arduino Nano for control.
- - connected to the ground (common ground with Arduino Nano).
18650 Li-ion Battery x 2
- + connected to the VIN pin on the Arduino Nano to provide power.
- - connected to the GND pin on the Arduino Nano (common ground).
Documented Code
void setup() {
  // put your setup code here, to run once:

}

void loop() {
  // put your main code here, to run repeatedly:

}
The provided code is a template with empty setup() and loop() functions, which are the entry points for Arduino sketches. The setup() function is called once when the sketch starts and is used to initialize settings or pin modes. The loop() function runs continuously and contains the main logic of the sketch. The actual functionality needs to be implemented within these functions based on the desired behavior of the circuit.