
Arduino UNO Controlled Robotic Vehicle with MPU-6050 and Bluetooth Connectivity
View and Edit Project In Cirkit Designer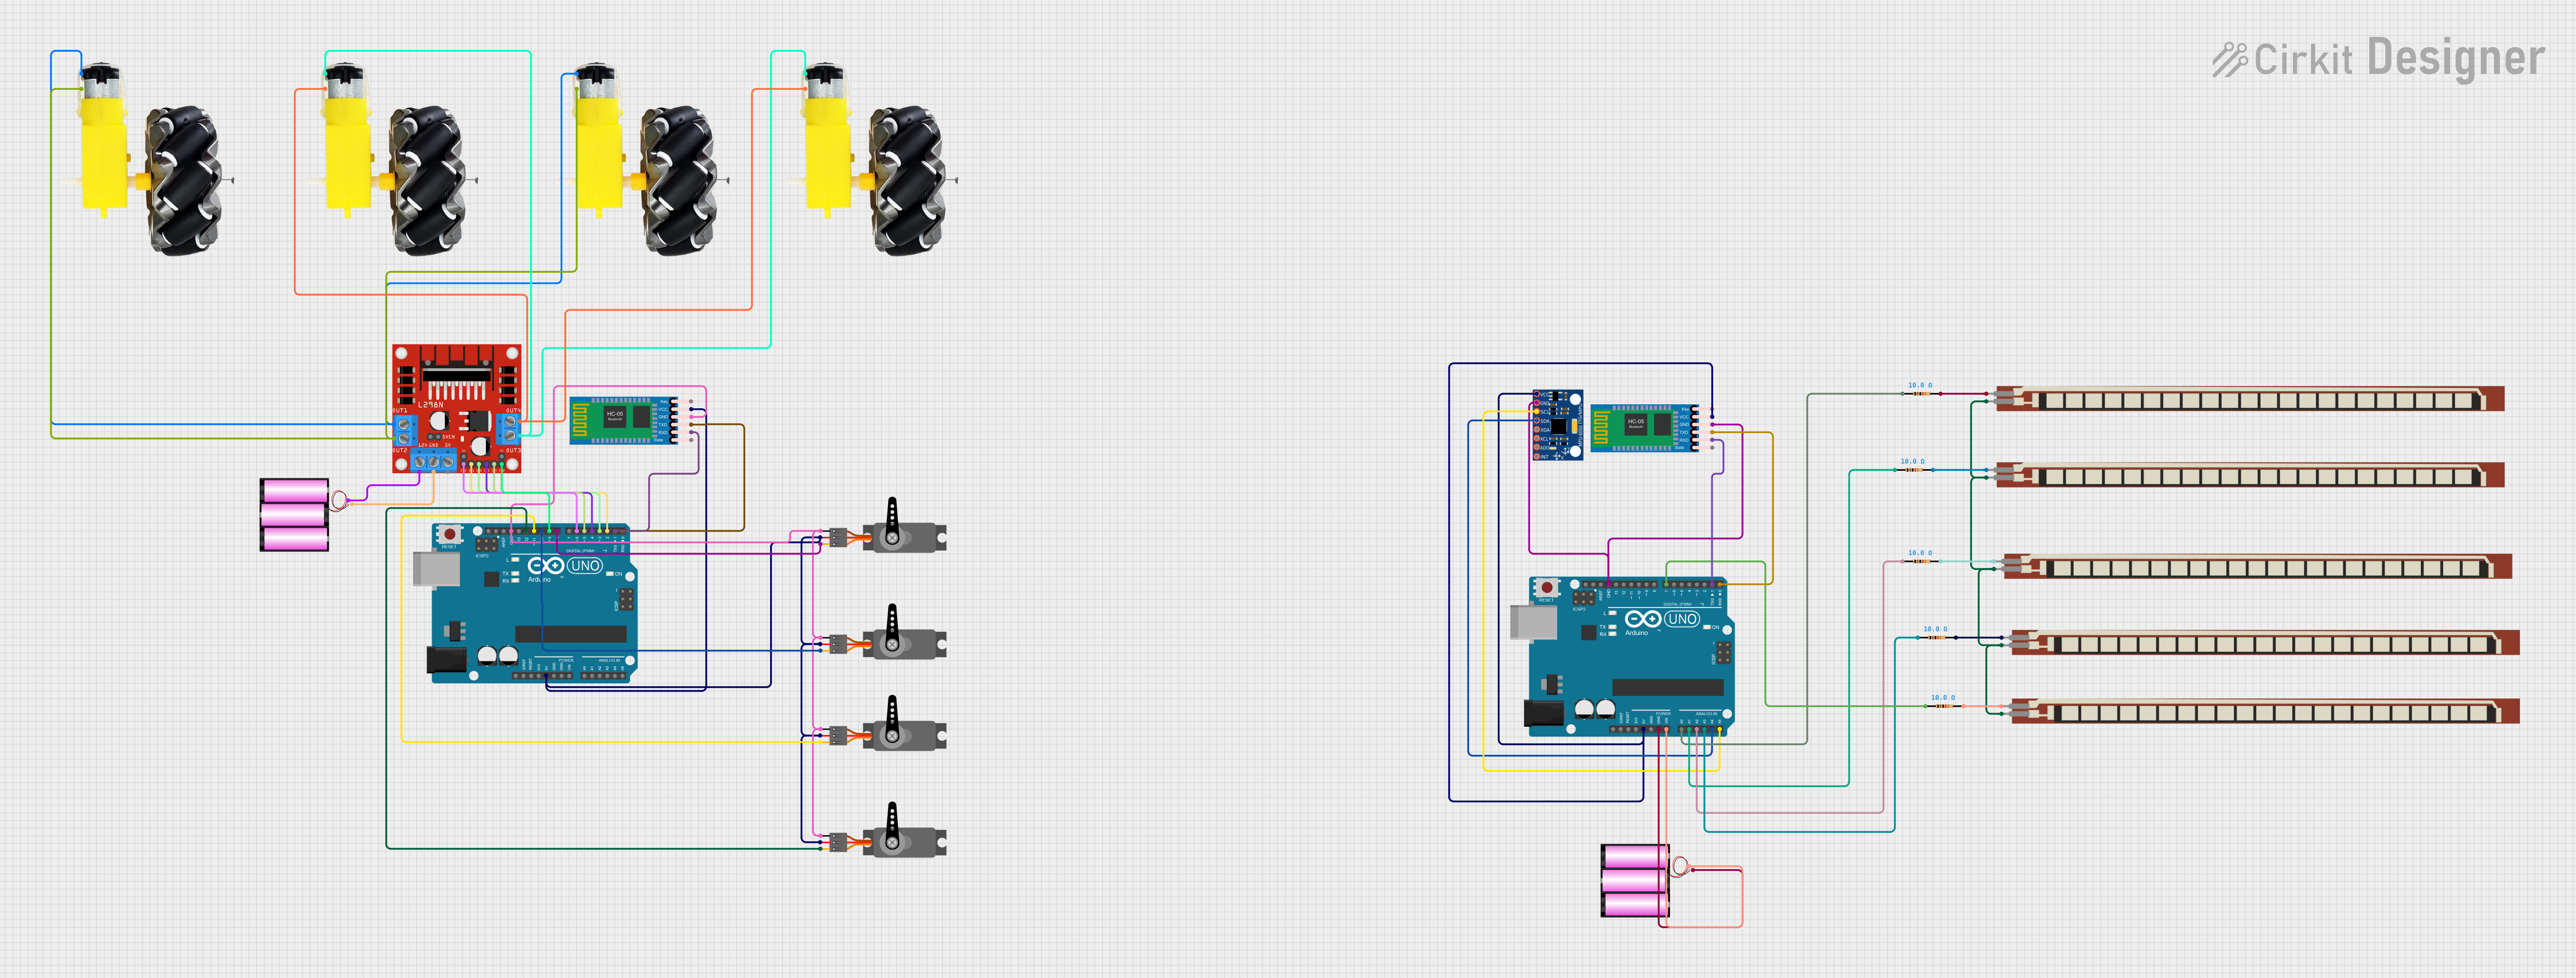
Circuit Documentation
Summary
This circuit is designed to control a robotic vehicle with an Arduino UNO as the central processing unit. It includes motor drivers for wheel movement, servos for articulated mechanisms, an MPU-6050 for motion tracking, flex sensors for input, and Bluetooth modules for wireless communication. The circuit is powered by 12V batteries and uses various resistors for voltage division and signal conditioning.
Component List
- Arduino UNO: A microcontroller board based on the ATmega328P, featuring digital and analog I/O pins.
- Motor and Wheels: Actuators for the robotic vehicle's movement.
- Servo: Rotary actuators for precise control of angular position.
- MPU-6050: A motion tracking device with a 3-axis gyroscope and a 3-axis accelerometer.
- Basic Flex Resistor: Sensors that change resistance when bent, used for detecting flexing motion.
- Resistor: Passive components used for limiting current or dividing voltages.
- L298N DC Motor Driver: A module for controlling the direction and speed of DC motors.
- HC-05 Bluetooth Module: A wireless communication module for Bluetooth connectivity.
- Battery 12V: Power sources for the circuit.
Wiring Details
Arduino UNO
- 5V: Powers the MPU-6050 and HC-05 Bluetooth Module.
- GND: Common ground for the circuit.
- Vin: Connected to the 12V battery for Arduino power supply.
- A0-A3: Connected to flex sensors through resistors.
- A4 (SDA), A5 (SCL): I2C communication with MPU-6050.
- D0 (RX), D1 (TX): Serial communication with HC-05 Bluetooth Module.
- D2-D7: Control signals for the L298N motor driver.
- D8-D12: PWM signals for servos.
Motor and Wheels
- Connected to the L298N motor driver for movement control.
Servo
- VCC: Powered by the Arduino's 5V pin.
- GND: Connected to the common ground.
- PWM: Receives PWM signals from Arduino for position control.
MPU-6050
- VCC: Powered by the Arduino's 5V pin.
- GND: Connected to the common ground.
- SCL, SDA: I2C communication with Arduino.
Basic Flex Resistor
- One pin connected to the Arduino's analog input through a resistor.
- The other pin connected to the common ground.
Resistor
- 10 Ohms resistors used for voltage division with flex sensors.
L298N DC Motor Driver
- OUT1-OUT4: Connected to the motors and wheels.
- 12V: Powered by the 12V battery.
- GND: Connected to the common ground.
- ENA, ENB: Enable pins controlled by Arduino.
- IN1-IN4: Input pins controlled by Arduino for motor direction.
HC-05 Bluetooth Module
- VCC: Powered by the Arduino's 5V pin.
- GND: Connected to the common ground.
- TXD, RXD: Serial communication with Arduino.
Battery 12V
- Provides power to the Arduino (through Vin) and the motor driver.
Documented Code
Arduino UNO Code (Main Controller)
#include <Wire.h>
#include <MPU6050.h>

// Create an object for MPU6050
MPU6050 mpu;

// Flex sensors connected to analog pins
int flexPins[] = {A0, A1, A2, A3};  // Four flex sensors on analog pins
int flexValues[4];  // Store flex sensor values

// The 5th flex sensor is connected to digital pin 7
const int flexDigitalPin = 7;

void setup() {
  Serial.begin(9600);  // Bluetooth communication

  // Initialize MPU6050 (I2C)
  Wire.begin();
  mpu.initialize();

  // Check if the MPU6050 is connected
  if (!mpu.testConnection()) {
    Serial.println("MPU6050 not connected");
    while (1);
  }

  // Initialize flex sensor pins as inputs
  for (int i = 0; i < 4; i++) {
    pinMode(flexPins[i], INPUT);
  }

  // Set the 5th flex sensor (digital pin 7) as input
  pinMode(flexDigitalPin, INPUT);
}

void loop() {
  // Read MPU6050 data (acceleration in the X and Y axes)
  int16_t ax, ay, az;
  mpu.getAcceleration(&ax, &ay, &az);

  // Read flex sensor values from analog pins
  for (int i = 0; i < 4; i++) {
    flexValues[i] = analogRead(flexPins[i]);
  }

  // Read the digital state of the 5th flex sensor
  int flex5State = digitalRead(flexDigitalPin);

  // Send car movement commands based on hand tilt (MPU6050 data)
  if (ax > 5000) {
    Serial.println("MOVE_FORWARD");
  } else if (ax < -5000) {
    Serial.println("MOVE_BACKWARD");
  } else if (ay > 5000) {
    Serial.println("TURN_LEFT");
  } else if (ay < -5000) {
    Serial.println("TURN_RIGHT");
  } else {
    Serial.println("STOP");
  }

  // Send robotic arm movement commands based on flex sensor values
  if (flexValues[0] < 500) {
    Serial.println("BASE_MOVE");
  }
  if (flexValues[1] < 500) {
    Serial.println("SHOULDER_MOVE");
  }
  if (flexValues[2] < 500) {
    Serial.println("ELBOW_MOVE");
  }
  if (flexValues[3] < 500) {
    Serial.println("GRIPPER_CLOSE");
  }

  // Handle the digital flex sensor
  if (flex5State == LOW) {
    Serial.println("GRIPPER_OPEN");  // Example action when the digital flex sensor is triggered
  }

  delay(100);  // Small delay for stability
}
Servo Controller Code (Placeholder)
void setup() {
  // put your setup code here, to run once:

}

void loop() {
  // put your main code here, to run repeatedly:

}
Additional Microcontroller Code (Placeholder)
void setup() {
  // put your setup code here, to run once:

}

void loop() {
  // put your main code here, to run repeatedly:

}
(Note: The placeholder code for the servo controllers and the additional microcontroller indicates that the specific functionality for these components has not been implemented in the provided code snippets.)