
Arduino UNO Controlled Multi-LED and Relay System with Solenoids and LCD Display
View and Edit Project In Cirkit Designer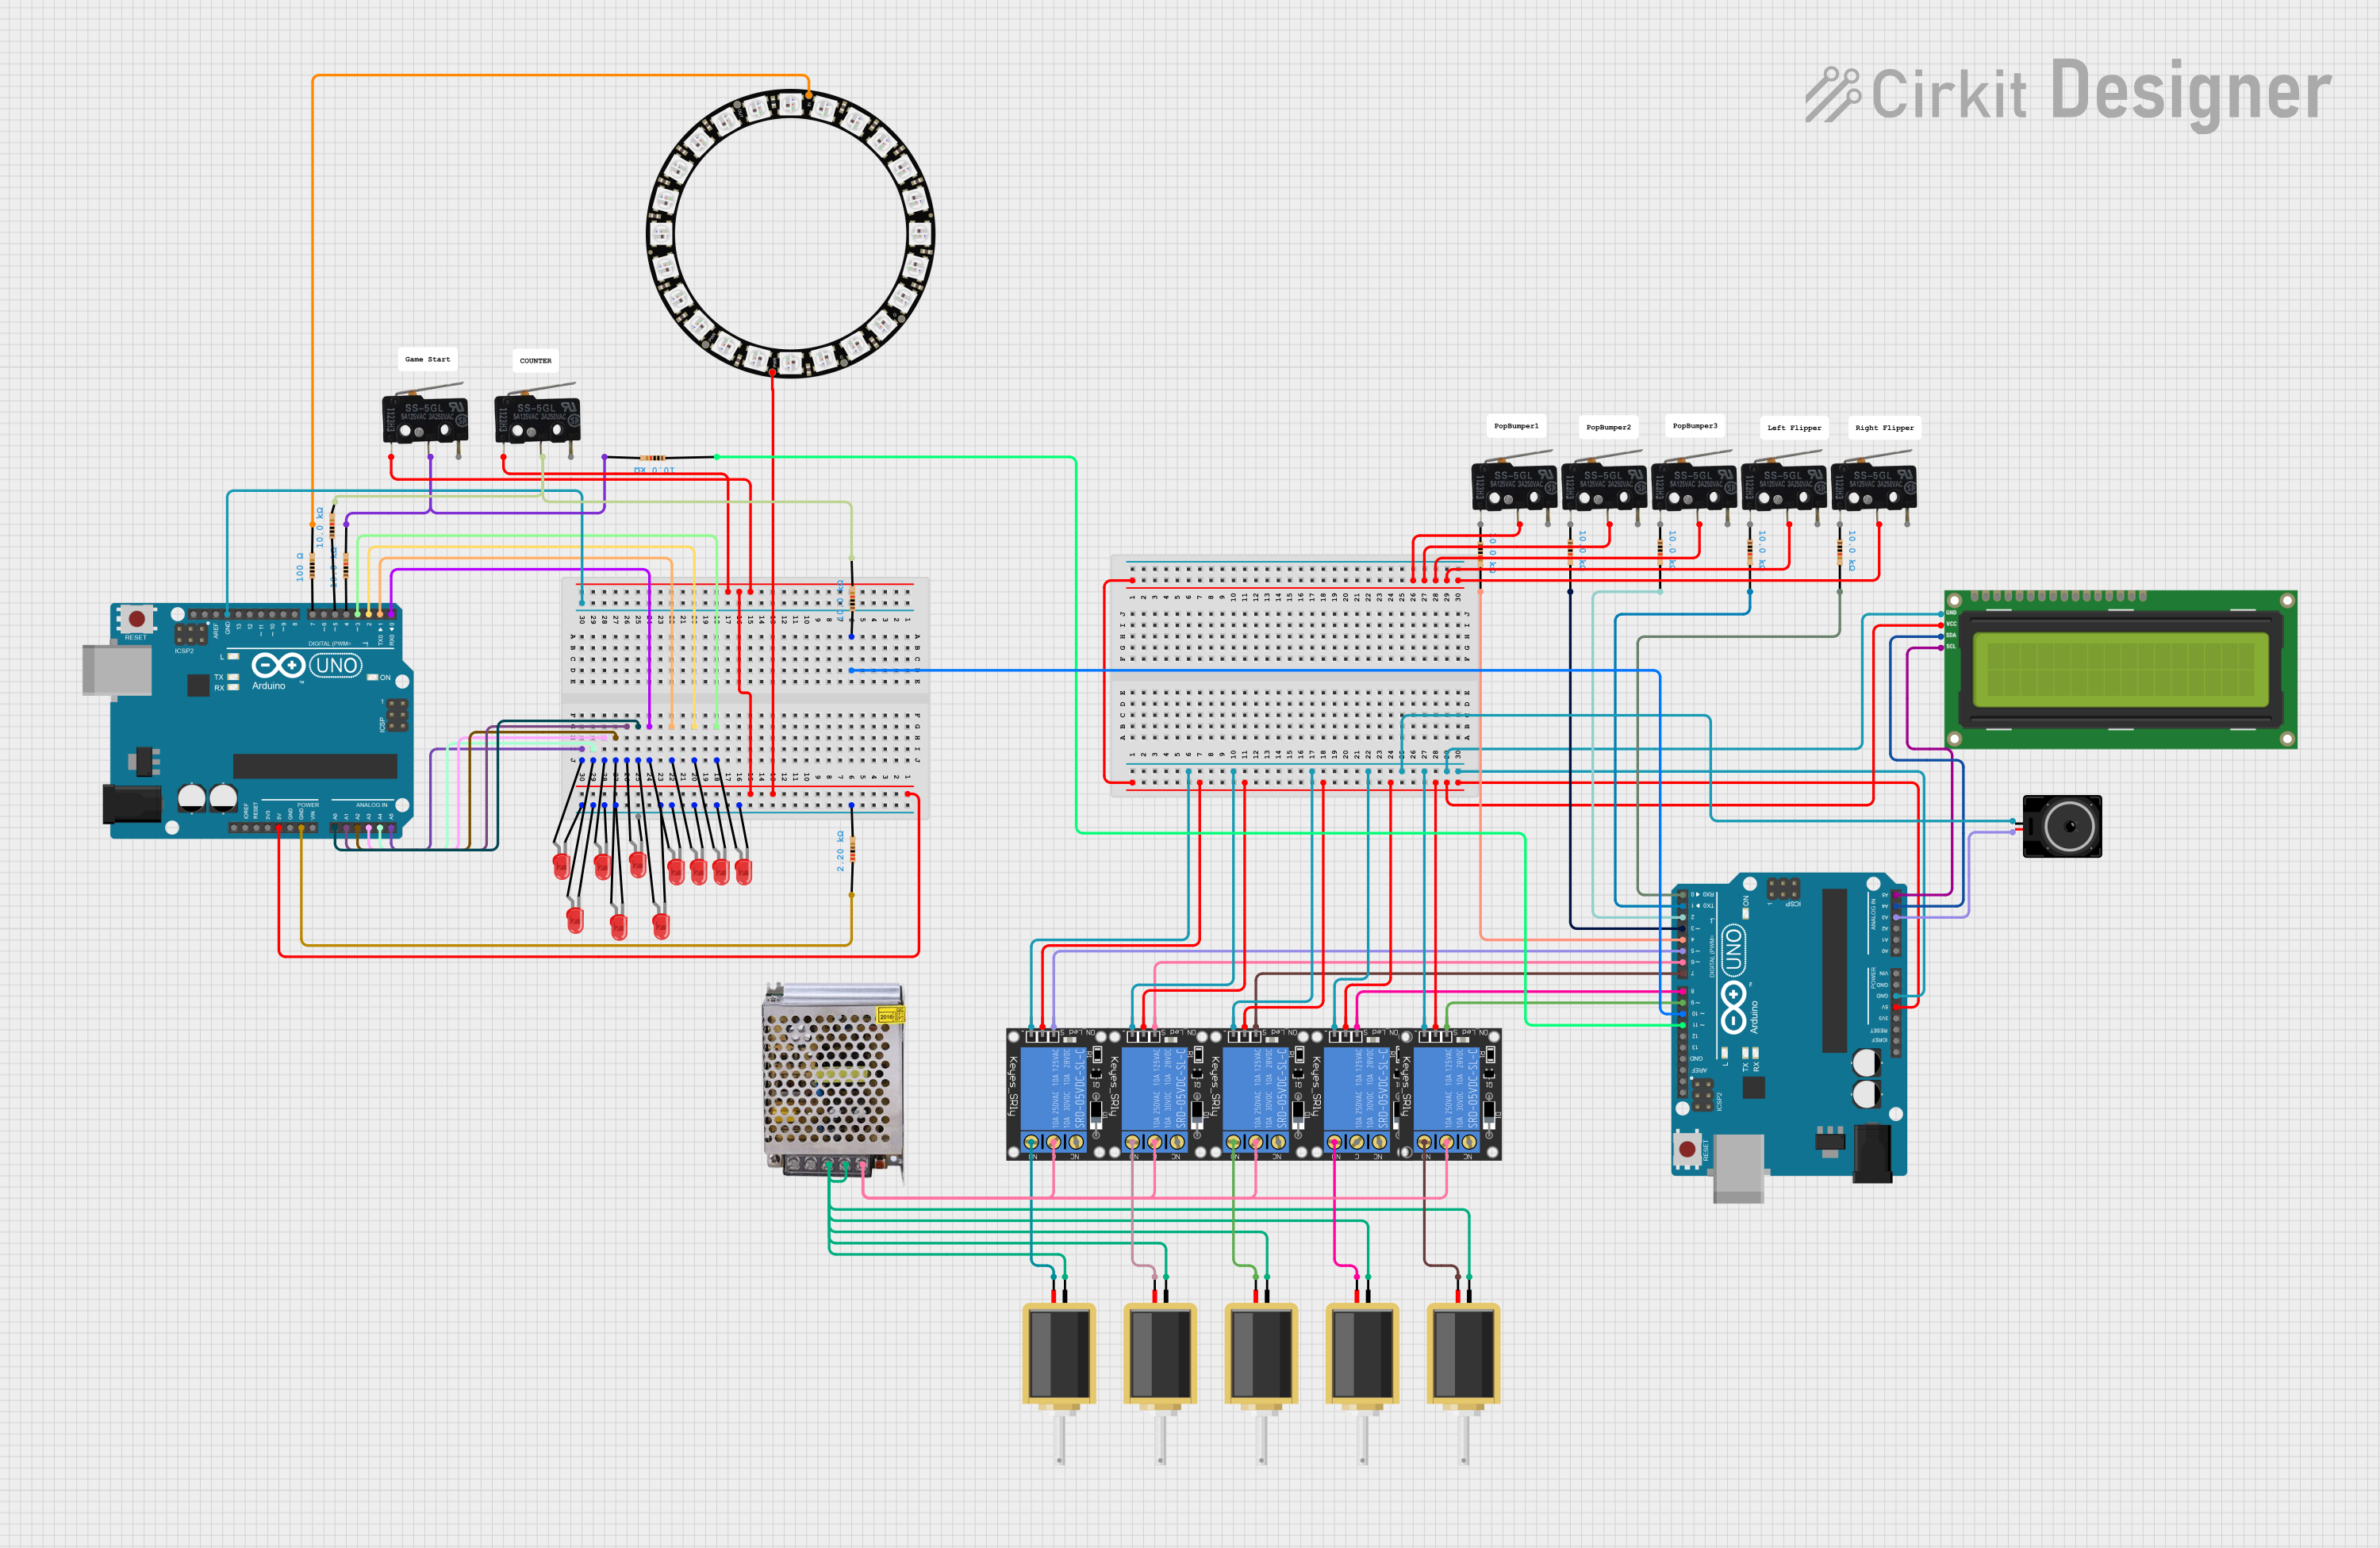
Circuit Documentation
Summary
This circuit involves multiple components including LEDs, relays, solenoids, micro switches, resistors, an Arduino UNO, a NeoPixel ring, an LCD screen, and a loudspeaker. The circuit is designed to control various outputs such as LEDs and solenoids using the Arduino UNO microcontroller. The relays are used to switch higher power loads, and the micro switches provide user input. The NeoPixel ring and LCD screen are used for visual feedback, while the loudspeaker provides audio feedback.
Component List
LED: Two Pin (red)
- Description: A standard red LED with two pins: anode and cathode.
- Pins: cathode, anode
1-Channel Relay (5V 10A)
- Description: A relay module that can switch up to 10A at 5V.
- Pins: NC, signal, C, power, NO, ground
Arduino UNO
- Description: A microcontroller board based on the ATmega328P.
- Pins: UNUSED, IOREF, Reset, 3.3V, 5V, GND, Vin, A0, A1, A2, A3, A4, A5, SCL, SDA, AREF, D13, D12, D11, D10, D9, D8, D7, D6, D5, D4, D3, D2, D1, D0
POWER SUPPLY 12V 5AMP
- Description: A power supply providing 12V at 5A.
- Pins: 220V Positive Pole (AC), 220V Negative Pole (AC), GND, GND (DC), 12V-24V Output (DC)
Solenoid
- Description: An electromechanical solenoid.
- Pins: pin1, pin2
Micro Switch
- Description: A small switch that can be used for user input.
- Pins: COM, NO, NC
Resistor
- Description: A resistor with a specified resistance.
- Pins: pin1, pin2
- Properties: Resistance: 10000 Ohms, 2200 Ohms, 100 Ohms
I2C LCD 16x2 Screen
- Description: A 16x2 character LCD screen with I2C interface.
- Pins: SCL, SDA, VCC (5V), GND, VDD, VO, RS, RW, E, D0, D1, D2, D3, D4, D5, D6, D7, BLA, BLK
Loudspeaker
- Description: A small loudspeaker.
- Pins: pin1, pin2
Adafruit 24 NeoPixel Ring
- Description: A ring of 24 individually addressable RGB LEDs.
- Pins: VDD, OUT, IN, GND
Wiring Details
LED: Two Pin (red)
Anode connected to:
- Arduino UNO D3
- Arduino UNO D2
- Arduino UNO D1
- Arduino UNO D0
- Arduino UNO A0
- Arduino UNO A1
- Arduino UNO A2
- Arduino UNO A3
- Arduino UNO A4
- Arduino UNO A5
Cathode connected to:
- Other LEDs' cathodes
1-Channel Relay (5V 10A)
Power connected to:
- Other relays' power pins
- Micro Switch NO pins
- I2C LCD 16x2 Screen VCC (5V)
- Arduino UNO 5V
Ground connected to:
- Other relays' ground pins
- Loudspeaker pin1
- I2C LCD 16x2 Screen GND
- Arduino UNO GND
Signal connected to:
- Arduino UNO D8
- Arduino UNO D5
- Arduino UNO D7
- Arduino UNO D9
- Arduino UNO D6
NO connected to:
- Solenoid pin2
C connected to:
- Other relays' C pins
- POWER SUPPLY 12V 5AMP 12V-24V Output (DC)
Arduino UNO
D10 connected to:
- Resistor pin1
D3 connected to:
- LED anode
D2 connected to:
- LED anode
D1 connected to:
- LED anode
D0 connected to:
- LED anode
A0 connected to:
- LED anode
A1 connected to:
- LED anode
A2 connected to:
- LED anode
A3 connected to:
- LED anode
- Loudspeaker pin2
A4 connected to:
- LED anode
- I2C LCD 16x2 Screen SDA
A5 connected to:
- LED anode
- I2C LCD 16x2 Screen SCL
5V connected to:
- Adafruit 24 NeoPixel Ring VDD
- Micro Switch COM pins
GND connected to:
- Resistor pin1
POWER SUPPLY 12V 5AMP
12V-24V Output (DC) connected to:
- Relay C pins
GND connected to:
- Solenoid pin1
Solenoid
Pin1 connected to:
- Other solenoids' pin1
- POWER SUPPLY 12V 5AMP GND
Pin2 connected to:
- Relay NO pins
Micro Switch
COM connected to:
- Arduino UNO 5V
NO connected to:
- Relay power pins
Resistor
Pin1 connected to:
- Arduino UNO D10
Pin2 connected to:
- Arduino UNO GND
- Micro Switch NO pins
- Adafruit 24 NeoPixel Ring IN
I2C LCD 16x2 Screen
SDA connected to:
- Arduino UNO A4
SCL connected to:
- Arduino UNO A5
VCC (5V) connected to:
- Relay power pins
GND connected to:
- Relay ground pins
Loudspeaker
Pin1 connected to:
- Relay ground pins
Pin2 connected to:
- Arduino UNO A3
Adafruit 24 NeoPixel Ring
VDD connected to:
- Arduino UNO 5V
IN connected to:
- Resistor pin2
Documented Code
Arduino UNO (Instance 1)
void setup() {
  // put your setup code here, to run once:

}

void loop() {
  // put your main code here, to run repeatedly:

}
Arduino UNO (Instance 2)
void setup() {
  // put your setup code here, to run once:

}

void loop() {
  // put your main code here, to run repeatedly:

}
This documentation provides a comprehensive overview of the circuit, including a detailed component list, wiring details, and the code used for the microcontrollers.