Cirkit Designer
Your all-in-one circuit design IDE
Home /
Project Documentation
Arduino UNO Controlled Servo with MPU-6050 Gyroscope/Accelerometer
Circuit Documentation
Summary of the Circuit
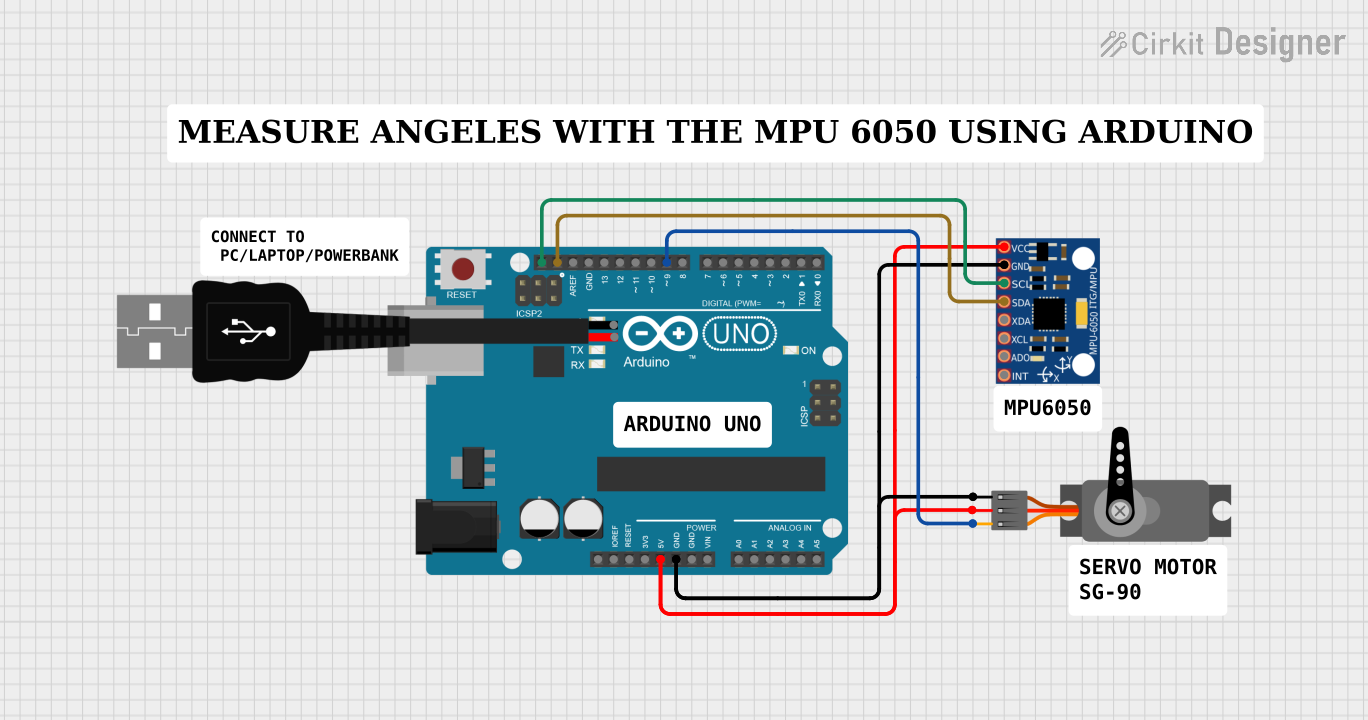
This circuit integrates an Arduino UNO microcontroller with a Servo motor and an MPU-6050 accelerometer/gyroscope module. The Arduino UNO serves as the central processing unit, controlling the Servo motor based on the data received from the MPU-6050 sensor. The Servo motor is powered and controlled by the Arduino, and the MPU-6050 communicates with the Arduino over the I2C protocol using the SCL and SDA lines. The circuit is designed to be powered through the Arduino UNO's voltage regulator, which provides a 5V supply to both the Servo and the MPU-6050.
Component List
Arduino UNO
- Description: A microcontroller board based on the ATmega328P.
- Pins: UNUSED, IOREF, Reset, 3.3V, 5V, GND, Vin, A0-A5, SCL, SDA, AREF, D0-D13.
Servo
- Description: An actuator that can be precisely controlled for angular position.
- Pins: GND, VCC, PWM.
MPU-6050
- Description: A motion tracking device that combines a 3-axis gyroscope and a 3-axis accelerometer.
- Pins: VCC, GND, SCL, SDA, XDA, XCL, AD0, INT.
USB male 2 pin connection
- Description: A USB connector for power supply.
- Pins: Negative -, Positive +.
Comments
- Description: Placeholder components for additional notes or documentation.
Wiring Details
Arduino UNO
- 5V to Servo VCC and MPU-6050 VCC
- GND to Servo GND and MPU-6050 GND
- SCL to MPU-6050 SCL
- SDA to MPU-6050 SDA
- D9 to Servo PWM
Servo
- VCC connected to Arduino UNO 5V
- GND connected to Arduino UNO GND
- PWM connected to Arduino UNO D9
MPU-6050
- VCC connected to Arduino UNO 5V
- GND connected to Arduino UNO GND
- SCL connected to Arduino UNO SCL
- SDA connected to Arduino UNO SDA
Documented Code
Arduino UNO Code (sketch.ino)
void setup() {
  // put your setup code here, to run once:

}

void loop() {
  // put your main code here, to run repeatedly:

}
Additional Documentation (documentation.txt)
No additional documentation provided.