
Circuit Documentation
Summary
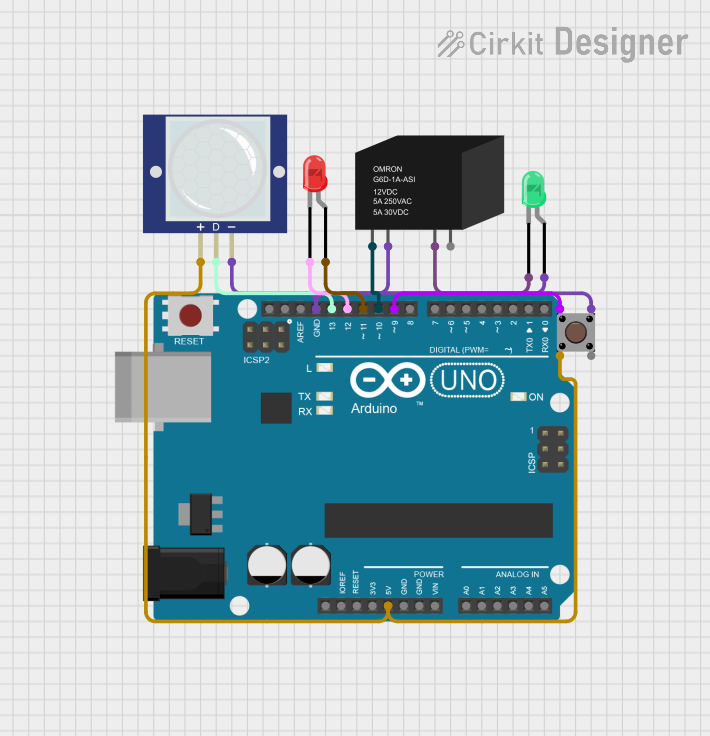
This circuit is designed to detect motion using a PIR motion sensor and control a red LED and a relay based on the sensor's output and a pushbutton input. The circuit is built around an Arduino UNO microcontroller, which processes the inputs and controls the outputs accordingly.
Component List
PIR Motion Sensor (Wokwi Compatible)
- Pins: VCC, OUT, GND
- Description: Detects motion and outputs a high signal when motion is detected.
LED: Two Pin (red)
- Pins: Cathode, Anode
- Description: A red LED that lights up when current flows through it.
Arduino UNO
- Pins: UNUSED, IOREF, Reset, 3.3V, 5V, GND, Vin, A0, A1, A2, A3, A4, A5, SCL, SDA, AREF, D13, D12, D11, D10, D9, D8, D7, D6, D5, D4, D3, D2, D1, D0
- Description: A microcontroller board based on the ATmega328P.
RELAY-G5D
- Pins: COIL1, COIL2, NO, COM
- Description: A relay used to control high-power devices.
LED: Two Pin (green)
- Pins: Cathode, Anode
- Description: A green LED that lights up when current flows through it.
Pushbutton
- Pins: Pin 3 (out), Pin 4 (out), Pin 1 (in), Pin 2 (in)
- Description: A pushbutton switch used to provide user input.
Wiring Details
PIR Motion Sensor (Wokwi Compatible)
- VCC is connected to the 5V pin of the Arduino UNO and Pin 2 (in) of the Pushbutton.
- OUT is connected to the D13 pin of the Arduino UNO.
- GND is connected to the GND pin of the Arduino UNO, COIL2 of the RELAY-G5D, anode of the green LED, and Pin 3 (out) of the Pushbutton.
LED: Two Pin (red)
- Cathode is connected to the D12 pin of the Arduino UNO.
- Anode is connected to the D11 pin of the Arduino UNO.
Arduino UNO
- 5V is connected to the VCC pin of the PIR Motion Sensor and Pin 2 (in) of the Pushbutton.
- GND is connected to the GND pin of the PIR Motion Sensor, COIL2 of the RELAY-G5D, anode of the green LED, and Pin 3 (out) of the Pushbutton.
- D13 is connected to the OUT pin of the PIR Motion Sensor.
- D12 is connected to the cathode of the red LED.
- D11 is connected to the anode of the red LED.
- D10 is connected to the COIL1 of the RELAY-G5D.
- D9 is connected to the Pin 1 (in) of the Pushbutton.
RELAY-G5D
- COIL1 is connected to the D10 pin of the Arduino UNO.
- COIL2 is connected to the GND pin of the Arduino UNO, GND pin of the PIR Motion Sensor, anode of the green LED, and Pin 3 (out) of the Pushbutton.
- NO is connected to the cathode of the green LED.
LED: Two Pin (green)
- Cathode is connected to the NO pin of the RELAY-G5D.
- Anode is connected to the GND pin of the Arduino UNO, GND pin of the PIR Motion Sensor, COIL2 of the RELAY-G5D, and Pin 3 (out) of the Pushbutton.
Pushbutton
- Pin 1 (in) is connected to the D9 pin of the Arduino UNO.
- Pin 2 (in) is connected to the 5V pin of the Arduino UNO and VCC pin of the PIR Motion Sensor.
- Pin 3 (out) is connected to the GND pin of the Arduino UNO, GND pin of the PIR Motion Sensor, COIL2 of the RELAY-G5D, and anode of the green LED.
Code Documentation
void setup() {
  // Set pin modes
  DDRB |= 0x0C; // Set D12 (PB4) and D10 (PB2) as outputs
  DDRC &= ~0x20; // Set D13 (PC5) as input
  DDRD &= ~0x02; // Set D9 (PD1) as input

  // Initialize pins
  PORTB &= ~0x0C; // Ensure RED_LED_PIN and RELAY_PIN are LOW
}

void loop() {
  // Read PIR sensor
  if (PINC & 0x20) { // If motion detected
    PORTB |= 0x10; // Turn on RED_LED_PIN
  } else {
    PORTB &= ~0x10; // Turn off RED_LED_PIN
  }

  // Read pushbutton
  if (PIND & 0x02) { // If button pressed
    PORTB |= 0x04; // Activate RELAY_PIN
  } else {
    PORTB &= ~0x04; // Deactivate RELAY_PIN
  }
}
Code Explanation
- setup(): Configures the pin modes for the Arduino UNO. Sets D12 and D10 as outputs, D13 and D9 as inputs, and initializes the output pins to LOW.
- loop(): Continuously reads the PIR sensor and the pushbutton. If motion is detected by the PIR sensor, the red LED is turned on. If the pushbutton is pressed, the relay is activated.