Cirkit Designer
Your all-in-one circuit design IDE
Home /
Project Documentation
Arduino UNO-Based Environmental Monitoring System with DHT11 and MQ-2 Sensors
Circuit Documentation
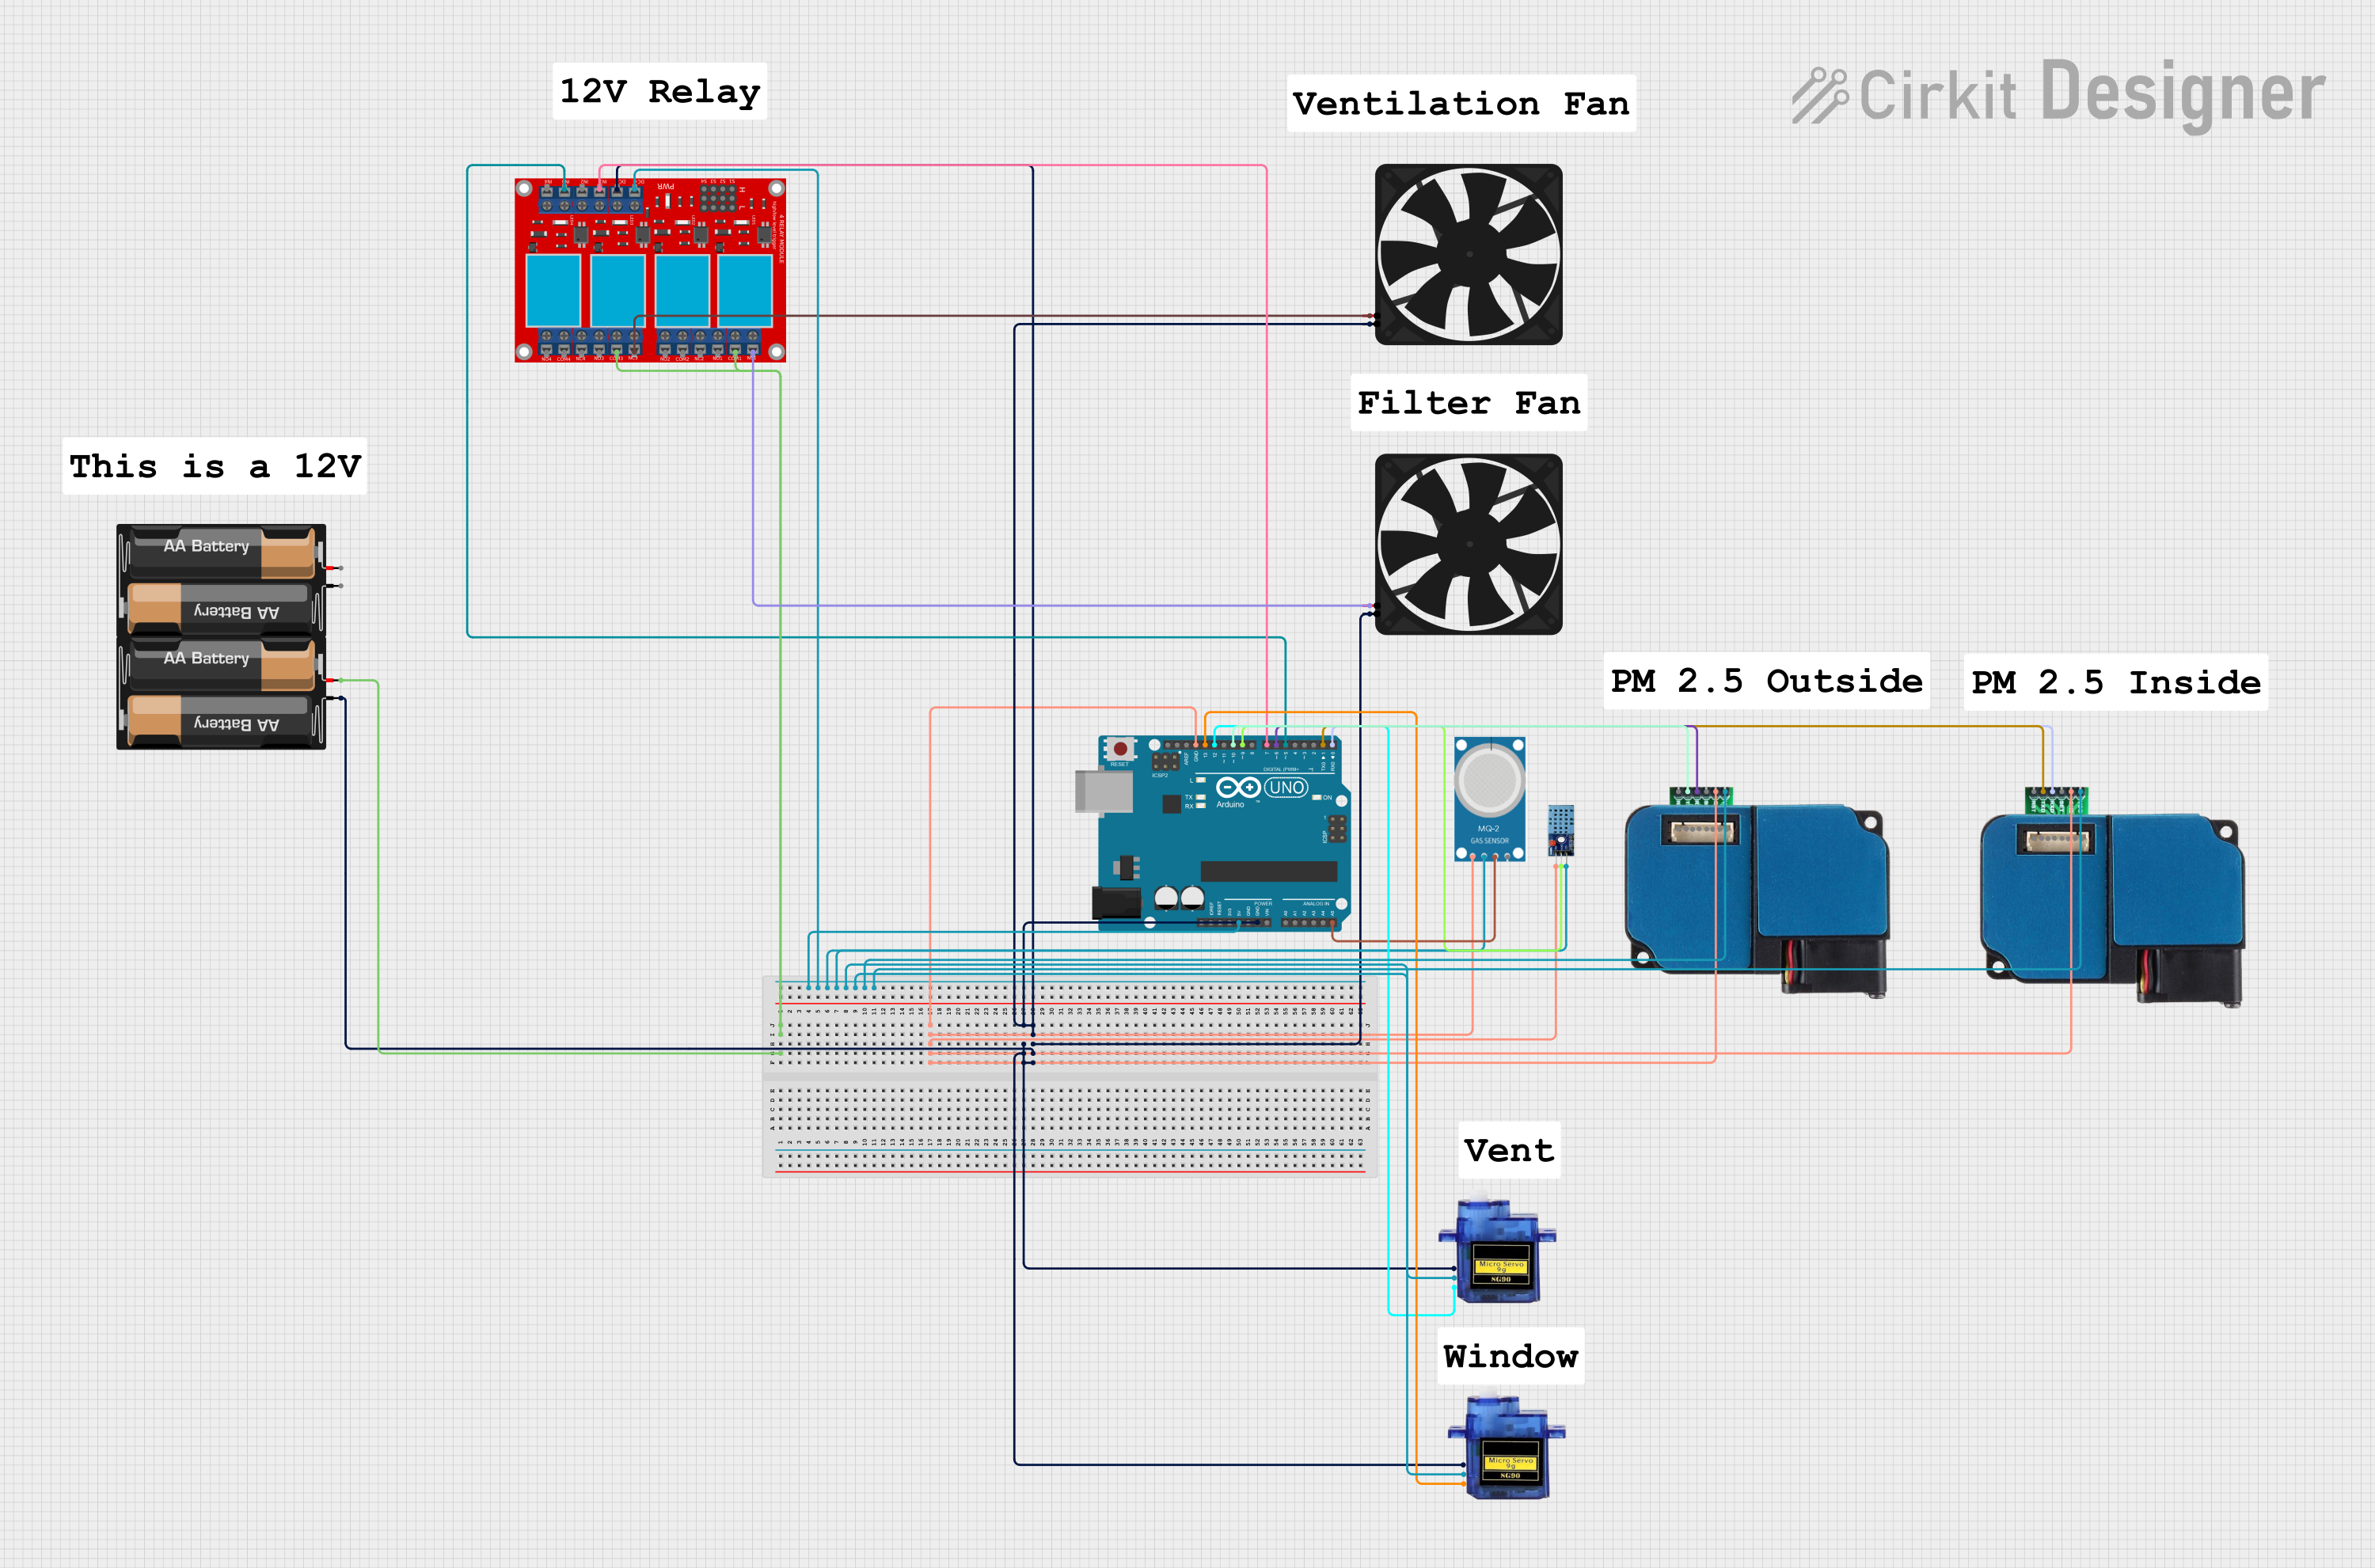
Summary
This circuit is designed to collect environmental data using various sensors and control actuators such as fans and servos. The central controller is an Arduino UNO, which interfaces with multiple sensors and actuators. The sensors include a DHT11 for temperature and humidity, an MQ-2 for gas detection, and PMS5003 and ZH03B for particulate matter detection. The actuators include fans and micro servos. A 4-channel relay module is used to control the fans.
Component List
2 x AA Battery Mount
- Pins: -, +
- Description: Provides power to the circuit.
Micro servo 9G
- Pins: GND, +5V, PWM
- Description: Small servo motor for precise control.
Fan
- Pins: GND, 5V
- Description: Used for air circulation.
Arduino UNO
- Pins: UNUSED, IOREF, Reset, 3.3V, 5V, GND, Vin, A0, A1, A2, A3, A4, A5, SCL, SDA, AREF, D13, D12, D11, D10, D9, D8, D7, D6, D5, D4, D3, D2, D1, D0
- Description: Microcontroller board for interfacing with sensors and actuators.
4 channel relay module
- Pins: N.O. 4, COM 4, N.C. 4, N.O. 3, COM 3, N.C. 3, N.O. 2, COM 2, N.C. 2, N.O. 1, COM 1, N.C. 1, Pin 13, Pin 14, Pin 15, Pin 16, Pin 17, Pin 18, Pin 19, Pin 20, Pin 21, Pin 22, Pin 23, Pin 24, VCC+, VCC- (GND), IN 1, IN 2, IN 3, IN 4
- Description: Used to control high-power devices like fans.
MQ-2
- Pins: GND, VCC, ANALOG, Digital
- Description: Gas sensor for detecting various gases.
PMS5003 Board (6-pin)
- Pins: VCC, GND, SET, RXD, TXD, RST
- Description: Particulate matter sensor.
DHT 11
- Pins: VCC, GND, DATA
- Description: Temperature and humidity sensor.
ZH03B
- Pins: PIN 1 (VDD), PIN 2 (GND), PIN 3 (reserved), PIN 4 (RXD), PIN 5 (TXD), PIN 6 (reserved), PIN 7 (reserved), PIN 8 (PWM Output)
- Description: Particulate matter sensor.
Wiring Details
2 x AA Battery Mount
- + connected to COM 1 and COM 3 of the 4 channel relay module.
- - connected to GND of the Fan, Micro servo 9G, and Arduino UNO.
Micro servo 9G
- GND connected to GND of the Arduino UNO.
- +5V connected to 5V of the Arduino UNO.
- PWM connected to D13 of the Arduino UNO.
Fan
- GND connected to GND of the Arduino UNO.
- 5V connected to N.C. 1 of the 4 channel relay module.
Arduino UNO
- GND connected to GND of the DHT 11, MQ-2, PMS5003 Board (6-pin), and Micro servo 9G.
- 5V connected to VCC+ of the 4 channel relay module, VCC of the DHT 11, MQ-2, and PMS5003 Board (6-pin).
- A5 connected to ANALOG of the MQ-2.
- D13 connected to PWM of the Micro servo 9G.
- D12 connected to PWM of another Micro servo 9G.
- D10 connected to TXD of the PMS5003 Board (6-pin).
- D9 connected to DATA of the DHT 11.
- D7 connected to IN 1 of the 4 channel relay module.
- D6 connected to RXD of the PMS5003 Board (6-pin).
- D5 connected to IN 3 of the 4 channel relay module.
- D1 connected to TXD of another PMS5003 Board (6-pin).
- D0 connected to RXD of another PMS5003 Board (6-pin).
4 channel relay module
- COM 1 connected to + of the 2 x AA Battery Mount.
- COM 3 connected to + of the 2 x AA Battery Mount.
- VCC- (GND) connected to GND of the Fan, Micro servo 9G, and Arduino UNO.
- VCC+ connected to 5V of the Arduino UNO.
- IN 1 connected to D7 of the Arduino UNO.
- IN 3 connected to D5 of the Arduino UNO.
- N.C. 1 connected to 5V of the Fan.
- N.C. 3 connected to 5V of another Fan.
MQ-2
- GND connected to GND of the Arduino UNO.
- VCC connected to 5V of the Arduino UNO.
- ANALOG connected to A5 of the Arduino UNO.
PMS5003 Board (6-pin)
- GND connected to GND of the Arduino UNO.
- VCC connected to 5V of the Arduino UNO.
- TXD connected to D10 of the Arduino UNO.
- RXD connected to D6 of the Arduino UNO.
DHT 11
- GND connected to GND of the Arduino UNO.
- VCC connected to 5V of the Arduino UNO.
- DATA connected to D9 of the Arduino UNO.
ZH03B
- PIN 1 (VDD) connected to 5V of the Arduino UNO.
- PIN 2 (GND) connected to GND of the Arduino UNO.
- PIN 4 (RXD) connected to D0 of the Arduino UNO.
- PIN 5 (TXD) connected to D1 of the Arduino UNO.
Documented Code
/**
 * This example demonstrates how to collect temperature and humidity measurements
 * from the Adafruit DHT11 sensor. Measurements are printed out to the serial monitor.
 *
 * - Make sure to first install the following libraries through the Arduino Library Manager:
 *   - DHT Sensor Library (by Adafruit)
 *   - Adafruit Unified Sensor (by Adafruit)
 * - When you open the serial monitor to view measurements from the DHT11, make sure
 * that you select 9600 baud so that the serial monitor can receive data from the Arduino.
 *
 * This example was originally written by Adafruit Industries LLC.
 */

#include <Adafruit_Sensor.h>
#include <DHT.h>
#include <DHT_U.h>

#define DHTPIN 2     // Digital pin connected to the DHT sensor
// Feather HUZZAH ESP8266 note: use pins 3, 4, 5, 12, 13 or 14 --
// Pin 15 can work but DHT must be disconnected during program upload.

// Uncomment the type of sensor in use:
#define DHTTYPE    DHT11     // DHT 11
//#define DHTTYPE    DHT22     // DHT 22 (AM2302)
//#define DHTTYPE    DHT21     // DHT 21 (AM2301)

// See guide for details on sensor wiring and usage:
//   https://learn.adafruit.com/dht/overview

DHT_Unified dht(DHTPIN, DHTTYPE);

uint32_t delayMS;

void setup() {
  Serial.begin(9600);
  // Initialize device.
  dht.begin();
  Serial.println(F("DHTxx Unified Sensor Example"));
  // Print temperature sensor details.
  sensor_t sensor;
  dht.temperature().getSensor(&sensor);
  Serial.println(F("------------------------------------"));
  Serial.println(F("Temperature Sensor"));
  Serial.print  (F("Sensor Type: ")); Serial.println(sensor.name);
  Serial.print  (F("Driver Ver:  ")); Serial.println(sensor.version);
  Serial.print  (F("Unique ID:   ")); Serial.println(sensor.sensor_id);
  Serial.print  (F("Max Value:   ")); Serial.print(sensor.max_value); Serial.println(F("°C"));
  Serial.print  (F("Min Value:   ")); Serial.print(sensor.min_value); Serial.println(F("°C"));
  Serial.print  (F("Resolution:  ")); Serial.print(sensor.resolution); Serial.println(F("°C"));
  Serial.println(F("------------------------------------"));
  // Print humidity sensor details.
  dht.humidity().get