
Circuit Documentation
Summary
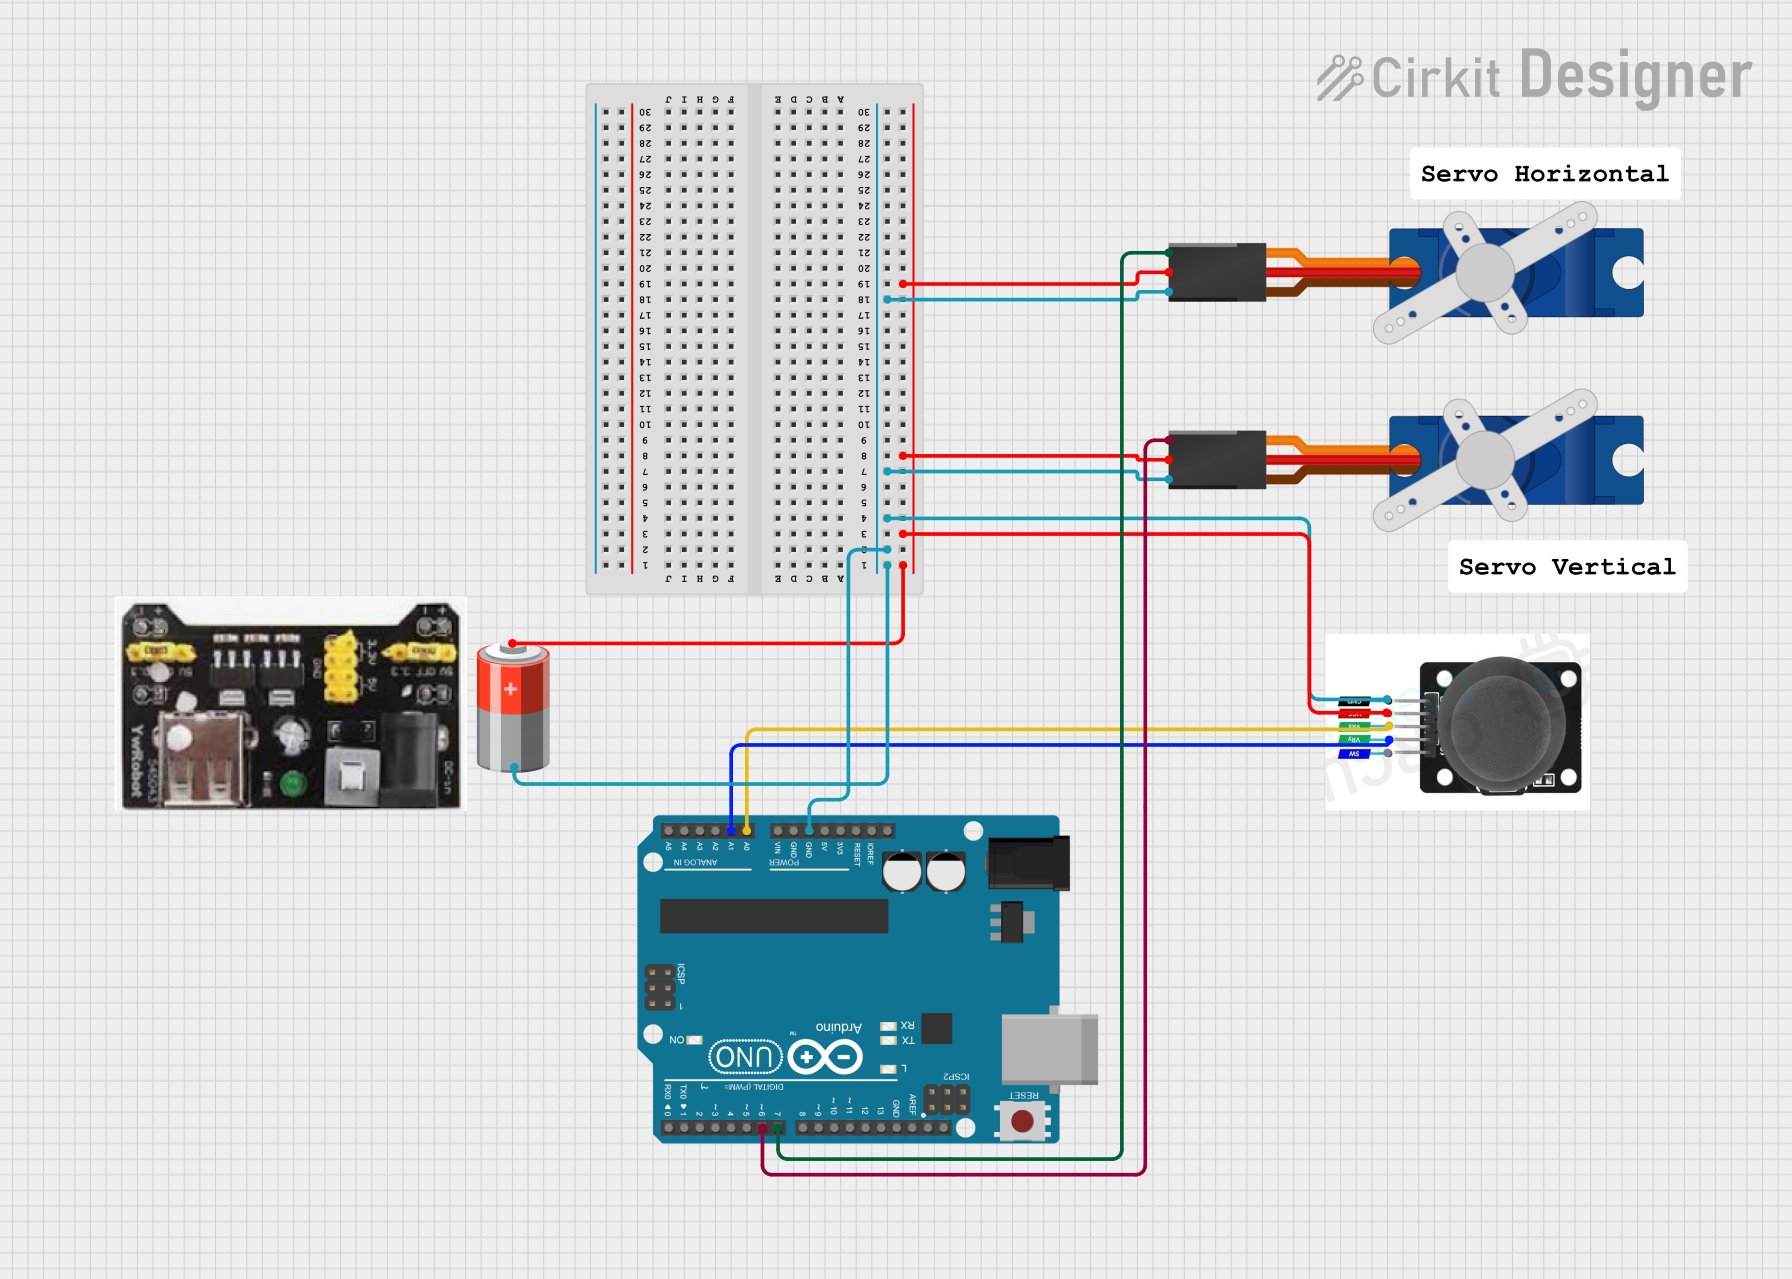
The circuit in question is designed to interface an Arduino UNO with a joystick module and two Tower Pro SG90 servos. The joystick provides two-axis input to the Arduino, which can be used to control the servos or for other interactive purposes. The servos are powered by a 5V battery, and the joystick module also receives its power from the same battery. The Arduino reads the analog values from the joystick and outputs the data through its serial interface.
Component List
Arduino UNO
- Description: A microcontroller board based on the ATmega328P.
- Pins: UNUSED, IOREF, Reset, 3.3V, 5V, GND, Vin, A0-A5, SCL, SDA, AREF, D0-D13.
Tower Pro SG90 Servo (x2)
- Description: A small and lightweight servo motor suitable for RC and robotics applications.
- Pins: Signal, +5V, GND.
Joystick Module
- Description: A module with two potentiometers to measure X and Y axis movement and a switch.
- Pins: SW, VRY, VRX, VCC, GND.
5V Battery
- Description: A power source providing a stable 5V output.
- Pins: + (positive), - (negative).
MB102 Breadboard Power Supply Module 3.3V/5V
- Description: A power supply module that can provide 3.3V or 5V to a breadboard.
- Pins: GND, 3.3V, 5V.
Wiring Details
Arduino UNO
- 5V - Not connected.
- GND - Connected to the negative terminal of the 5V battery.
- A0 - Connected to the VRX pin of the Joystick module.
- A1 - Connected to the VRY pin of the Joystick module.
- D6 - Connected to the Signal pin of one Tower Pro SG90 servo.
- D7 - Connected to the Signal pin of the other Tower Pro SG90 servo.
Tower Pro SG90 Servo
- Signal - Connected to D6 or D7 on the Arduino UNO (one servo per pin).
- +5V - Connected to the positive terminal of the 5V battery.
- GND - Connected to the negative terminal of the 5V battery.
Joystick Module
- VCC - Connected to the positive terminal of the 5V battery.
- GND - Connected to the negative terminal of the 5V battery.
- VRX - Connected to A0 on the Arduino UNO.
- VRY - Connected to A1 on the Arduino UNO.
- SW - Not connected.
5V Battery
- + - Connected to VCC on the Joystick module and +5V on both Tower Pro SG90 servos.
- - - Connected to GND on the Arduino UNO, Joystick module, and both Tower Pro SG90 servos.
Documented Code
// Code for Arduino UNO to read joystick values and print them to the serial monitor.

const int xPin = A0, yPin = A1; // Joystick pins connected to Arduino's analog pins A0 and A1
float xValue, yValue; // Variables to store joystick values

void setup() {
  pinMode(xPin, INPUT); // Set the joystick X-axis pin as input
  pinMode(yPin, INPUT); // Set the joystick Y-axis pin as input
  Serial.begin(9600); // Start serial communication at 9600 baud rate
}

void loop() {
  xValue = analogRead(xPin); // Read the value from the joystick X-axis
  yValue = analogRead(yPin); // Read the value from the joystick Y-axis

  // Print the X-axis value to the serial monitor
  Serial.print("Value of x-axis: ");
  Serial.println(xValue);

  // Print the Y-axis value to the serial monitor
  Serial.print("Value of y-axis: ");
  Serial.println(yValue);

  delay(100); // Wait for 100 milliseconds before reading the values again
}
Note: The code provided is for the Arduino UNO microcontroller to read the analog values from the joystick module and output them to the serial monitor. The servos are not controlled in this code snippet. Additional code would be required to control the servos based on the joystick input.